传统SSM框架👻笔记
Spring框架 介绍
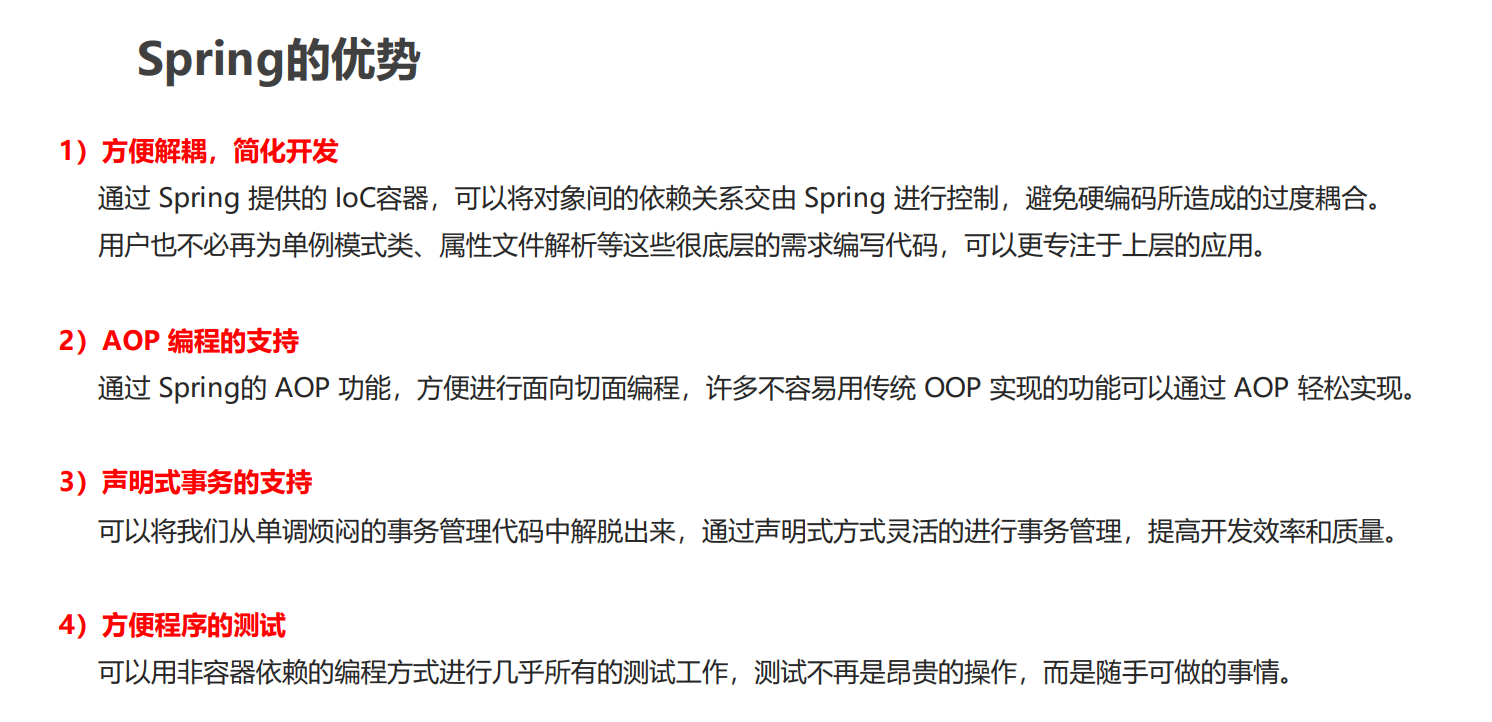
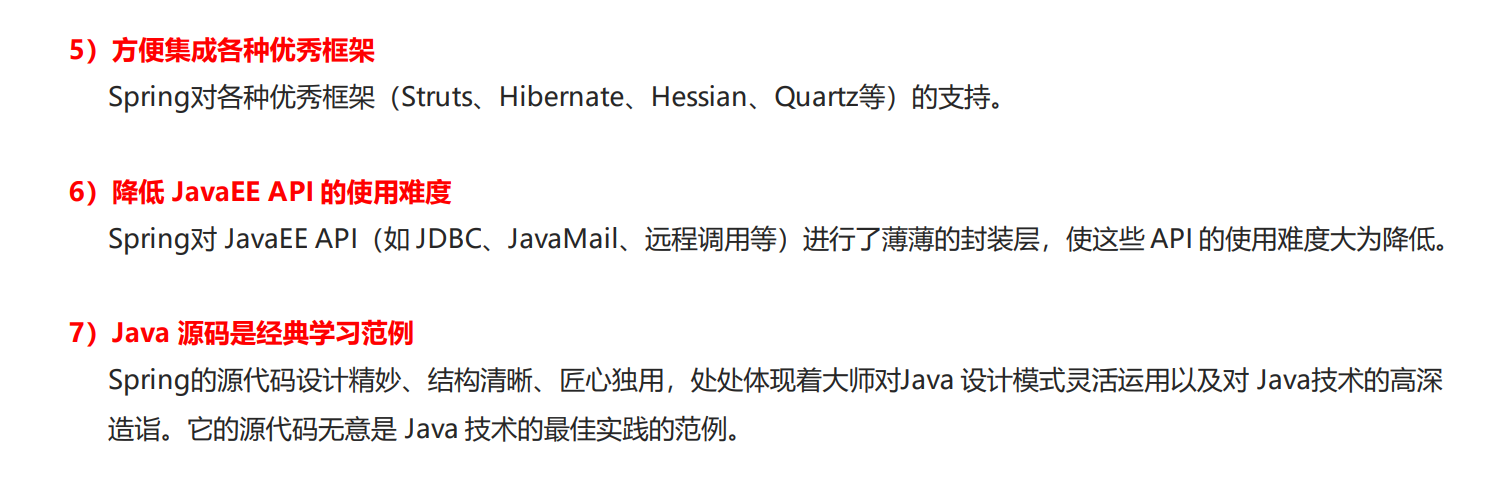
Spring优势
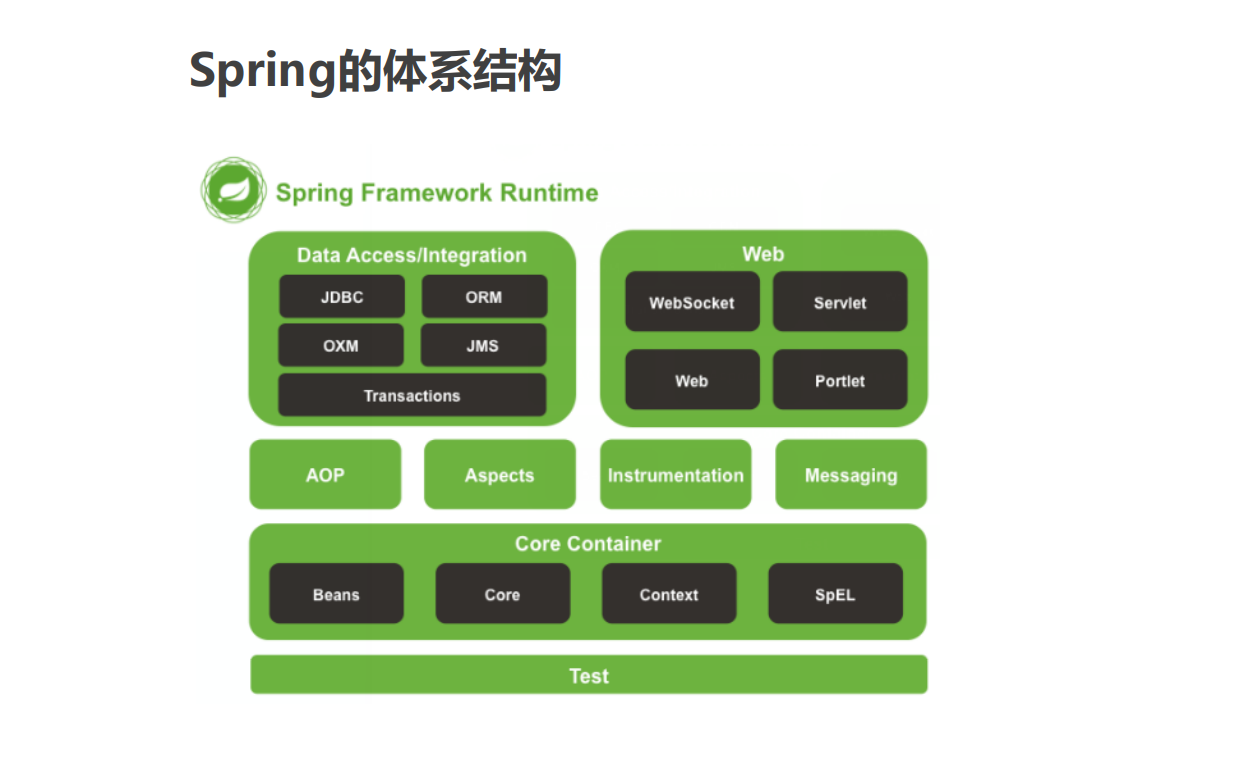
Spring体系结构
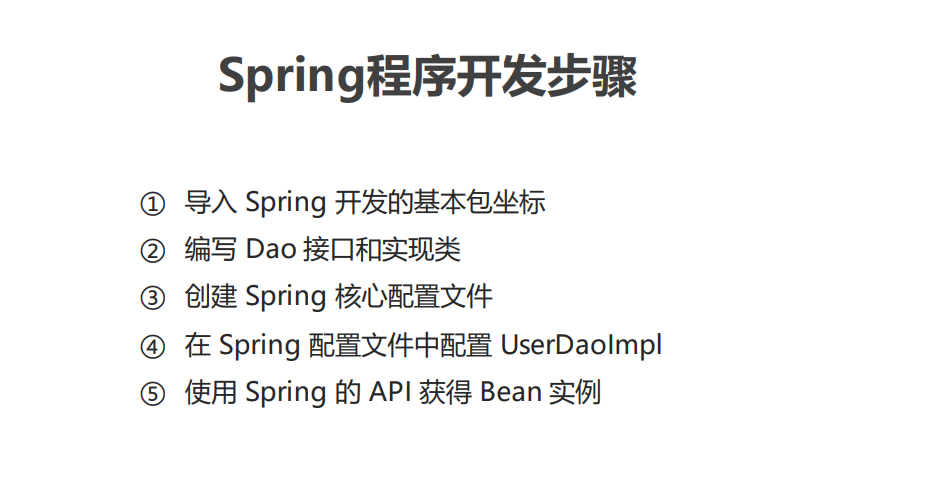
Spring开发步骤
一. 坐标 导入基本包
<dependencies > <dependency > <groupId > org.springframework</groupId > <artifactId > spring-context</artifactId > <version > 5.3.18</version > </dependency > </dependencies >
二. 编写Dao和实现类对象
public interface UserDao { public void save () ; } public class UserDaoImpl implements UserDao { @Override public void save () { System.out.println("UserDao save method running...." ); } }
三. 核心配置文件 applicationContext.xml
<?xml version="1.0" encoding="UTF-8" ?> <beans xmlns ="http://www.springframework.org/schema/beans" xmlns:xsi ="http://www.w3.org/2001/XMLSchema-instance" xsi:schemaLocation ="http://www.springframework.org/schema/beans http://www.springframework.org/schema/beans/spring-beans.xsd" ></beans >
四. 在 Spring 配置文件中配置 UserDaoImpl
<?xml version="1.0" encoding="UTF-8" ?> <beans xmlns ="http://www.springframework.org/schema/beans" xmlns:xsi ="http://www.w3.org/2001/XMLSchema-instance" xsi:schemaLocation ="http://www.springframework.org/schema/beans http://www.springframework.org/schema/beans/spring-beans.xsd" > <bean id ="userDao" class ="com.itheima.dao.impl.UserDaoImpl" > </bean > </beans >
五. 使用Spring的API获得Bean实例
@Test public void test1 () { ApplicationContext applicationContext = new ClassPathXmlApplicationContext ("applicationContext.xml" ); UserDao userDao = (UserDao) applicationContext.getBean("userDao" ); userDao.save(); }
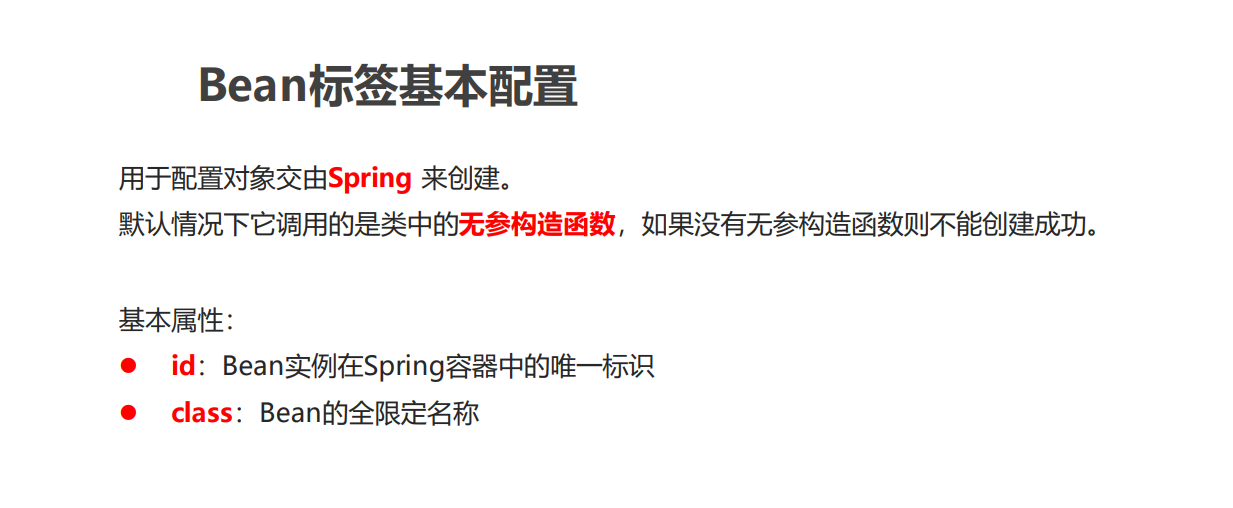
Spring配置文件 Bean标签
Bean标签基本配置
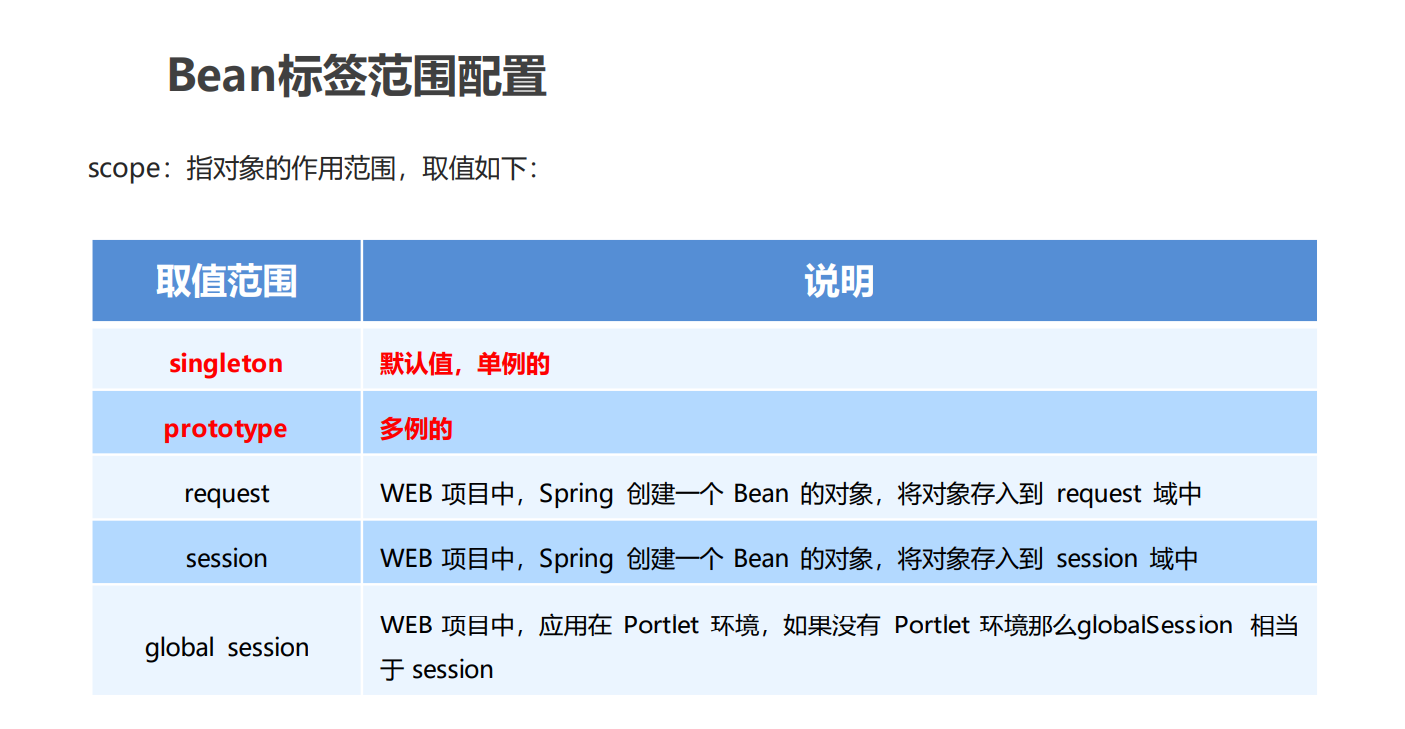
Scope范围配置
当scope的取值为**singleton**时
Bean的实例化个数:**1个 **
Bean的实例化时机:当Spring核心文件被加载时,实例化配置的Bean实例
Bean的生命周期:
对象创建:当应用加载,创建容器时 ,对象就被创建了
对象运行:只要容器在,对象一直活着
对象销毁:当应用卸载,销毁容器时,对象就被销毁了
当scope的取值为**prototype**时
Bean的实例化个数:多个
Bean的实例化时机:当调用getBean()方法时实例化Bean
对象创建:当使用对象时,创建新的对象实例
对象运行:只要对象在使用中,就一直活着
对象销毁:当对象长时间不用时,被 Java 的垃圾回收器回收了
Bean生命周期配置 init-method:指定类中的初始化方法名称
destroy-method:指定类中销毁方法名称
Bean实例化三种方式
**1 无参构造方法实例化 **
**2 工厂静态方法实例化 **
3 工厂实例方法实例化
无参构造方法实例化
<bean id ="userDao" class ="com.itheima.factory.StaticFactoryBean" />
工厂静态方法实例化
factory-method 寻找该id的静态方法 从返回值中获取对象
public class StaticFactoryBean { public static UserDao createUserDao () { return new UserDaoImpl (); } }
<bean id ="userDao" class ="com.itheima.factory.StaticFactoryBean" factory-method ="createUserDao" />
工厂实例方法实例化
factory-bean 寻找此id的bean对象
factory-method 寻找到的bean对象的id
public class DynamicFactoryBean { public UserDao createUserDao () { return new UserDaoImpl (); } }
<bean id ="factoryBean" class ="com.itheima.factory.DynamicFactoryBean" /> <bean id ="userDao" factory-bean ="factoryBean" factory-method ="createUserDao" />
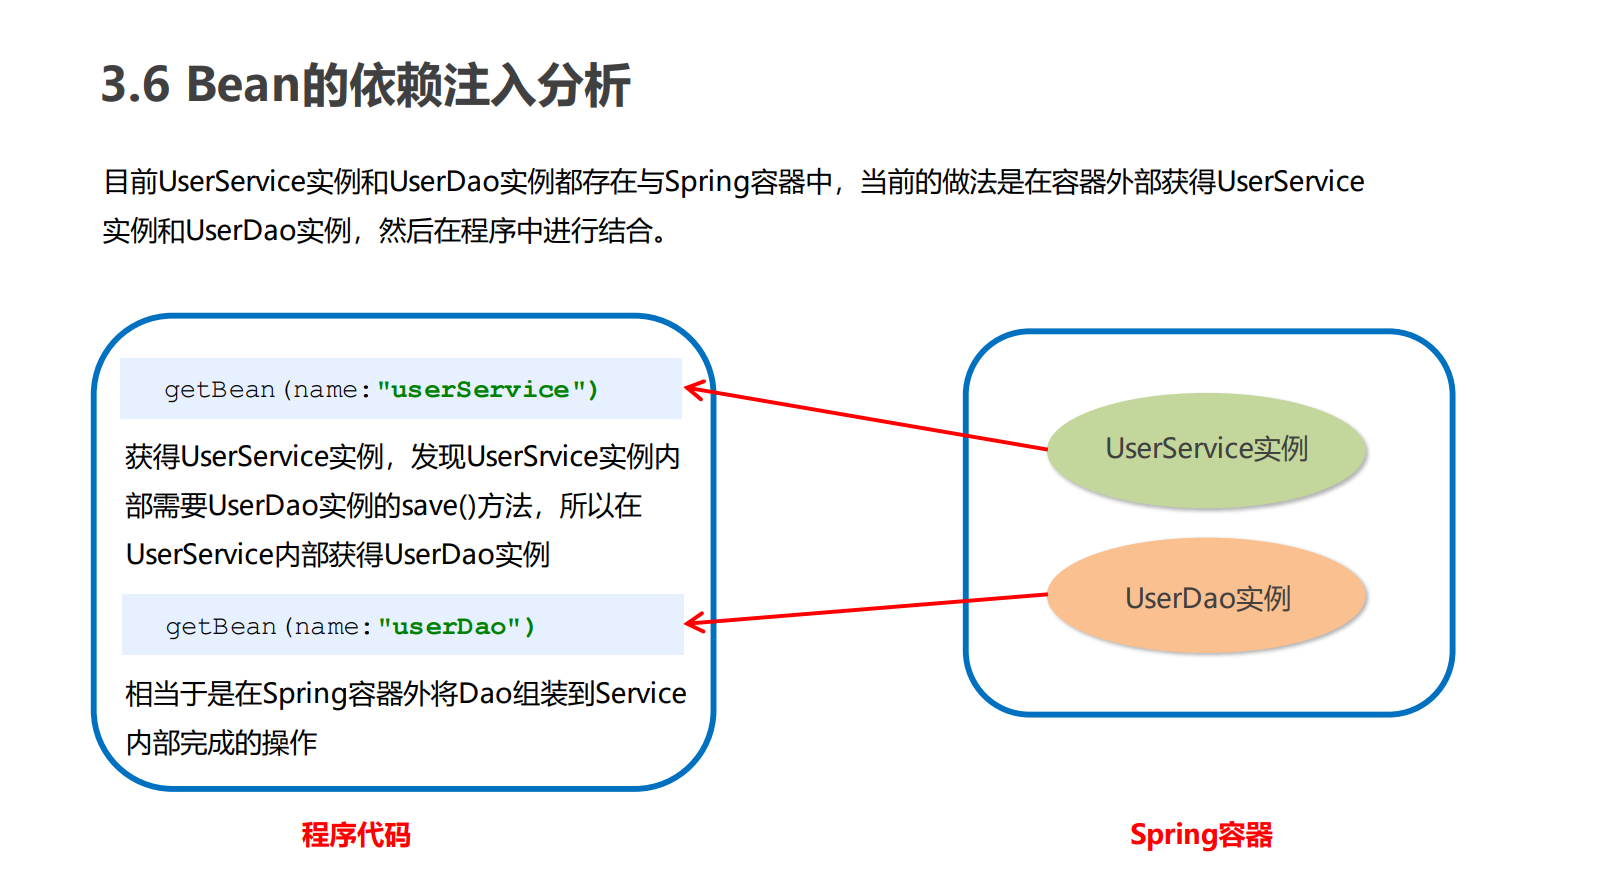
依赖注入 注入方式
Bean的依赖注入概念:
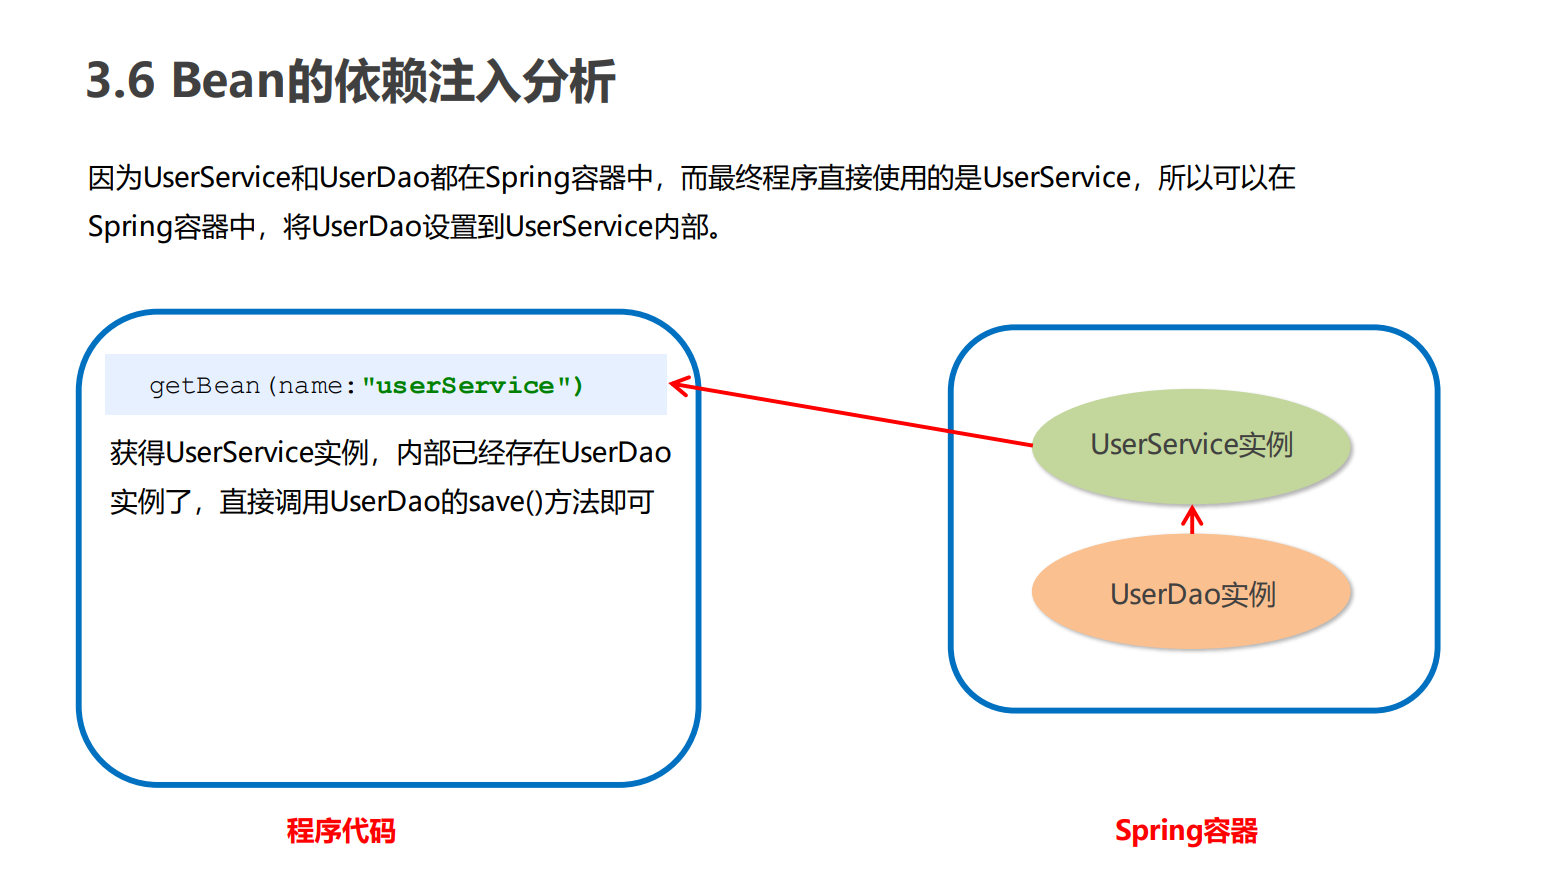
依赖注入(Dependency Injection ):它是 Spring 框架核心 IOC 的具体实现。
**在编写程序时,通过控制反转,把对象的创建交给了 Spring,但是代码中不可能出现没有依赖的情况。 IOC 解耦只是降低他们的依赖关系,但不会消除。例如:业务层仍会调用持久层的方法。 **
那这种业务层和持久层的依赖关系,在使用 Spring 之后,就让 Spring 来维护了。 简单的说,就是坐等框架把持久层对象传入业务层,而不用我们自己去获取。
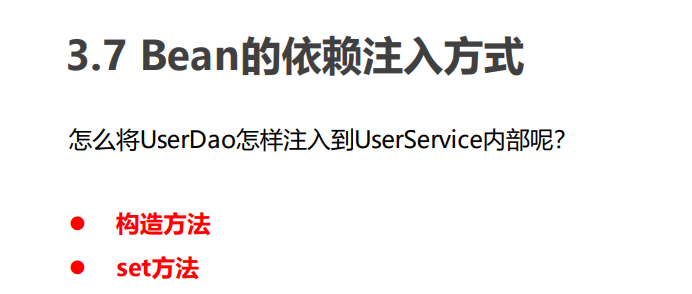
Set方式:
public class SetServiceImpl implements SetService { private SetDao setDao; public void setUserDao (SetDao setDao) { this .setDao = setDao; } @Override public void save () { setDao.save(); } }
<bean id ="setDao" class ="com.ganga.dao.impl.SetDaoImpl" > </bean > <bean id ="setService" class ="com.ganga.service.impl.SetServiceImpl" > <property name ="setDao" ref ="setDao" /> </bean >
另外还可以引入p
p:setDao-ref="setDao"
<?xml version="1.0" encoding="UTF-8" ?> <beans xmlns ="http://www.springframework.org/schema/beans" xmlns:xsi ="http://www.w3.org/2001/XMLSchema-instance" xmlns:p ="http://www.springframework.org/schema/p" xsi:schemaLocation ="http://www.springframework.org/schema/beans http://www.springframework.org/schema/beans/spring-beans.xsd" > <bean id ="setDao" class ="com.ganga.dao.impl.SetDaoImpl" > </bean > <bean id ="setService" class ="com.ganga.service.impl.SetServiceImpl" p:setDao-ref ="setDao" > </bean > </beans >
构造方法注入
public class ConstructorServiceImpl implements ConstructorService { private ConstructorDao constructorDao; public ConstructorServiceImpl () { } public ConstructorServiceImpl (ConstructorDao constructorDao) { this .constructorDao = constructorDao; } @Override public void method () { constructorDao.method(); } }
<bean id ="constructorDao" class ="com.ganga.dao.impl.ConstructorDaoImpl" > </bean > <bean id ="constructorService" class ="com.ganga.service.impl.ConstructorServiceImpl" > <constructor-arg name ="constructorDao" ref ="constructorDao" /> </bean >
Bean依赖注入的数据类型
上面的操作,都是注入的引用Bean,处了对象的引用可以注入,普通数据类型,集合等都可以在容器中进行注入。
注入数据的三种数据类型
普通数据类型
引用数据类型
集合数据类型
其中引用数据类型,此处就不再赘述了,之前的操作都是对UserDao对象的引用进行注入的,下面将以set方法注入为 例,演示普通数据类型和集合数据类型的注入。
普通数据类型
<bean id ="x01SetDao" class ="com.ganga.dao.impl.X01SetDaoImpl" > <property name ="username" value ="尴尬酱" /> <property name ="age" value ="9" /> </bean > <bean id ="x01ConstructorDao" class ="com.ganga.dao.impl.X01ConstructorDaoImpl" > <constructor-arg name ="username" value ="这就尴尬了" /> <constructor-arg name ="age" value ="20" /> </bean >
引用数据类型
集合数据类型
public class X03DaoImpl implements X03Dao { private List<String> stringList; private List<User> userList; private Map<String, User> stringUserMap; private Properties properties; public void setStringList (List<String> stringList) { this .stringList = stringList; } public void setUserList (List<User> userList) { this .userList = userList; } public void setStringUserMap (Map<String, User> stringUserMap) { this .stringUserMap = stringUserMap; } public void setProperties (Properties properties) { this .properties = properties; } @Override public void method () { System.out.println("====== List ======" ); System.out.println(stringList); for (User user : userList) { System.out.println(user); } System.out.println("\n====== Map ======" ); System.out.println(stringUserMap); System.out.println("\n====== Properties ======" ); System.out.println(properties); System.out.println("\nrun X03DaoImpl method..." ); } }
applicationContext.xml
<bean id ="x03Dao" class ="com.ganga.dao.impl.X03DaoImpl" > <property name ="stringList" > <list > <value > 亚索哥哥</value > <value > 永恩弟弟</value > <value > 卡特妹妹</value > </list > </property > <property name ="userList" > <list > <ref bean ="user1" /> <ref bean ="user2" /> <ref bean ="user3" /> <bean class ="com.ganga.pojo.User" > <constructor-arg name ="username" value ="盖伦哥哥" /> <constructor-arg name ="age" value ="10" /> <constructor-arg name ="adds" value ="德玛西亚" /> </bean > </list > </property > <property name ="stringUserMap" > <map > <entry key ="u1" value-ref ="user1" /> <entry key ="u2" value-ref ="user2" /> <entry key ="u3" value-ref ="user3" /> </map > </property > <property name ="properties" > <props > <prop key ="p1" > 亚索哥哥</prop > <prop key ="p2" > 永恩哥哥</prop > <prop key ="p3" > 卡特妹妹</prop > </props > </property > </bean > <bean id ="user1" class ="com.ganga.pojo.User" > <constructor-arg name ="username" value ="亚索哥哥" /> <constructor-arg name ="age" value ="18" /> <constructor-arg name ="adds" value ="艾欧尼亚" /> </bean > <bean id ="user2" class ="com.ganga.pojo.User" > <constructor-arg name ="username" value ="永恩哥哥" /> <constructor-arg name ="age" value ="16" /> <constructor-arg name ="adds" value ="艾欧尼亚" /> </bean > <bean id ="user3" class ="com.ganga.pojo.User" > <constructor-arg name ="username" value ="卡特妹妹" /> <constructor-arg name ="age" value ="9" /> <constructor-arg name ="adds" value ="诺克萨斯" /> </bean >
引入其他配置文件(分模块开发)
实际开发中,Spring的配置内容非常多,这就导致Spring配置很繁杂且体积很大,所以,可以将部分配置拆解到其他 配置文件中,而在Spring主配置文件通过import标签进行加载
<import resource ="applicationContext-xxx.xml" />
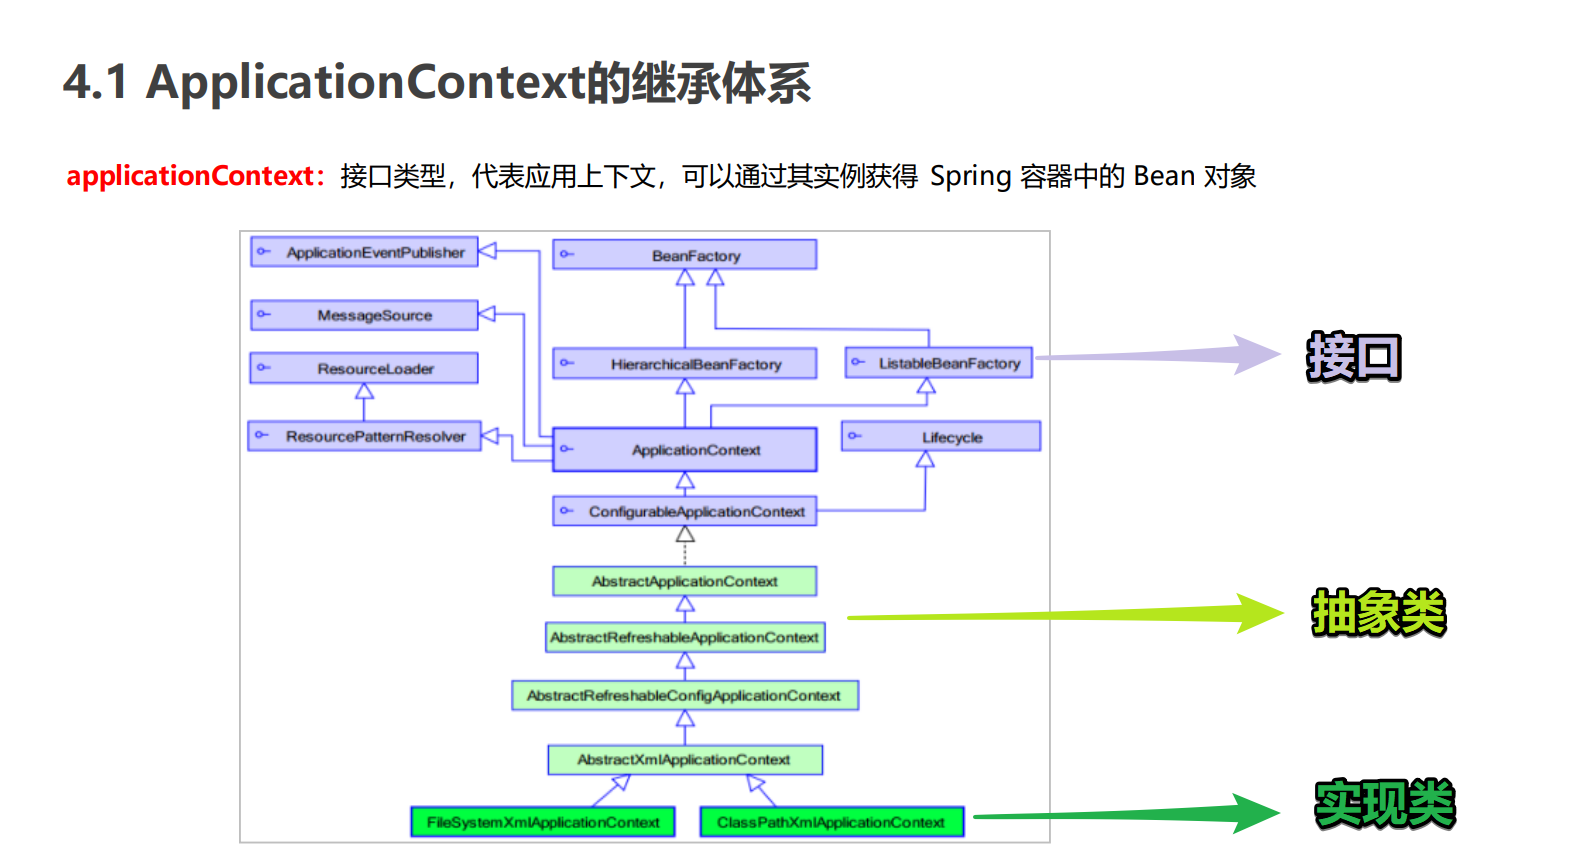
Spring相关API ApplicationContext的继承体系 applicationContext:
ApplicationContext的实现类
ClassPathXmlApplicationContext
它是从类的根路径下加载配置文件 推荐使用这种
FileSystemXmlApplicationContext
它是从磁盘路径上加载配置文件,配置文件可以在磁盘的任意位置。
AnnotationConfigApplicationContext
当使用注解配置容器对象时,需要使用此类来创建 spring 容器。它用来读取注解。
getBean()方法使用 常用的有两个
通过bean的 字符id来找 getBean("userDao")
其中,当参数的数据类型是字符串时,表示根据Bean的id从容器中获得Bean实例,返回是Object,需要强转。
通过类的calss自动匹配 getBean(UserDao.class)
当参数的数据类型是Class类型时,表示根据类型从容器中匹配Bean实例,当容器中相同类型的Bean有多个时, 则此方法会报错。
Spring配置数据源 数据源(连接池)的作用
数据源(连接池)是提高程序性能如出现的
事先实例化数据源,初始化部分连接资源
使用连接资源时从数据源中获取
使用完毕后将连接资源归还给数据源
常见的数据源(连接池):DBCP、C3P0、BoneCP、Druid
数据源的开发步骤
导入数据源的坐标和数据库驱动坐标
创建数据源对象
设置数据源的基本连接数据
使用数据源获取连接资源和归还连接资源
Spring配置数据源
可以将DataSource的创建权交由Spring容器去完成
DataSource有无参构造方法,而Spring默认就是通过无参构造方法实例化对象的
DataSource要想使用需要通过set方法设置数据库连接信息,而Spring可以通过set方法进行字符串注入
抽取jdbc配置文件
<?xml version="1.0" encoding="UTF-8" ?> <beans xmlns ="http://www.springframework.org/schema/beans" xmlns:context ="http://www.springframework.org/schema/context" xmlns:xsi ="http://www.w3.org/2001/XMLSchema-instance" xsi:schemaLocation = "http://www.springframework.org/schema/beans http://www.springframework.org/schema/beans/spring-beans.xsd http://www.springframework.org/schema/context http://www.springframework.org/schema/context/spring-context.xsd" > <context:property-placeholder location ="classpath:jdbc.properties" /> <bean id ="c3p0DataSource" class ="com.mchange.v2.c3p0.ComboPooledDataSource" > <property name ="driverClass" value ="${jdbc.driverClass}" /> <property name ="jdbcUrl" value ="${jdbc.url}" /> <property name ="user" value ="${jdbc.user}" /> <property name ="password" value ="${jdbc.password}" /> </bean > </beans >
jdbc.driverClass =com.mysql.jdbc.Driver jdbc.url =jdbc:mysql:///webcase?useSSL=false&useServerPrepStmts=true jdbc.user =root jdbc.password =ganga
重点: Spring容器加载properties文件
<context:property-placeholder location ="xx.properties" /> <property name ="" value ="${key}" />
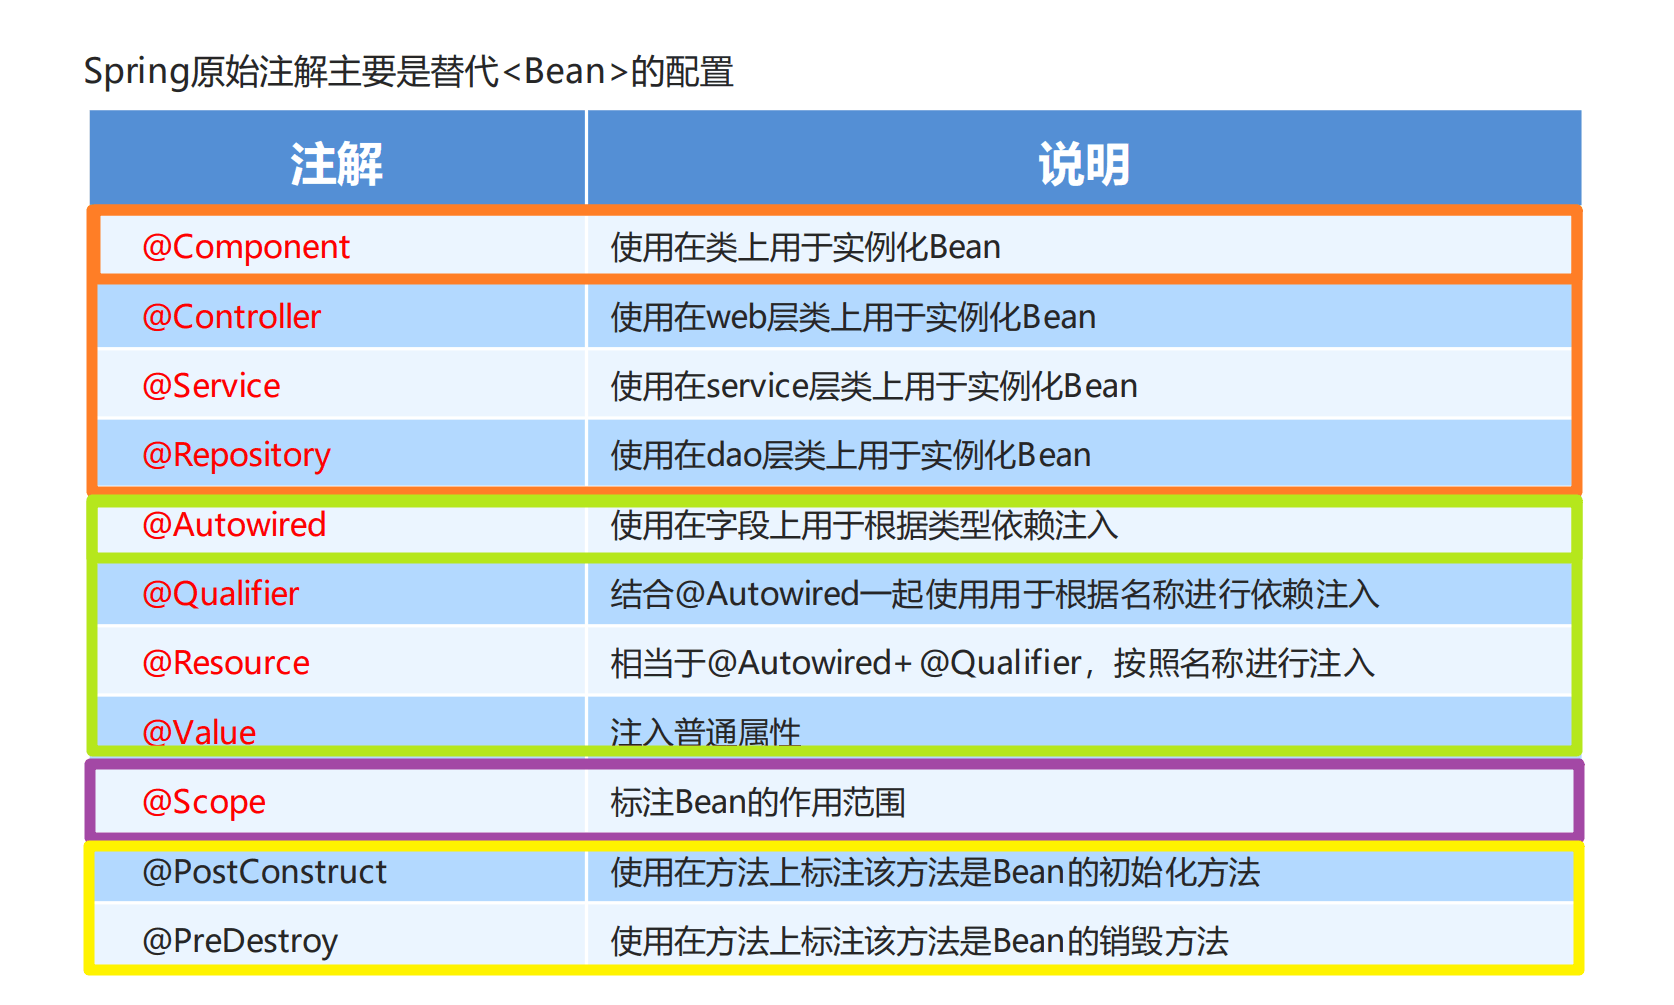
Spring注解开发 Spring是轻代码而重配置的框架,配置比较繁重,影响开发效率,所以注解开发是一种趋势,注解代替xml配置 文件可以简化配置,提高开发效率。
Spring原始注解 Spring原始注解主要是替代的配置
**注意: **
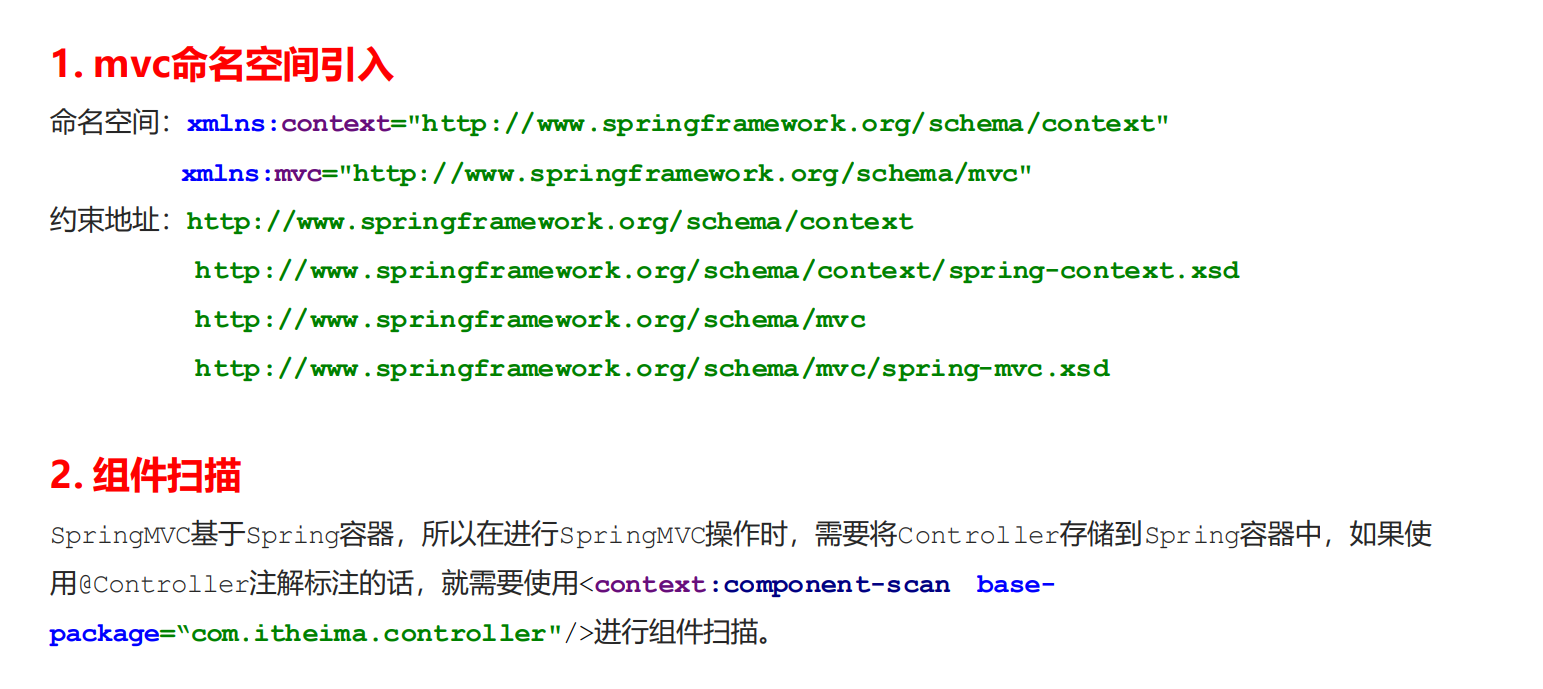
使用注解进行开发时,需要在applicationContext.xml中配置组件扫描,作用是指定哪个包及其子包下的Bean 需要进行扫描以便识别使用注解配置的类、字段和方法。
<context:component-scan base-package ="com.ganga" > </context:component-scan >
使用@Component或@Service标识UserServiceImpl需要Spring进行实例化
使用@Autowired或者@Autowired+@Qulifier或者@Resource进行userDao的注入
使用@Value进行字符串的注入 一般配合el表达式来体现解耦合
@Service("annoFirstService") public class AnnoFirstServiceImpl implements AnnoFirstService { @Resource(name = "annoFirstDao") private AnnoFirstDao annoFirstDao; @Value("${jdbc.driverClass}") private String driver; @Override public void method () { System.out.println("-------------------------------" ); System.out.println("driver: " + driver); System.out.println("-------------------------------" ); annoFirstDao.method(); } }
使用@PostConstruct标注初始化方法,使用@PreDestroy标注销毁方法
@PostConstruct public void init () { System.out.println("初始化方法...." ); } @PreDestroy public void destroy () { System.out.println("销毁方法....." ); }
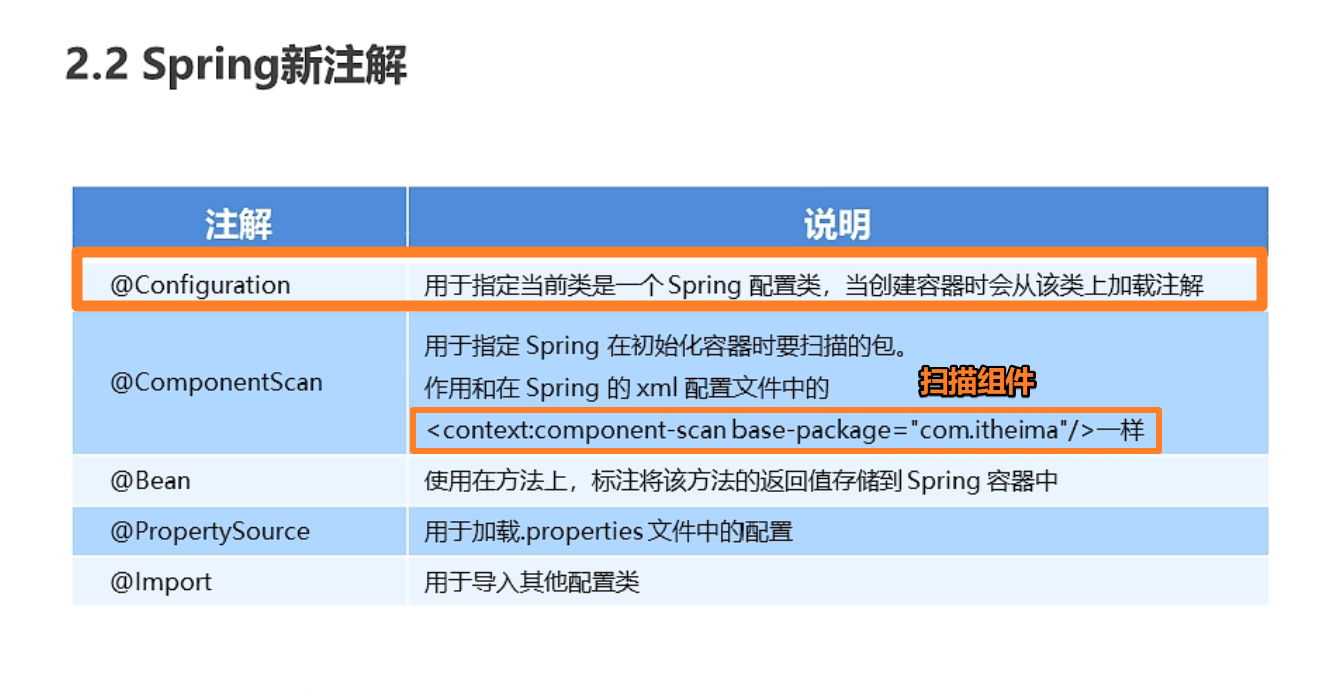
Spring新注解 使用上面的注解还不能全部替代xml配置文件,还需要使用注解替代的配置如下:
非自定义的Bean的配置: <bean>加载properties文件的配置: <context:property-placeholder>组件扫描的配置: <context:component-scan>引入其他文件: <import>
引入Spring新注解
要想使用注解开发 首先有一个核心配置类
SpringApplicationContext.java
package com.ganga.config;import org.springframework.context.annotation.ComponentScan;import org.springframework.context.annotation.Configuration;import org.springframework.context.annotation.Import;@Configuration @ComponentScan("com.ganga") @Import({SpringDataSourceApplicationContext.class}) public class SpringApplicationContext {}
解决 非自定义的Bean的配置 创建DataSource对象
SpringDataSourceApplicationContext.java
package com.ganga.config;import com.mchange.v2.c3p0.ComboPooledDataSource;import org.springframework.beans.factory.annotation.Value;import org.springframework.context.annotation.Bean;import org.springframework.context.annotation.PropertySource;import javax.sql.DataSource;@PropertySource("classpath:jdbc.properties") public class SpringDataSourceApplicationContext { @Value("${jdbc.driverClass}") private String driver; @Value("${jdbc.url}") private String url; @Value("${jdbc.user}") private String user; @Value("${jdbc.password}") private String password; @Bean("dataSourceNew") public DataSource getDataSource () throws Exception { ComboPooledDataSource dataSource = new ComboPooledDataSource (); dataSource.setDriverClass(driver); dataSource.setJdbcUrl(url); dataSource.setUser(user); dataSource.setPassword(password); return dataSource; } }
Spring整合Junit 原始Junit测试Spring的问题 在测试类中,每个测试方法都有以下两行代码:
ApplicationContext ac = new ClassPathXmlApplicationContext ("bean.xml" );IAccountService as = ac.getBean("accountService" ,IAccountService.class);
这两行代码的作用是获取容器,如果不写的话,直接会提示空指针异常。所以又不能轻易删掉。
上述问题解决思路
1. 让SpringJunit负责创建Spring容器,但是需要将配置文件的名称告诉它
1. 将需要进行测试Bean直接在测试类中进行注入
Spring集成Junit步骤
导入spring集成Junit的坐标 使用@Runwith注解替换原来的运行期 使用@ContextConfiguration指定配置文件或配置类 使用@Autowired注入需要测试的对象 创建测试方法进行测试
① 导入spring集成Junit的坐标
<dependency > <groupId > org.springframework</groupId > <artifactId > spring-test</artifactId > <version > 5.3.18</version > </dependency > <dependency > <groupId > junit</groupId > <artifactId > junit</artifactId > <version > 4.13.1</version > </dependency >
② 使用@Runwith注解替换原来的运行期
③ 使用@ContextConfiguration指定配置文件或配置类
④ 使用@Autowired注入需要测试的对象
⑤ 创建测试方法进行测试
SpringJunitRunTest.java
package com.ganga.test;import com.ganga.config.SpringApplicationContext;import com.ganga.service.UserService;import org.junit.Test;import org.junit.runner.RunWith;import org.springframework.beans.factory.annotation.Autowired;import org.springframework.beans.factory.annotation.Qualifier;import org.springframework.test.context.ContextConfiguration;import org.springframework.test.context.junit4.SpringJUnit4ClassRunner;import javax.sql.DataSource;import java.sql.Connection;import java.sql.SQLException;@RunWith(SpringJUnit4ClassRunner.class) @ContextConfiguration(classes = {SpringApplicationContext.class} ) public class SpringJunitRunTest { @Autowired private UserService userService; @Test public void userServiceTest () { userService.SelectAll(); } @Autowired private DataSource dataSource; @Test public void dataSourceTest () throws SQLException { Connection connection = dataSource.getConnection(); System.out.println(connection); connection.close(); } }
Spring集成Web环境 ApplicationContext应用上下文获取问题
ApplicationContext应用上下文获取方式
Spring提供了获取应用上下文的工具
Spring集成Web环境步骤
导入Spring集成Web的坐标
<dependency > <groupId > org.springframework</groupId > <artifactId > spring-web</artifactId > <version > 5.3.18</version > </dependency >
在web.xml中配置ContextLoaderListener监听器
<context-param > <param-name > contextConfigLocation</param-name > <param-value > classpath:applicationContext.xml</param-value > </context-param > <listener > <listener-class > org.springframework.web.context.ContextLoaderListener</listener-class > </listener >
使用Spirng-web 提供的工具获取Spring核心容器
ApplicationContext app = WebApplicationContextUtils.getWebApplicationContext(servletContext);
SpringMVC框架 SpringMVC概述 SpringMVC 是一种基于 Java 的实现 MVC 设计模型的请求驱动类型的轻量级 Web 框架 ,属于 SpringFrameWork 的后续产品,已经融合在 Spring Web Flow 中。
SpringMVC 已经成为目前最主流的MVC框架之一,并且随着Spring3.0 的发布,全面超越 Struts2,成为最优秀的 MVC 框架。它通过一套注解 ,让一个简单的 Java 类成为处理请求的控制器,而无须实现任何接口。同时 它还支持 RESTful 编程风格的请求 。
SpringMVC快速入门 需求:客户端发起请求,服务器端接收请求,执行逻辑并进行视图跳转。
开发步骤:
导入SpringMVC相关坐标 配置SpringMVC核心控制器DispathcerServlet 创建Controller类和视图页面 使用注解配置Controller类中业务方法的映射地址 配置SpringMVC核心文件 spring-mvc.xml 客户端发起请求测试
① 导入Spring和SpringMVC的坐标
① 导入Servlet和Jsp的坐标
<dependency > <groupId > org.springframework</groupId > <artifactId > spring-webmvc</artifactId > <version > 5.3.18</version > </dependency > <dependency > <groupId > org.springframework</groupId > <artifactId > spring-context</artifactId > <version > 5.3.18</version > </dependency > <dependency > <groupId > org.springframework</groupId > <artifactId > spring-web</artifactId > <version > 5.3.18</version > </dependency > <dependency > <groupId > org.springframework</groupId > <artifactId > spring-test</artifactId > <version > 5.3.18</version > </dependency > <dependency > <groupId > javax.servlet</groupId > <artifactId > javax.servlet-api</artifactId > <version > 4.0.1</version > <scope > provided</scope > </dependency > <dependency > <groupId > javax.servlet.jsp</groupId > <artifactId > javax.servlet.jsp-api</artifactId > <version > 2.3.3</version > </dependency > <dependency > <groupId > javax.servlet.jsp</groupId > <artifactId > jsp-api</artifactId > <version > 2.2</version > <scope > provided</scope > </dependency >
② 在web.xml配置SpringMVC的核心控制器
<servlet > <servlet-name > DispatcherServlet</servlet-name > <servlet-class > org.springframework.web.servlet.DispatcherServlet</servlet-class > <init-param > <param-name > contextConfigLocation</param-name > <param-value > classpath:spring-mvc.xml</param-value > </init-param > <load-on-startup > 1</load-on-startup > </servlet > <servlet-mapping > <servlet-name > DispatcherServlet</servlet-name > <url-pattern > /</url-pattern > </servlet-mapping >
③ 创建Controller和业务方法
③ 创建视图页面index.jsp
④ 配置注解
package com.ganga.controller;import org.springframework.stereotype.Controller;import org.springframework.web.bind.annotation.RequestMapping;@Controller public class UserController { @RequestMapping("/method") public String method () { System.out.println("UserController method run ..." ); return "index.jsp" ; } }
⑤ 创建spring-mvc.xml
<?xml version="1.0" encoding="UTF-8" ?> <beans xmlns ="http://www.springframework.org/schema/beans" xmlns:context ="http://www.springframework.org/schema/context" xmlns:xsi ="http://www.w3.org/2001/XMLSchema-instance" xsi:schemaLocation = "http://www.springframework.org/schema/beans http://www.springframework.org/schema/beans/spring-beans.xsd http://www.springframework.org/schema/context http://www.springframework.org/schema/context/spring-context.xsd " > <context:component-scan base-package ="com.ganga.controller" /> </beans >
⑥ 访问测试地址
SpringMVC流程视图
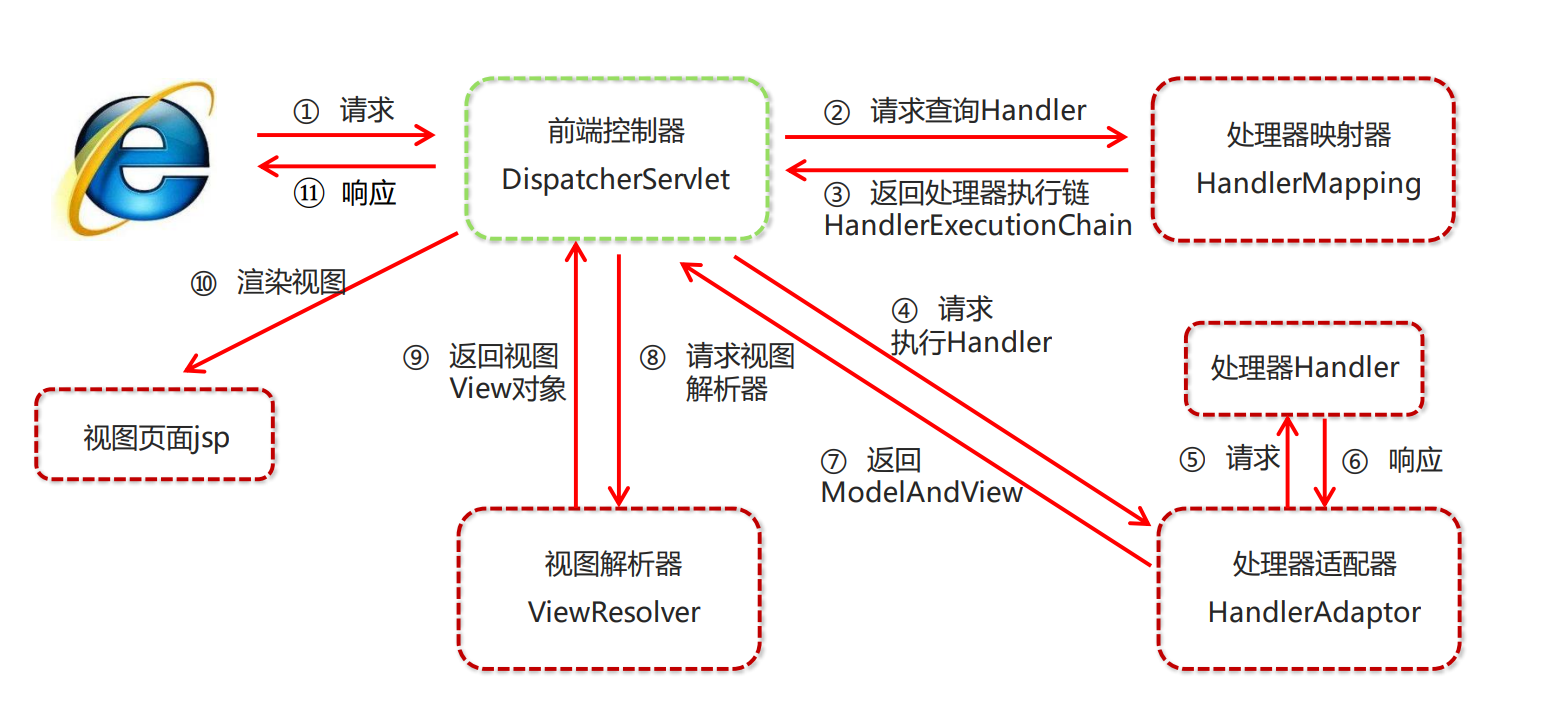
SpringMVC的执行流程
① 用户发送请求至**前端控制器DispatcherServlet。 **
② DispatcherServlet收到请求调用HandlerMapping处理器映射器。
③ 处理器映射器找到具体的处理器(可以根据xml配置、注解进行查找),生成处理器对象及处理器拦截器(如果 有则生成)一并返回给DispatcherServlet。
④ DispatcherServlet调用HandlerAdapter处理器适配器。
⑤ HandlerAdapter经过适配调用具体的处理器(Controller,也叫后端控制器)。
⑥ Controller执行完成返回ModelAndView。
⑦ HandlerAdapter将controller执行结果ModelAndView返回给DispatcherServlet。
⑧ DispatcherServlet将ModelAndView传给ViewReslover视图解析器。
⑨ ViewReslover解析后返回具体View。
⑩ DispatcherServlet根据View进行渲染视图(即将模型数据填充至视图中)。DispatcherServlet响应用户。
SpringMVC 组件解析
前端控制器:DispatcherServlet
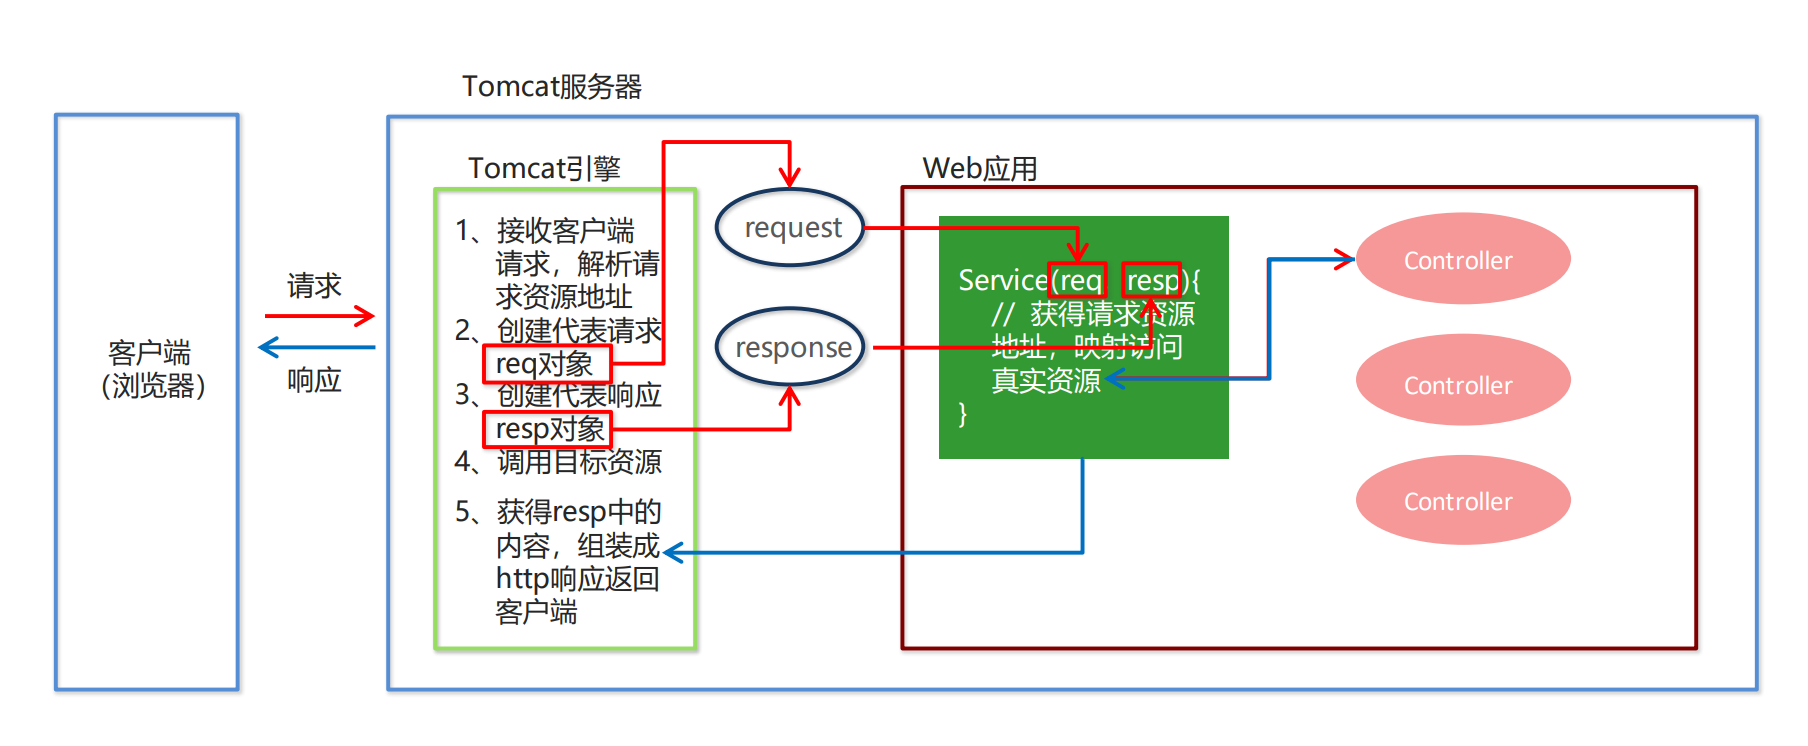
用户请求到达前端控制器,它就相当于 MVC 模式中的 C ,DispatcherServlet 是整个流程控制的中心,由它调用其它组件处理用户的请求,DispatcherServlet 的存在降低了组件之间的耦合性。
处理器映射器:HandlerMapping
HandlerMapping 负责根据用户请求找到 Handler 即处理器,SpringMVC 提供了不同的映射器实现不同的映射方式,例如:配置文件方式,实现接口方式,注解方式等。
处理器适配器:HandlerAdapter
通过 HandlerAdapter 对处理器进行执行,这是适配器模式的应用,通过扩展适配器可以对更多类型的处理 器进行执行。
处理器:Handler处理器:Handler
它就是我们开发中要编写的具体业务控制器 。由 DispatcherServlet 把用户请求转发到 Handler。由 Handler 对具体的用户请求进行处理。
视图解析器:ViewResolver
View Resolver 负责将处理结果生成 View 视图,ViewResolver 首先根据逻辑视图名解析成物理视图名,即 具体的页面地址,再生成 View 视图对象,最后对 View 进行渲染将处理结果通过页面展示给用户。
视图:View
SpringMVC 框架提供了很多的 View 视图类型的支持,包括:jstlView、freemarkerView、pdfView等。最常用的视图就是 jsp 。一般情况下需要通过页面标签或页面模版技术将模型数据通过页面展示给用户,需要由程 序员根据业务需求开发具体的页面
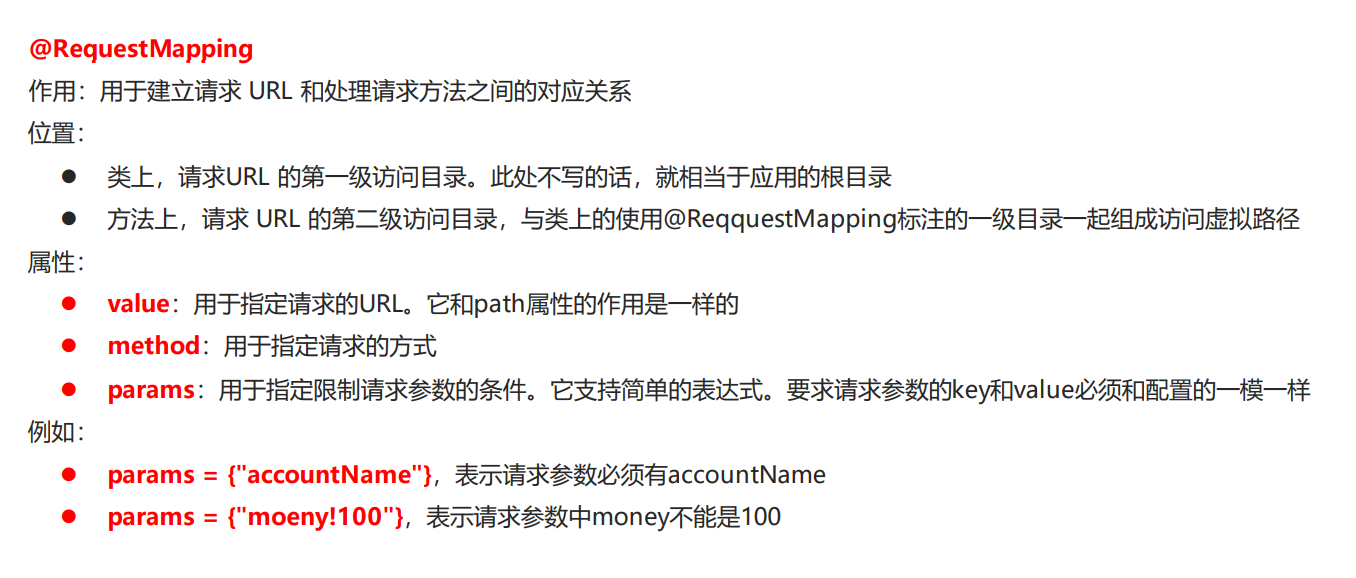
SpringMVC注解解析 @RequestMapping
另外:RequestMapping标签里面设置属性: produces = “text/html;charset=UTF-8”
设置文件格式 和 字符集编码
相当于 response.setContentType(“text/html;charset=utf-8”);
@Controller @RequestMapping("/web/x1") public class UserControllerDame02 { @RequestMapping("/dame02") public String method () { System.out.println("run UserControllerDame02 dame02 ..." ); return "/jsp/dame02.jsp" ; } }
package com.ganga.controller.X1_RequestMapping注解;import org.springframework.stereotype.Controller;import org.springframework.web.bind.annotation.RequestMapping;import org.springframework.web.bind.annotation.RequestMethod;@Controller() @RequestMapping("web/x1") public class UserControllerDame03 { @RequestMapping(value = "/dame03-1",method = RequestMethod.GET) public String dame01 () { System.out.println("run UserControllerDame03 dame03 ..." ); return "/jsp/dame03.jsp" ; } @RequestMapping(value = "/dame03-2",method = RequestMethod.POST) public String dame02 () { System.out.println("run UserControllerDame03 dame031 ..." ); return "/jsp/dame03.jsp" ; } }
package com.ganga.controller.X1_RequestMapping注解;import org.springframework.stereotype.Controller;import org.springframework.web.bind.annotation.RequestMapping;import org.springframework.web.bind.annotation.RequestMethod;@Controller @RequestMapping("/web/x1") public class UserControllerDame04 { @RequestMapping(value = "/dame04-1",params = {"username","id"},method = RequestMethod.GET) public String method1 () { System.out.println("run UserControllerDame04-1 dame04-1 ..." ); return "/jsp/dame04-1.jsp" ; } @RequestMapping(value = "/dame04-2",params = {"user!100"},method = RequestMethod.GET) public String method2 () { System.out.println("run UserControllerDame04-2 dame04-2 ..." ); return "/jsp/dame04-2.jsp" ; } }
组件扫描
配置处理器适配器
<bean class ="org.springframework.web.servlet.mvc.method.annotation.RequestMappingHandlerAdapter" > <property name ="messageConverters" > <list > <bean class ="org.springframework.http.converter.json.MappingJackson2HttpMessageConverter" /> </list > </property > </bean > <mvc:annotation-driven />
视图解析器
<bean id ="viewResolver" class ="org.springframework.web.servlet.view.InternalResourceViewResolver" > <property name ="prefix" value ="/jsp/" /> <property name ="suffix" value =".jsp" /> </bean >
SpringMVC的数据响应 SpringMVC的数据响应方式
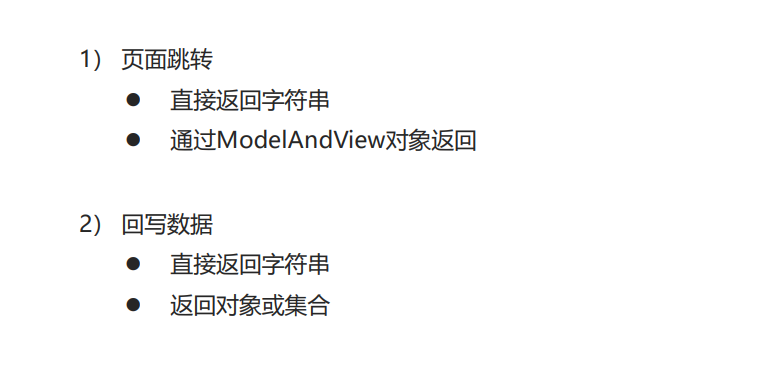
页面跳转
forward: 转发
redirect: 重定向
直接返回字符串
package com.ganga.controller.X3_SpringMVC数据响应.A页面跳转;import org.springframework.stereotype.Controller;import org.springframework.web.bind.annotation.RequestMapping;@Controller @RequestMapping("/web/x3") public class ReturnStringSkip { @RequestMapping("/dame05-1") public String method01 () { System.out.println("run dame05 method01" ); return "dame05" ; } @RequestMapping("/dame05-2") public String method02 () { System.out.println("run dame05 method02" ); return "redirect:http://localhost:8080/B5_SpringMVC_war/jsp/dame05.jsp" ; } }
通过ModerAndView
package com.ganga.controller.X3_SpringMVC数据响应.A页面跳转;import org.springframework.stereotype.Controller;import org.springframework.web.bind.annotation.RequestMapping;import org.springframework.web.servlet.ModelAndView;@Controller @RequestMapping("/web/x3") public class ReturnModelAndViewSkip { @RequestMapping("/dame06-1") public ModelAndView method01 () { ModelAndView modelAndView = new ModelAndView (); modelAndView.addObject("modelKey" ,"123" ); modelAndView.setViewName("dame06" ); return modelAndView; } @RequestMapping("/dame06-2") public ModelAndView method02 (ModelAndView modelAndView) { modelAndView.addObject("modelKey" ,"321" ); modelAndView.setViewName("dame06" ); return modelAndView; } }
上面两个进行拆分
package com.ganga.controller.X3_SpringMVC数据响应.A页面跳转;import org.springframework.stereotype.Controller;import org.springframework.ui.Model;import org.springframework.web.bind.annotation.RequestMapping;@Controller @RequestMapping("/web/x3") public class ReturnZStringModelSkip { @RequestMapping("/dame06-m") public String method (Model model) { model.addAttribute("modelKey" ,"model..." ); return "dame06" ; } }
回写数据
Web基础阶段,客户端访问服务器端,如果想直接回写字符串作为响应体返回的话,只需要使用 response.getWriter().print(“hello world”) 即可,那么在Controller中想直接回写字符串该怎样呢?
① 通过SpringMVC框架注入的response对象,使用response.getWriter().print(“hello world”) 回写数 据,此时不需要视图跳转,业务方法返回值为void。
@RequestMapping("/quick4") public void quickMethod4 (HttpServletResponse response) throws IOException { response.getWriter().print("hello world" ); }
② 将 的字符串直接返回,但此时需要通过**@ResponseBody**注解告知SpringMVC框架,方法 返回的字符串不是跳转是直接在http响应体中返回。
@RequestMapping("/quick5") @ResponseBody public String quickMethod5 () throws IOException {return "hello springMVC!!!" ;}
直接返回字符串
在异步项目中,客户端与服务器端往往要进行json格式字符串交互,此时我们可以手动拼接json字符串返回。
上述方式手动拼接json格式字符串的方式很麻烦,开发中往往要将复杂的java对象转换成json格式的字符串, 我们可以使用web阶段学习过的json转换工具jackson进行转换,导入jackson坐标。
<dependency > <groupId > com.fasterxml.jackson.core</groupId > <artifactId > jackson-core</artifactId > <version > 2.9.0</version > </dependency > <dependency > <groupId > com.fasterxml.jackson.core</groupId > <artifactId > jackson-databind</artifactId > <version > 2.9.0</version > </dependency > <dependency > <groupId > com.fasterxml.jackson.core</groupId > <artifactId > jackson-annotations</artifactId > <version > 2.9.0</version > </dependency >
代码演示
package com.ganga.controller.X3_SpringMVC数据响应.B回写数据;import com.alibaba.fastjson.JSON;import com.ganga.pojo.User;import org.springframework.stereotype.Controller;import org.springframework.web.bind.annotation.RequestMapping;import org.springframework.web.bind.annotation.ResponseBody;import javax.servlet.http.HttpServletResponse;import java.io.IOException;@Controller @RequestMapping("/web/x3") public class WriterBackAttribute { @RequestMapping("/dame08-1") public void me01 (HttpServletResponse response) throws IOException { response.getWriter().print("response! me01" ); } @RequestMapping("/dame08-2") @ResponseBody public String me02 () { return "response! me02" ; } @RequestMapping("/dame08-3") @ResponseBody public String me03 () { return "{\"username\":\"ganga\",\"age\":18}" ; } @RequestMapping("/dame08-4") @ResponseBody public String me04 () { User user = new User ("gangajiang" , 9 ); String json = JSON.toJSONString(user); return json; } @RequestMapping("/dame08-5") @ResponseBody public User me05 () { System.out.println("run dame08-5 me05..." ); User user = new User ("obg" , 99 ); return user; } }
返回对象或集合
通过SpringMVC帮助我们对对象或集合进行json字符串的转换并回写,为处理器适配器配置消息转换参数, 指定使用jackson进行对象或集合的转换,因此需要在spring-mvc.xml中进行配置
在方法上添加@ResponseBody就可以返回json格式的字符串,但是这样配置比较麻烦,配置的代码比较多, 因此,我们可以使用mvc的注解驱动代替上述配置。
<bean class ="org.springframework.web.servlet.mvc.method.annotation.RequestMappingHandlerAdapter" > <property name ="messageConverters" > <list > <bean class ="org.springframework.http.converter.json.MappingJackson2HttpMessageConverter" /> </list > </property > </bean > <mvc:annotation-driven />
代码演示
package com.ganga.controller.X3_SpringMVC数据响应.B回写数据;import com.ganga.pojo.User;import org.springframework.stereotype.Controller;import org.springframework.web.bind.annotation.RequestMapping;import org.springframework.web.bind.annotation.ResponseBody;import java.util.ArrayList;import java.util.List;@Controller @RequestMapping("/web/x3") public class WriterBackAttributeObjAndList { @RequestMapping("/dame09-1") @ResponseBody public User me01 () { User user = new User ("obg-me01" , 99 ); return user; } @RequestMapping("/dame09-2") @ResponseBody public List<User> me02 () { List<User> users = new ArrayList <User>(); users.add(new User ("lisa" , 17 )); users.add(new User ("zs" , 99 )); users.add(new User ("ls" , 66 )); return users; } }
SpringMVC获取请求数据 获取的数据类型
基本数据类型
Controller中的业务方法的参数名称要与请求参数的name一致,参数值会自动映射匹配。
package com.ganga.controller.X4_SpringMVC获取请求数据.A普通数据类型;import org.springframework.stereotype.Controller;import org.springframework.web.bind.annotation.RequestMapping;import org.springframework.web.bind.annotation.ResponseBody;@Controller @RequestMapping("/web/x4") public class UserRequestParameterController01 { @RequestMapping("/user01") @ResponseBody public String user01 (String username, int age) { System.out.println(username + " : " + age); String write = "<h1 align=\"center\">getParameter: username=" + username + " & age=" + age + "</h1>" ; return write; } }
获取POJO类型参数
Controller中的业务方法的POJO参数的属性名与请求参数的name一致,参数值会自动映射匹配。
package com.ganga.controller.X4_SpringMVC获取请求数据.BPOJO数据类型;import com.ganga.pojo.User;import org.springframework.stereotype.Controller;import org.springframework.web.bind.annotation.RequestMapping;import org.springframework.web.bind.annotation.ResponseBody;@Controller @RequestMapping("/web/x4") public class UserRequestParameterController02 { @RequestMapping("/user02") @ResponseBody public String user02 (User user) { System.out.println(user); String write = "<h1 align=\"center\">getParameter: " +user.toString() + "</h1>" ; return write; } }
获取数组数据类型
Controller中的业务方法数组名称与请求参数的name一致,参数值会自动映射匹配。
package com.ganga.controller.X4_SpringMVC获取请求数据.C数组数据类型;import com.ganga.pojo.User;import org.springframework.stereotype.Controller;import org.springframework.web.bind.annotation.RequestMapping;import org.springframework.web.bind.annotation.ResponseBody;import java.util.Arrays;import java.util.List;@Controller @RequestMapping("/web/x4") public class UserRequestParameterController03 { @RequestMapping("/user03") @ResponseBody public String user03 (String[] pramName) { List<String> strings = Arrays.asList(pramName); System.out.println(strings); return strings.toString(); } }
4.获取集合数据类型
package com.ganga.controller.X4_SpringMVC获取请求数据.D集合数据类型;import com.ganga.pojo.VO;import org.springframework.stereotype.Controller;import org.springframework.web.bind.annotation.RequestMapping;import org.springframework.web.bind.annotation.ResponseBody;@Controller @RequestMapping("/web/x4") public class UserRequestParameterController04 { @RequestMapping("/user04") @ResponseBody public String user04 (VO vo) { System.out.println(vo.toString()); return vo.toString(); } }
解决请求乱码问题 当post请求时,数据会出现乱码,我们可以设置一个过滤器来进行编码的过滤。
<filter > <filter-name > CharacterEncodingFilter</filter-name > <filter-class > org.springframework.web.filter.CharacterEncodingFilter</filter-class > <init-param > <param-name > encoding</param-name > <param-value > UTF-8</param-value > </init-param > </filter > <filter-mapping > <filter-name > CharacterEncodingFilter</filter-name > <url-pattern > /*</url-pattern > </filter-mapping >
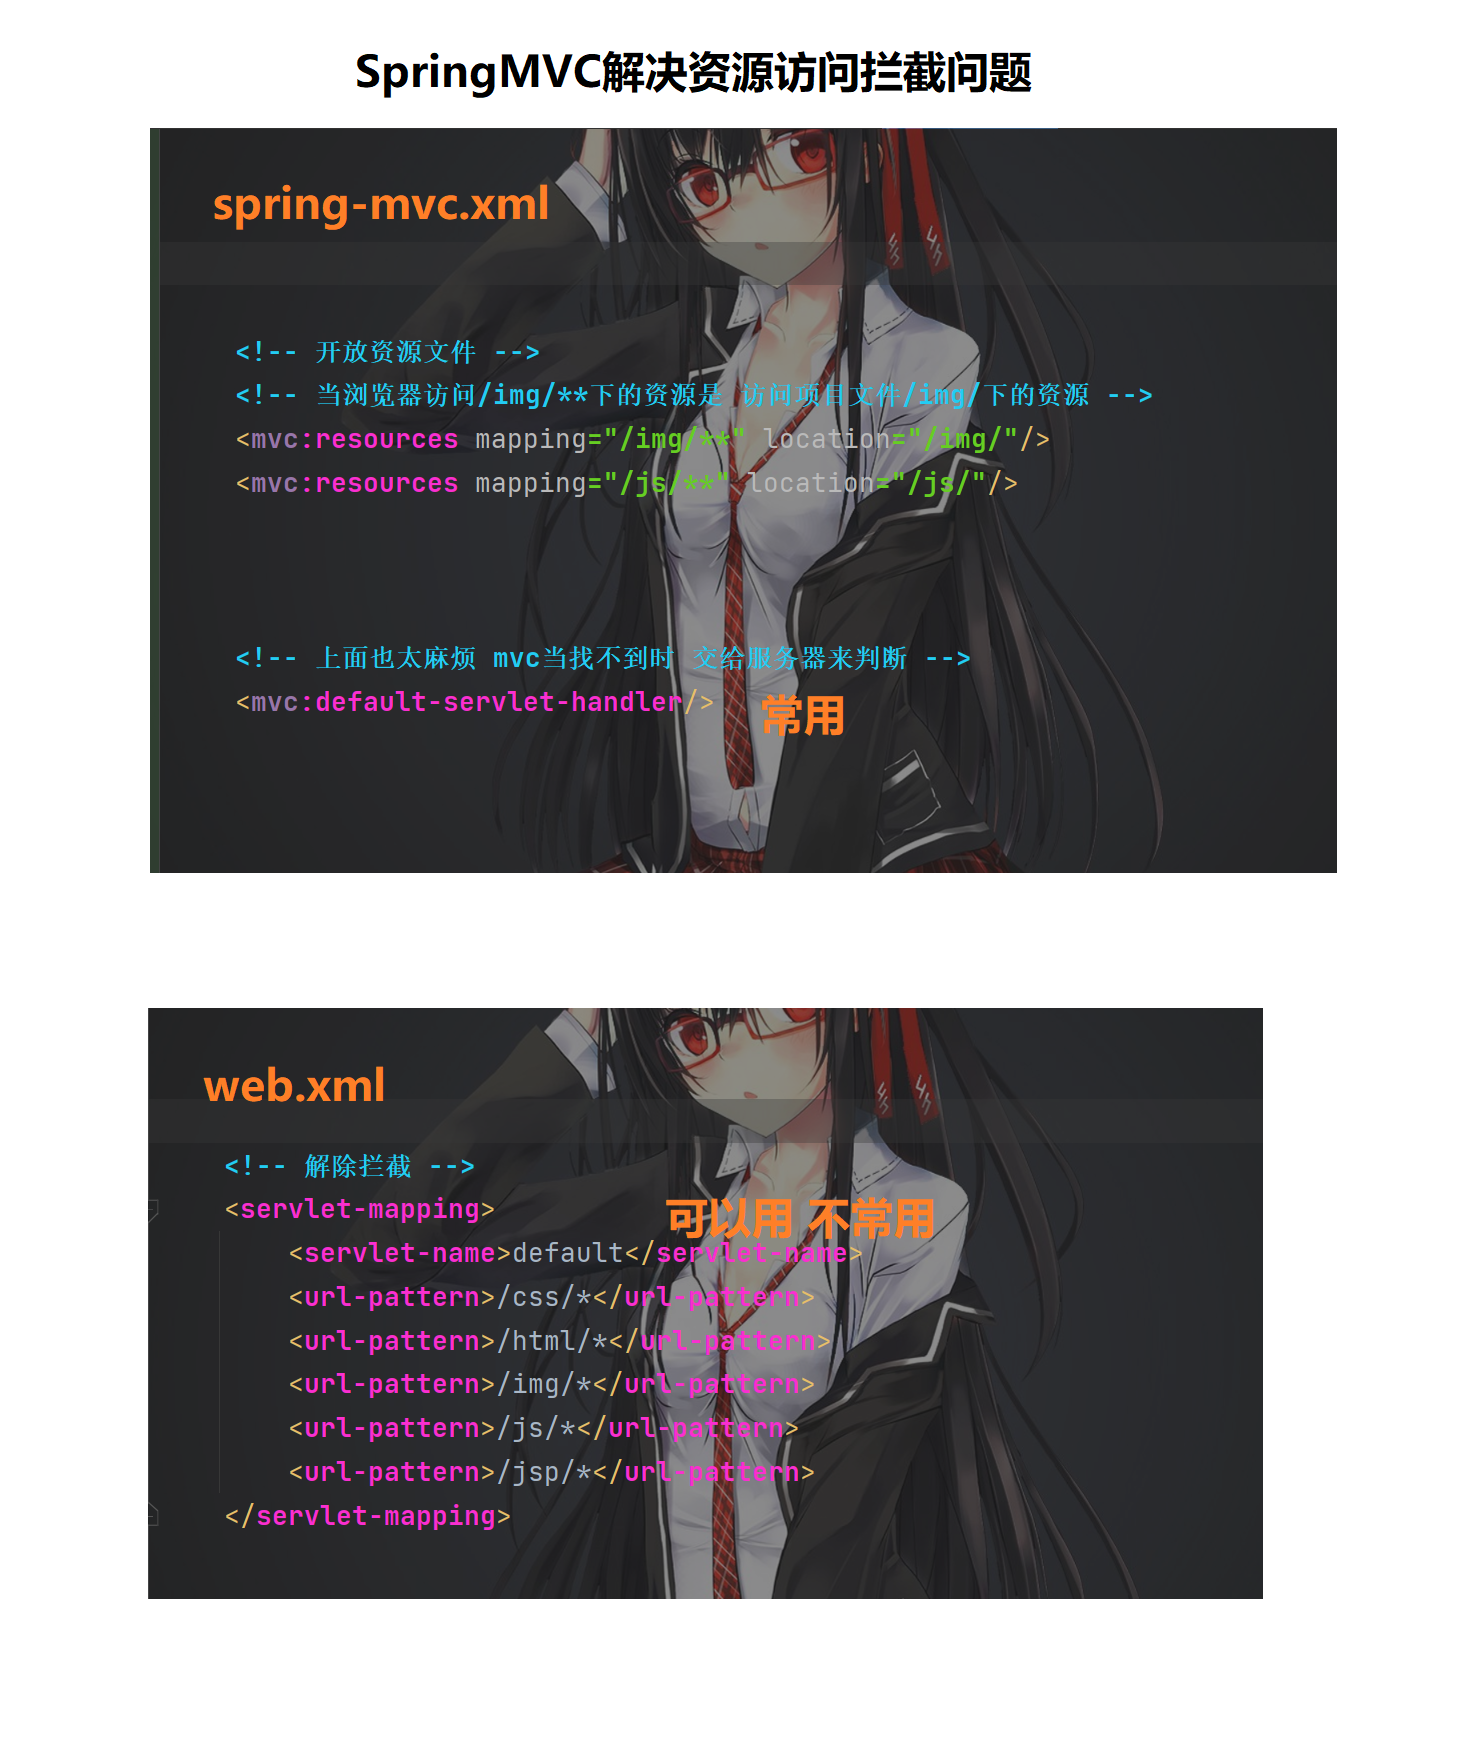
资源拦截问题 解决方案
参数绑定注解 @requestParam
代码演示:
package com.ganga.controller.X4_SpringMVC获取请求数据.F注解RequestParam;import org.springframework.stereotype.Controller;import org.springframework.web.bind.annotation.RequestMapping;import org.springframework.web.bind.annotation.RequestParam;import org.springframework.web.bind.annotation.ResponseBody;@Controller @RequestMapping("/web/x4") public class TestRequestParamAnnotation { @RequestMapping("/param00") @ResponseBody public String param00 (String username) { System.out.println(username); if (username == null ){ return "null" ; } return username; } @RequestMapping("/param01") @ResponseBody public String param01 (@RequestParam("name") String username) { System.out.println(username); return username; } @RequestMapping("/param02-1") @ResponseBody public String param02_1 (@RequestParam(value = "name",required = true) String username) { System.out.println(username); return username; } @RequestMapping("/param02-2") @ResponseBody public String param02_2 (@RequestParam(value = "name",required = false) String username) { System.out.println(username); return username; } @RequestMapping("/param03") @ResponseBody public String param03 (@RequestParam(value = "name",defaultValue = "default") String username) { System.out.println(username); return username; } }
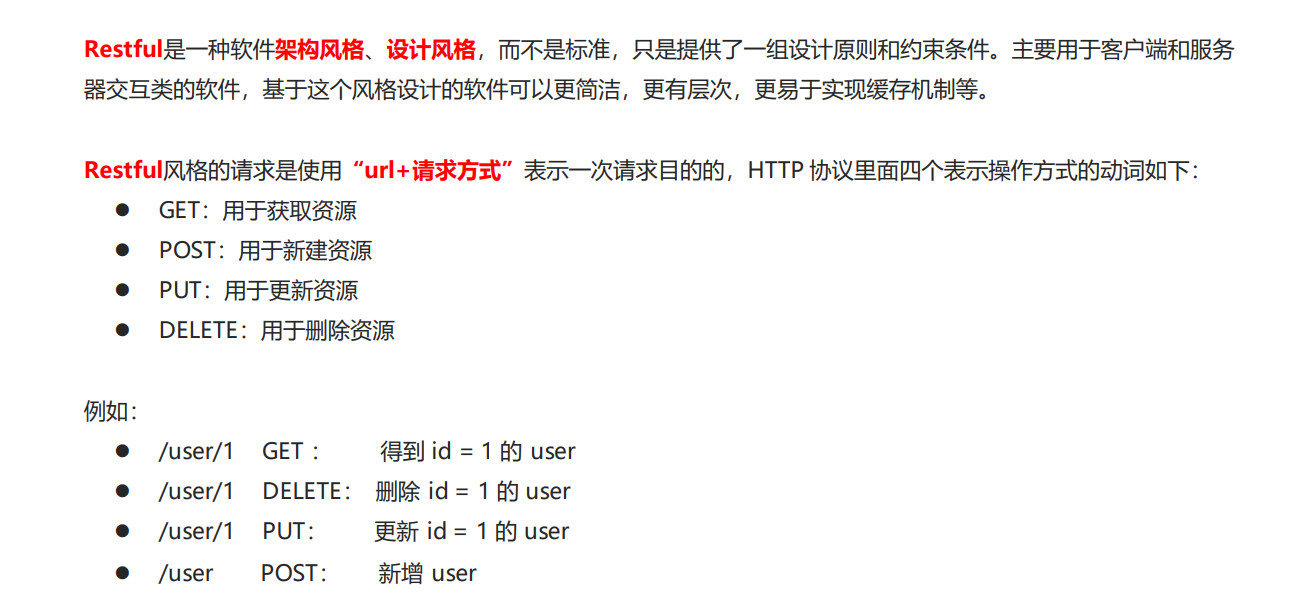
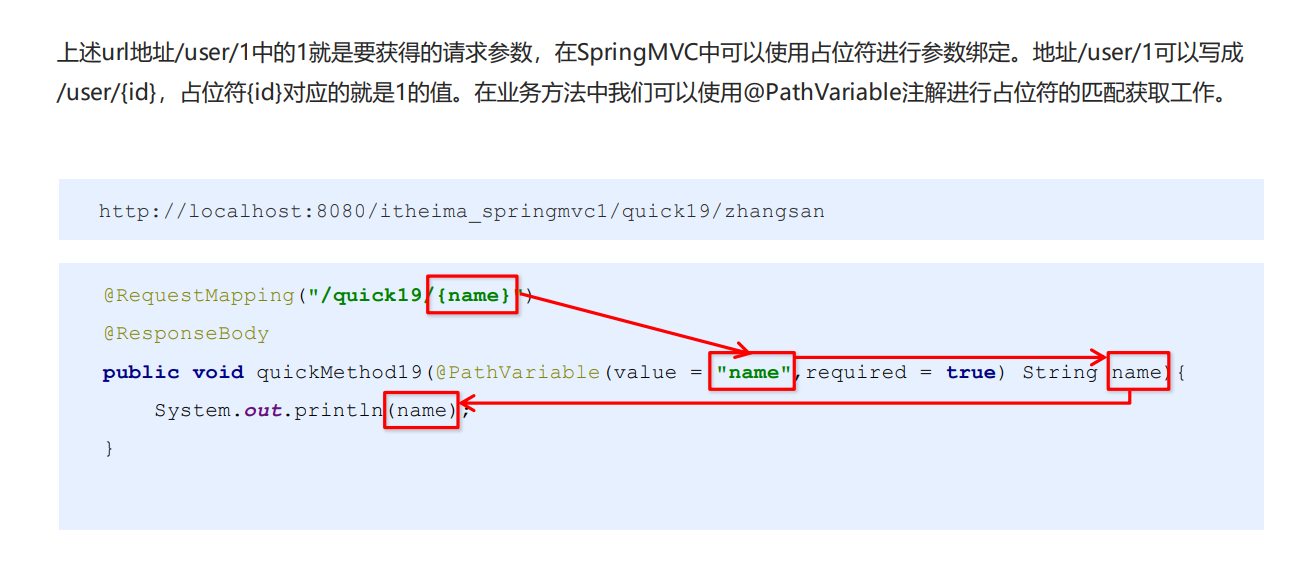
获取restful参数风格
代码演示:
package com.ganga.controller.X4_SpringMVC获取请求数据.G获取Restful风格参数;import org.springframework.stereotype.Controller;import org.springframework.web.bind.annotation.PathVariable;import org.springframework.web.bind.annotation.RequestMapping;import org.springframework.web.bind.annotation.RequestMethod;import org.springframework.web.bind.annotation.ResponseBody;@Controller @RequestMapping("/web/x4") public class TestPathVariable { @RequestMapping("/restful/{user}") @ResponseBody public String pathVariable (@PathVariable(value = "user",required = false) String username) { System.out.println(username); return username; } @RequestMapping(value = "/userAdd/{user}",method = RequestMethod.POST) @ResponseBody public String pathVariablePost (@PathVariable("user") String username) { System.out.println(username); return username; } }
自定义转换器
SpringMVC 默认已经提供了一些常用的类型转换器,例如客户端提交的字符串转换成int型进行参数设置。
但是不是所有的数据类型都提供了转换器,没有提供的就需要自定义转换器,例如:日期类型的数据就需要自 定义转换器。
开发步骤:
**① 定义转换器类实现Converter接口 **
② 在配置文件中声明转换器
③ 在中引用转换器
**① 定义转换器类实现Converter接口 **
package com.ganga.converter;import org.springframework.core.convert.converter.Converter;import java.text.ParseException;import java.text.SimpleDateFormat;import java.util.Date;public class DataConverter implements Converter <String, Date> { @Override public Date convert (String source) { SimpleDateFormat simple = new SimpleDateFormat ("yyyy-MM-dd:HH-mm-ss" ); Date date = null ; try { date = simple.parse(source); } catch (ParseException e) { e.printStackTrace(); } return date; } }
② 在配置文件中声明转换器
spring-mvc.xml
<bean id ="conversionService" class ="org.springframework.context.support.ConversionServiceFactoryBean" > <property name ="converters" > <list > <bean class ="com.ganga.converter.DataConverter" > </bean > </list > </property > </bean > <mvc:annotation-driven conversion-service ="conversionService" />
③ 在中引用转换器
package com.ganga.controller.X4_SpringMVC获取请求数据.H自定义转换器;import org.springframework.stereotype.Controller;import org.springframework.web.bind.annotation.RequestMapping;import org.springframework.web.bind.annotation.RequestParam;import org.springframework.web.bind.annotation.ResponseBody;import java.util.Date;@Controller @RequestMapping("/web/x4/") public class ConverterConversionServiceFactionBean { @RequestMapping("/converter") @ResponseBody public String converterTest (@RequestParam("date") Date date) { System.out.println(date); String dateStr = date.toString(); return dateStr; } }
获取Servlet相关API SpringMVC支持使用原始ServletAPI对象作为控制器方法的参数进行注入,常用的对象如下:
方法参数类型是Servlet相关API SpringMVC回自动注入
- **HttpServletResponse**
HttpServletResponse HttpSession
@Controller @RequestMapping("/web/x4") public class SpringMvcGetServletAPI { @RequestMapping("/getAPI") @ResponseBody public String getServletAPI (HttpServletRequest request, HttpServletResponse response, HttpSession session) { return request + "<br>" + response + "<br>" + session; } }
获得请求头 @RequestHeader
使用@RequestHeader可以获得请求头信息,
相当于web阶段学习的request.getHeader(name)
@RequestHeader注解的属性如下:
value:
required:
@CookieValue
使用@CookieValue可以获得指定Cookie的值
@CookieValue注解的属性如下:
value:
required:
package com.ganga.controller.X4_SpringMVC获取请求数据.J获取请求头;import org.springframework.stereotype.Controller;import org.springframework.web.bind.annotation.CookieValue;import org.springframework.web.bind.annotation.RequestHeader;import org.springframework.web.bind.annotation.RequestMapping;import org.springframework.web.bind.annotation.ResponseBody;@Controller @RequestMapping("/web/x4") public class SpringMvcGetHeader { @RequestMapping("/getHeader") @ResponseBody public String getHeader (@RequestHeader("User-Agent") String user_agent) { System.out.println(user_agent); return user_agent; } @RequestMapping("/getCookie") @ResponseBody public String getCookie (@CookieValue("JSESSIONID") String JSESSIONID) { System.out.println(JSESSIONID); return JSESSIONID; } }
文件上传 文件上传三要素
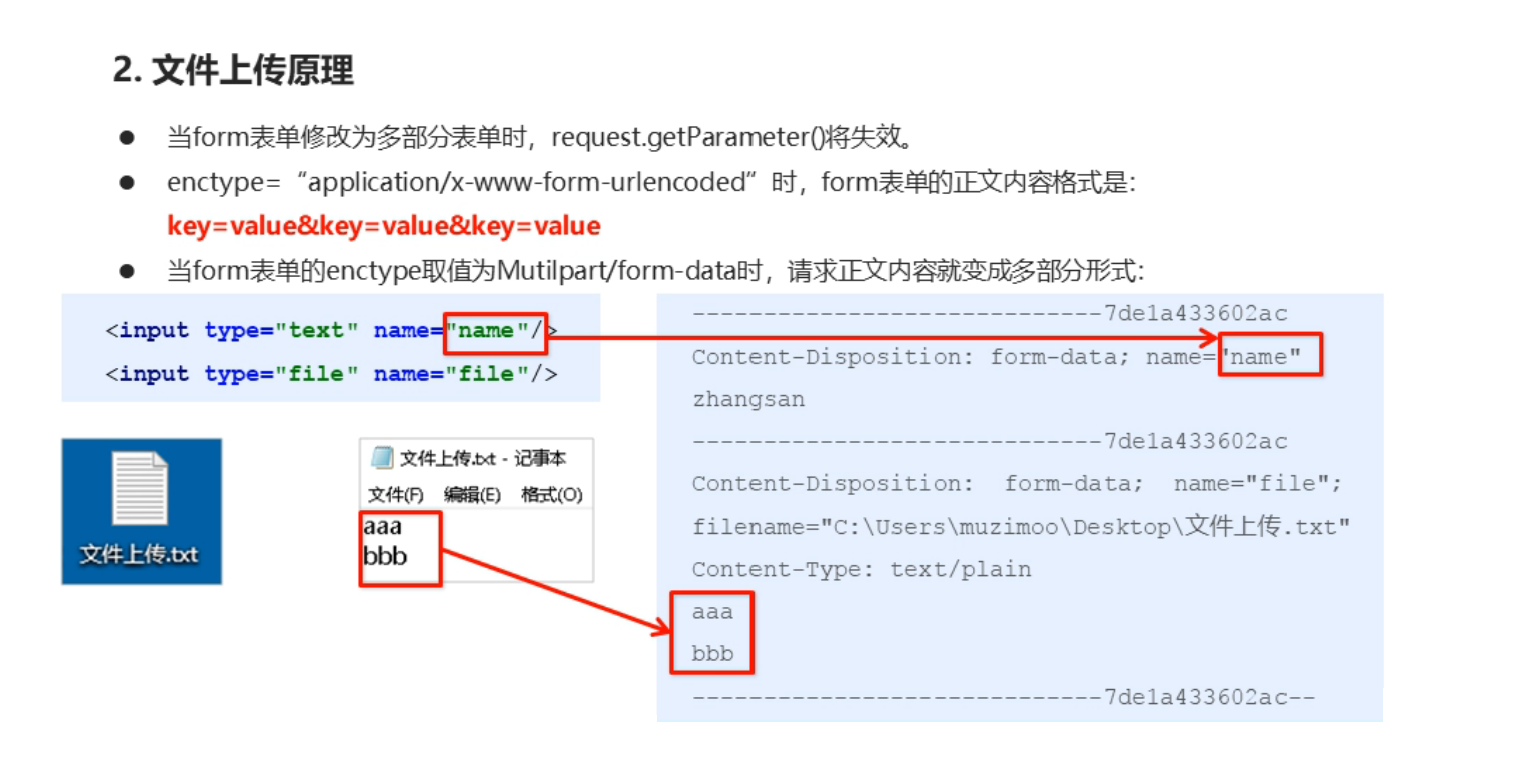
文件上传原理
当form表单修改为多部分表单时,request.getParameter()将失效。
enctype=“application/x-www-form-urlencoded”时,form表单的正文内容格式是:
**key=value&key=value&key=value **
当form表单的enctype取值为Mutilpart/form-data时,请求正文内容就变成多部分形式:
**文件上传步骤 **
**① 导入fileupload和io坐标 **
**② 配置文件上传解析器 **
③ 编写文件上传代码
**① 导入fileupload和io坐标 **
pom.xml
<dependency > <groupId > commons-io</groupId > <artifactId > commons-io</artifactId > <version > 2.6</version > </dependency > <dependency > <groupId > commons-fileupload</groupId > <artifactId > commons-fileupload</artifactId > <version > 1.4</version > </dependency >
**② 配置文件上传解析器 **
spring-mvc.xml
<bean id ="multipartResolver" class ="org.springframework.web.multipart.commons.CommonsMultipartResolver" > <property name ="maxUploadSize" value ="40960000" /> <property name ="maxUploadSizePerFile" value ="20480000" /> <property name ="defaultEncoding" value ="utf-8" /> </bean >
③ 编写文件上传代码
java代码
package com.ganga.controller.X4_SpringMVC获取请求数据.K文件上传;import org.springframework.stereotype.Controller;import org.springframework.web.bind.annotation.RequestMapping;import org.springframework.web.bind.annotation.ResponseBody;import org.springframework.web.multipart.MultipartFile;import java.io.File;import java.io.IOException;@Controller @RequestMapping("/web/x4") public class SendFile { @RequestMapping("/upload01") @ResponseBody public String upload01 (String filename, MultipartFile upload) { System.out.println(filename); String originalFilename = upload.getOriginalFilename(); try { upload.transferTo(new File ("D:\\MySSM\\A2_Spring_MVC\\B5_SpringMVC\\src\\main\\webapp\\file\\" +originalFilename)); } catch (IOException e) { e.printStackTrace(); } return "......" ; } @RequestMapping("/upload02-1") @ResponseBody public String upload02 (String fileName,MultipartFile upload1,MultipartFile upload2,MultipartFile upload3) { System.out.println(fileName); String name1 = upload1.getOriginalFilename(); String name2 = upload2.getOriginalFilename(); String name3 = upload3.getOriginalFilename(); try { upload1.transferTo(new File ("D:\\MySSM\\A2_Spring_MVC\\B5_SpringMVC\\src\\main\\webapp\\file\\" + name1)); upload2.transferTo(new File ("D:\\MySSM\\A2_Spring_MVC\\B5_SpringMVC\\src\\main\\webapp\\file\\" + name2)); upload3.transferTo(new File ("D:\\MySSM\\A2_Spring_MVC\\B5_SpringMVC\\src\\main\\webapp\\file\\" + name3)); } catch (IOException e) { e.printStackTrace(); } return "......" ; } @RequestMapping("/upload02-2") @ResponseBody public String upload03 (String fileName,MultipartFile[] upload) { System.out.println(fileName); for (MultipartFile multipartFile : upload) { String originalFilename = multipartFile.getOriginalFilename(); try { multipartFile.transferTo(new File ("D:\\MySSM\\A2_Spring_MVC\\B5_SpringMVC\\src\\main\\webapp\\file\\" +originalFilename)); } catch (IOException e) { e.printStackTrace(); } } return "......" ; } }
表单:
<%@ page contentType="text/html;charset=UTF-8" language="java" %> <%@ page isELIgnored="false" %> <html> <head> <title>Title</title> </head> <body style="background: bisque" > <br><br><br> <div align="center" > <h1>文件上传 - 单文件上传</h1> <form method="post" enctype="multipart/form-data" action="${pageContext.request.contextPath}/web/x4/upload01" > 文件名称:<input type="text" name="filename" ><br> 上传文件:<input type="file" name="upload" ><br> <input type="submit" value="提交上传" > </form> </div> <br><br><br> <div align="center" > <h1>文件上传 - 多文件上传 - 02 </h1> <form method="post" enctype="multipart/form-data" action="${pageContext.request.contextPath}/web/x4/upload02-1" > 文件名称:<input type="text" name="filename" ><br> 上传文件:<input type="file" name="upload1" ><br> 上传文件:<input type="file" name="upload2" ><br> 上传文件:<input type="file" name="upload3" ><br> <input type="submit" value="提交上传" > </form> </div> <br><br><br> <div align="center" > <h1>文件上传 - 多文件上传 - 01 </h1> <form method="post" enctype="multipart/form-data" action="${pageContext.request.contextPath}/web/x4/upload02-2" > 文件名称:<input type="text" name="filename" ><br> 上传文件:<input type="file" name="upload" ><br> 上传文件:<input type="file" name="upload" ><br> 上传文件:<input type="file" name="upload" ><br> <input type="submit" value="提交上传" > </form> </div> </body> </html>
SpringMVC拦截过滤器 自定义拦截器很简单,只有如下三步:
① 创建拦截器类实现HandlerInterceptor接口
② 配置拦截器
③ 测试拦截器的拦截效果
① 创建拦截器类实现HandlerInterceptor接口 package com.ganga.interceptor;import org.springframework.web.servlet.HandlerInterceptor;import org.springframework.web.servlet.ModelAndView;import javax.servlet.http.HttpServletRequest;import javax.servlet.http.HttpServletResponse;public class MyInterceptor implements HandlerInterceptor { @Override public boolean preHandle (HttpServletRequest request, HttpServletResponse response, Object handler) throws Exception { System.out.println("\n run preHandle ..." ); String user = request.getParameter("user" ); if ("ganga" .equals(user)){ return true ; }else { request.getRequestDispatcher("/error.jsp" ) .forward(request,response); return false ; } } @Override public void postHandle (HttpServletRequest request, HttpServletResponse response, Object handler, ModelAndView modelAndView) throws Exception { System.out.println("\n run postHandle ..." ); } @Override public void afterCompletion (HttpServletRequest request, HttpServletResponse response, Object handler, Exception ex) throws Exception { System.out.println("\n run afterCompletion ..." ); } }
② 配置拦截器 <mvc:interceptors > <mvc:interceptor > <mvc:mapping path ="/web/dame01/**" /> <bean class ="com.ganga.interceptor.MyInterceptor" /> </mvc:interceptor > </mvc:interceptors >
③ 测试拦截器的拦截效果 package com.ganga.controller;import org.springframework.stereotype.Controller;import org.springframework.web.bind.annotation.RequestMapping;import org.springframework.web.bind.annotation.RequestParam;import org.springframework.web.servlet.ModelAndView;@Controller @RequestMapping("/web/dame02") public class DameController02 { @RequestMapping("/me02") public ModelAndView method02 (ModelAndView modelAndView,@RequestParam("user") String username) { modelAndView.addObject("params" ,username); modelAndView.setViewName("/index.jsp" ); System.out.println("\n访问执行..." ); return modelAndView; } }
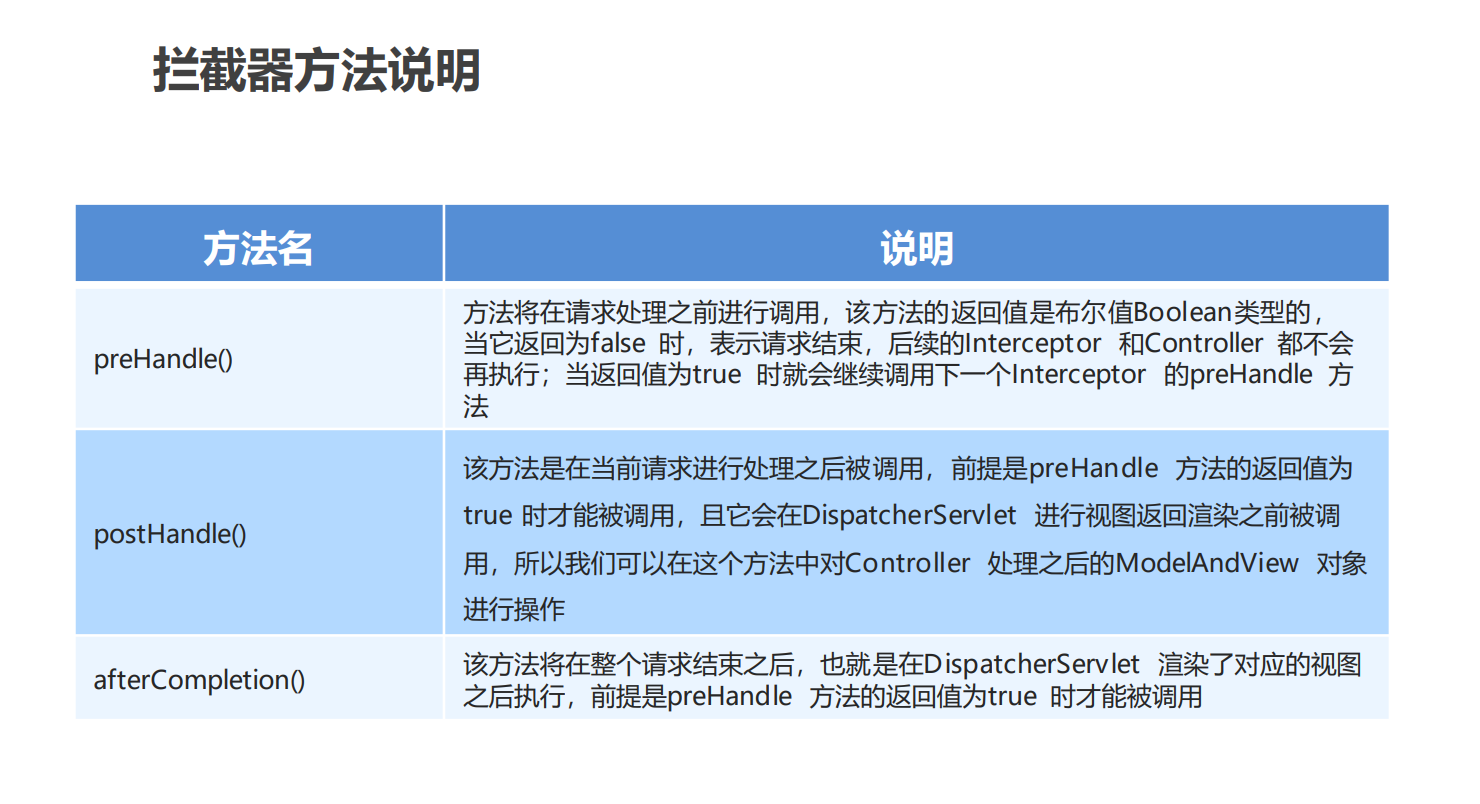
拦截器方法
注意: 它是一个chain 与servlet的拦截器filter一样 是一个chain [链]
<mvc:interceptors > <mvc:interceptor > <mvc:mapping path ="/web/dame03/**" /> <bean class ="com.ganga.interceptor.DameChain01" /> </mvc:interceptor > <mvc:interceptor > <mvc:mapping path ="/web/dame03/**" /> <bean class ="com.ganga.interceptor.DameChain02" /> </mvc:interceptor > </mvc:interceptors >
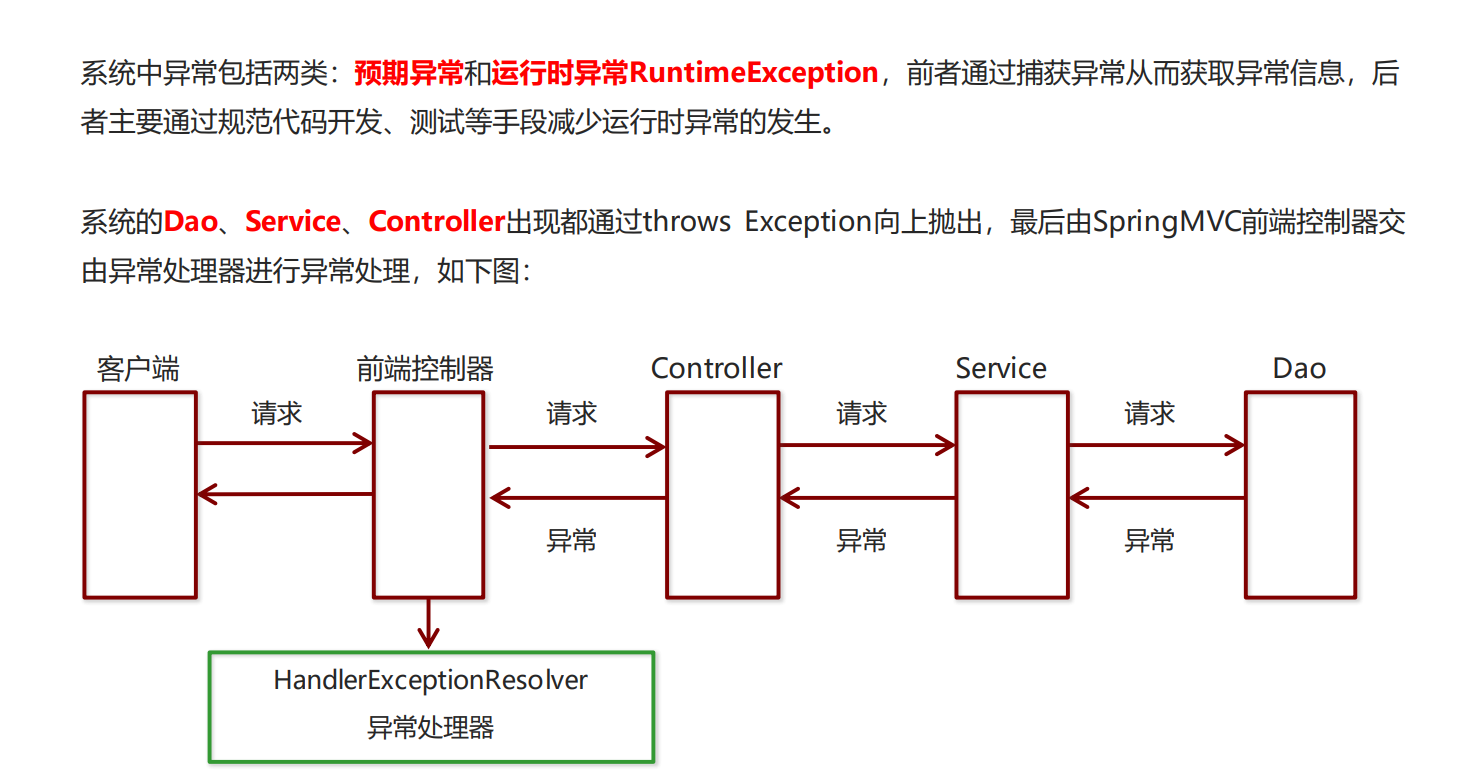
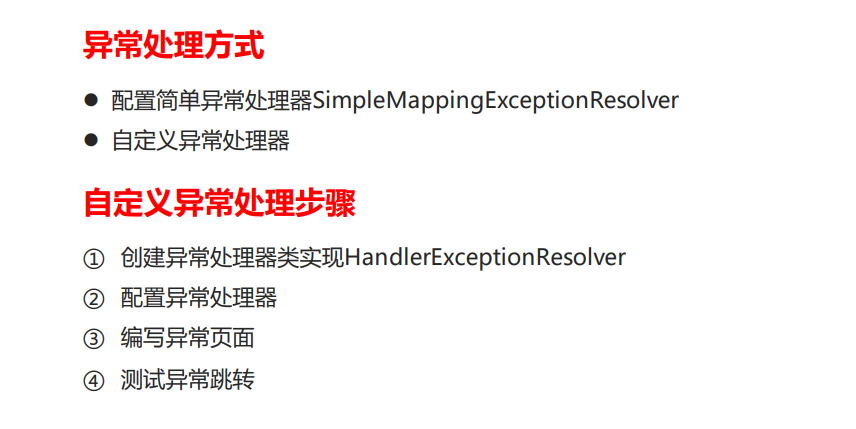
SpringMVC异常处理机制 异常处理的思路
异常处理两种方式
方式一:
简单的异常处理器 SimpleMappingExceptionResolver
SpringMVC已经定义好了该类型转换器,在使用时可以根据项目情况进行相应异常与视图的映射配置
<bean class ="org.springframework.web.servlet.handler.SimpleMappingExceptionResolver" > <property name ="defaultErrorView" value ="/index.jsp" /> <property name ="exceptionMappings" > <map > <entry key ="java.lang.ClassCastException" value ="/error.jsp" /> <entry key ="java.lang.ArithmeticException" value ="/error.jsp" /> <entry key ="java.io.FileNotFoundException" value ="/error.jsp" /> <entry key ="java.lang.NullPointerException" value ="/error.jsp" /> <entry key ="com.ganga.exception.MyException" value ="/error.jsp" /> </map > </property > </bean >
方式二:
自定义异常 HandlerExceptionResolver
① 创建异常处理器类实现HandlerExceptionResolver
② 配置异常处理器
③ 编写异常页面
④ 测试异常跳转
① 创建异常处理器类实现HandlerExceptionResolver
package com.ganga.exception;import org.springframework.web.servlet.HandlerExceptionResolver;import org.springframework.web.servlet.ModelAndView;import javax.servlet.http.HttpServletRequest;import javax.servlet.http.HttpServletResponse;import java.io.FileNotFoundException;public class MyHandlerExceptionResolver implements HandlerExceptionResolver { @Override public ModelAndView resolveException (HttpServletRequest request, HttpServletResponse response, Object handler, Exception ex) { ModelAndView mav = new ModelAndView (); if (ex instanceof ClassCastException){ mav.addObject("errors" ,"类转换异常" ); }else if (ex instanceof ArithmeticException){ mav.addObject("errors" ,"除0异常" ); }else if (ex instanceof FileNotFoundException){ mav.addObject("errors" ,"空文件路径异常" ); }else if (ex instanceof NullPointerException){ mav.addObject("errors" ,"空指针异常" ); }else if (ex instanceof MyException){ mav.addObject("errors" ,"自定义异常" ); } mav.setViewName("/errors.jsp" ); return mav; } }
② 配置异常处理器
<bean class ="com.ganga.exception.MyHandlerExceptionResolver" />
③ 编写异常页面
<%@ page contentType="text/html;charset=UTF-8" language="java" %>
<html>
<head>
<title>Title</title>
</head>
<body>
这是一个最终异常的显示页面
</body>
</html>
④ 测试异常跳转
知识要点
SpringJdbcTemplate JdbcTemplate概述 它是spring框架中提供的一个对象,是对原始繁琐的Jdbc API对象的简单封装 。spring框架为我们提供了很多的操作模板类。例如:操作关系型数据的JdbcTemplate和HibernateTemplate,操作nosql数据库的RedisTemplate,操 作消息队列的JmsTemplate等等。
JdbcTemplate开发步骤 ① 导入spring-jdbc和spring-tx坐标
② 创建数据库表和实体
③ 创建JdbcTemplate对象注入DataSource放入容器
④ 执行数据库操作
演示操作: ① 导入spring-jdbc和spring-tx坐标
pom.xml
<dependency > <groupId > org.springframework</groupId > <artifactId > spring-jdbc</artifactId > <version > 5.3.18</version > </dependency > <dependency > <groupId > org.springframework</groupId > <artifactId > spring-tx</artifactId > <version > 5.3.18</version > </dependency >
② 创建数据库表和实体
③ 创建JdbcTemplate对象注入DataSource放入容器
jdbc.properties
jdbc.driverClass =com.mysql.jdbc.Driver jdbc.url =jdbc:mysql:///webcase?useSSL=false&useServerPrepStmts=true jdbc.user =root jdbc.password =ganga
applicationContext.xml
<context:property-placeholder location ="classpath:jdbc.properties" /> <bean id ="dataSource" class ="com.mchange.v2.c3p0.ComboPooledDataSource" > <property name ="driverClass" value ="${jdbc.driverClass}" /> <property name ="jdbcUrl" value ="${jdbc.url}" /> <property name ="user" value ="${jdbc.user}" /> <property name ="password" value ="${jdbc.password}" /> </bean > <bean id ="jdbcTemplate" class ="org.springframework.jdbc.core.JdbcTemplate" > <property name ="dataSource" ref ="dataSource" /> </bean >
④ 执行数据库操作
package com.ganga.test;import com.mchange.v2.c3p0.ComboPooledDataSource;import org.springframework.context.ApplicationContext;import org.springframework.context.support.ClassPathXmlApplicationContext;import org.springframework.jdbc.core.JdbcTemplate;import org.testng.annotations.Test;import javax.sql.DataSource;import javax.xml.crypto.Data;import java.beans.PropertyVetoException;public class JdbcTemplateTest { @Test public void entryTest01 () throws PropertyVetoException { JdbcTemplate jdbcTemplate = new JdbcTemplate (); ComboPooledDataSource dataSource = new ComboPooledDataSource (); dataSource.setDriverClass("com.mysql.jdbc.Driver" ); dataSource.setJdbcUrl("jdbc:mysql:///webcase?useSSL=false" ); dataSource.setUser("root" ); dataSource.setPassword("ganga" ); jdbcTemplate.setDataSource(dataSource); int row = jdbcTemplate.update("insert into account values(?,?)" , "ganga" , 100000000 ); System.out.println(row); } @Test public void entryTest02 () { ApplicationContext app = new ClassPathXmlApplicationContext ("applicationContext.xml" ); JdbcTemplate jdbcTemplate = app.getBean(JdbcTemplate.class); int row = jdbcTemplate.update("insert into account values(?,?)" ,"gangajiang" ,"1230000" ); System.out.println(row); } }
JdbcTemplate的常用操作 增删改查
JdbcTemplateCRUDTest.java
package com.ganga.test;import com.ganga.pojo.Account;import org.junit.Test;import org.junit.runner.RunWith;import org.springframework.beans.factory.annotation.Autowired;import org.springframework.jdbc.core.BeanPropertyRowMapper;import org.springframework.jdbc.core.JdbcTemplate;import org.springframework.test.context.ContextConfiguration;import org.springframework.test.context.junit4.SpringJUnit4ClassRunner;import java.util.List;@RunWith(SpringJUnit4ClassRunner.class) @ContextConfiguration("classpath:applicationContext.xml") public class JdbcTemplateCRUDTest { @Autowired private JdbcTemplate jdbcTemplate; @Test public void updateAddTest () { String sql = "insert into account values(?,?)" ; int row = jdbcTemplate.update(sql, "gangale" , "1" ); System.out.println(row); } @Test public void updateDeleteTest () { String sql = "delete from account where user = ?" ; int row = jdbcTemplate.update(sql, "gangale" ); System.out.println(row); } @Test public void updateUpdateTest () { String sql = "update account set money=? where user=?" ; int row = jdbcTemplate.update(sql,"2" ,"gangale" ); System.out.println(row); } @Test public void querySelectTest01 () { String sql = "select * from account" ; List<Account> query = jdbcTemplate.query(sql, new BeanPropertyRowMapper <Account>(Account.class)); System.out.println(query); } @Test public void querySelectTest02 () { String sql = "select * from account where user=?" ; Account ganga = jdbcTemplate.queryForObject(sql, new BeanPropertyRowMapper <Account>(Account.class), "ganga" ); System.out.println(ganga); } @Test public void querySelectTest03 () { String sql = "select count(*) from account" ; List<Long> longs = jdbcTemplate.queryForList(sql, Long.class); System.out.println(longs); } }
SpringAOP 学习SpringAOP之前,先学习一下JDK动态代理 和Cglib动态代理 的实现方式
JDK 动态代理 步骤:
定义目标类接口
实现目标类接口 重写目标类方法
创建一个代理工厂类 实现 InvocationHandler 实现invoke()方法
在invoke()方法中实现 :1. 增强方法 2. 调用目标方法
通过Proxy.newProxyInstance()方法获取动态代理对象
UserDao
package com.ganga.servlet;public interface UserDao { int getAge (String name, int age) ; }
UserDaoImpl
package com.ganga.servlet.impl;import com.ganga.servlet.UserDao;public class UserDaoImpl implements UserDao { @Override public int getAge (String name, int age) { System.out.println("目标方法执行......" ); System.out.println("代理前的目标结果是:" + age); return age; } }
UserInvocationHandler [重点]
package com.ganga.handler;import com.ganga.aspect.MyAspect;import java.lang.reflect.InvocationHandler;import java.lang.reflect.Method;import java.lang.reflect.Proxy;public class UserInvocationHandler implements InvocationHandler { Object target; public Object getInstance (Object target) { this .target = target; return Proxy.newProxyInstance( target.getClass().getClassLoader(), target.getClass().getInterfaces(), this ); } @Override public Object invoke (Object proxy, Method method, Object[] args) throws Throwable { Object ageObj; MyAspect myAspect = new MyAspect (); myAspect.check_permission(); ageObj = method.invoke(target, args); if (ageObj != null ){ int age = (int ) ageObj; age = age + 1 ; ageObj = age; } myAspect.log(); return ageObj; } }
MyAspect
package com.ganga.aspect;public class MyAspect { public void check_permission () { System.out.println("检查权限..." ); } public void log () { System.out.println("日志记录..." ); } }
DameUser
package com.ganga;import com.ganga.handler.UserInvocationHandler;import com.ganga.servlet.UserDao;import com.ganga.servlet.impl.UserDaoImpl;public class DameUser { public static void main (String[] args) { UserDao userDao = new UserDaoImpl (); UserDao proxy = (UserDao) new UserInvocationHandler ().getInstance(userDao); int age = proxy.getAge("尴尬酱" , 9 ); System.out.println("增强方法后的 代理后的 返回结果:" +age); } }
Cglib动态代理 UserTarget
package com.ganga.service;public class UserTarget { public int getAge (String name,int age) { System.out.println("目标方法执行......" ); System.out.println("目标方法执行age参数值为: " + age); return age; } }
CglibProxy [重点]
package com.ganga.proxy;import com.ganga.aspect.MyAspect;import org.springframework.cglib.proxy.Enhancer;import org.springframework.cglib.proxy.MethodInterceptor;import org.springframework.cglib.proxy.MethodProxy;import java.lang.reflect.Method;public class CglibProxy implements MethodInterceptor { Object target; public Object createProxy (Object target) { this .target = target; Enhancer enhancer = new Enhancer (); enhancer.setSuperclass(target.getClass()); enhancer.setCallback(this ); Object proxy = enhancer.create(); return proxy; } @Override public Object intercept (Object proxy, Method method, Object[] args, MethodProxy methodProxy) throws Throwable { MyAspect myAspect = new MyAspect (); myAspect.check_permission(); Object ageObj = null ; ageObj = method.invoke(target, args); if (ageObj != null ){ int age = (int ) ageObj; age = age + 1 ; ageObj = age; } myAspect.log(); return ageObj; } }
MyAspect
package com.ganga.aspect;public class MyAspect { public void check_permission () { System.out.println("检查权限..." ); } public void log () { System.out.println("日志记录..." ); } }
CglibProxyTest
package com.ganga.test;import com.ganga.proxy.CglibProxy;import com.ganga.service.UserTarget;import net.sf.cglib.proxy.MethodInterceptor;public class CglibProxyTest { public static void main (String[] args) { UserTarget userTarget = new UserTarget (); CglibProxy im = new CglibProxy (); UserTarget proxy = (UserTarget) im.createProxy(userTarget); int age = proxy.getAge("尴尬酱" , 9 ); System.out.println("代理后age的值是: " + age); } }
AOP面向切面编程 一:什么是面向切面编程
AOP 为 A O P 面向切面编程 ,是通过预编译方式 和运行期 动态代理
动态代理
AOP 是 OOP 的延续,是软件开发中的一个热点,也是Spring框架中的一个重要内容,是函数式编程的一种衍生范型 。利用AOP可以对业务逻辑的各个部分进行隔离 ,从而使得业务逻辑各部分之间的耦合度降低 ,提高程序 的可重用性,同时提高了开发的效率。
二:AOP 的作用及其优势
三:AOP 的底层实现
实际上,AOP 的底层是通过 Spring 提供的的动态代理技术实现的 。在运行期间 ,Spring通过动态代理技术动态 的生成代理对象,代理对象方法执行时进行增强功能的介入,在去调用目标对象的方法,从而完成功能的增强。
四:AOP 的动态代理技术
常用的动态代理技术
JDK 代理 : 基于接口的动态代理技术
cglib 代理:基于父类的动态代理技术
五:JDK的动态代理
首先要有一个目标接口:
package com.ganga.proxy.jdk;public interface TargetInterface { void sell () ; }
有一个目标类 实现 这个目标接口
package com.ganga.proxy.jdk;public class Target implements TargetInterface { @Override public void sell () { System.out.println("目标方法执行。。。" ); } }
要增强的代码
package com.ganga.proxy.jdk;public class MyAdvice { public void before () { System.out.println("前置增强..." ); } public void after () { System.out.println("后置增强..." ); } }
动态代理 并 测试
package com.ganga.proxy.jdk;import java.lang.reflect.InvocationHandler;import java.lang.reflect.Method;import java.lang.reflect.Proxy;public class RunMain { public static void main (String[] args) { Target target = new Target (); MyAdvice myAdvice = new MyAdvice (); TargetInterface proxy = (TargetInterface) Proxy.newProxyInstance( target.getClass().getClassLoader(), target.getClass().getInterfaces(), new InvocationHandler () { @Override public Object invoke (Object proxy, Method method, Object[] args) throws Throwable { myAdvice.before(); Object invoke = method.invoke(target, args); myAdvice.after(); return invoke; } } ); proxy.sell(); } }
六:Cglib的动态代理
需要一个目标类 不需要接口
package com.ganga.proxy.cglib;public class Target { public void sell () { System.out.println("目标方法执行。。。" ); } }
要增强的代码
package com.ganga.proxy.cglib;public class MyAdvice { public void before () { System.out.println("前置增强..." ); } public void after () { System.out.println("后置增强..." ); } }
创建动态代理 并 测试
package com.ganga.proxy.cglib;import org.springframework.cglib.proxy.Enhancer;import org.springframework.cglib.proxy.MethodInterceptor;import org.springframework.cglib.proxy.MethodProxy;import java.lang.reflect.Method;public class RunMain { public static void main (String[] args) { Target target = new Target (); MyAdvice myAdvice = new MyAdvice (); Enhancer enhancer = new Enhancer (); enhancer.setSuperclass(target.getClass()); enhancer.setCallback(new MethodInterceptor () { @Override public Object intercept (Object o, Method method, Object[] objects, MethodProxy methodProxy) throws Throwable { myAdvice.before(); Object invoke = method.invoke(target, args); myAdvice.after(); return invoke; } }); Target proxy = (Target) enhancer.create(); proxy.sell(); } }
AOP 相关概念 Spring 的 AOP 实现底层就是对上面的动态代理的代码进行了封装,封装后我们只需要对需要关注的部分进行代码编写,并通过配置的方式完成指定目标的方法增强。
在正式讲解 AOP 的操作之前,我们必须理解 AOP 的相关术语,常用的术语如下:
Target(目标对象)
Proxy (代理)
Joinpoint(连接点)
Pointcut(切入点)
Advice(通知/ 增强)
Aspect(切面)
Weaving(织入)
AOP 开发明确的事项
**需要编写的内容 **
AOP 技术实现的内容 Spring 框架监控切入点方法的执行。
一旦监控到切入点方法被运行,使用代理机制,动态创建目标对象的代理对象,根据通知类别,在代理对象的对应位置,将通知对应的功能织入,完成完整的代码逻辑运行。
AOP 底层使用哪种代理方式
在 spring 中,框架会根据目标类是否实现了接口来决定采用哪种动态代理的方式。
基于XML的AOP开发 快速入门 ① 导入 AOP 相关坐标
② 创建目标接口和目标类(内部有切点)
③ 创建切面类(内部有增强方法)
④ 将目标类和切面类的对象创建权交给 spring
⑤ 在 applicationContext.xml 中配置织入关系
⑥ 测试代码
① 导入 AOP 相关坐标
<dependency > <groupId > org.springframework</groupId > <artifactId > spring-context</artifactId > <version > 5.3.18</version > </dependency > <dependency > <groupId > org.aspectj</groupId > <artifactId > aspectjweaver</artifactId > <version > 1.9.9.1</version > </dependency >
② 创建目标接口和目标类(内部有切点)
目标接口
package com.ganga.aop;public interface TargetInterface { void sell1 () ; int sell2 (String name,int age) ; int sell3 (String name,int age) ; }
目标类
package com.ganga.aop;public class Target implements TargetInterface { @Override public void sell1 () { System.out.println("目标方法执行。。。" ); } @Override public int sell2 (String name,int age) { System.out.println("姓名: " + name); System.out.println("年龄: " + age); return age; } @Override public int sell3 (String name, int age) { System.out.println("姓名: " + name); System.out.println("年龄: " + age); int i = 1 /0 ; return age; } }
③ 创建切面类(内部有增强方法)
package com.ganga.aop;import org.aspectj.lang.ProceedingJoinPoint;public class MyAdvice { public void before () { System.out.println("前置增强..." ); } public void afterReturning () { System.out.println("后置增强..." ); } public Object around (ProceedingJoinPoint pjp) throws Throwable { System.out.println("环绕前增强...." ); Object proceed = pjp.proceed(); System.out.println("环绕后增强...." ); return proceed; } public void throwing () { System.out.println("异常抛出后增强..." ); } public void after () { System.out.println("最终增强...." ); } }
④ 将目标类和切面类的对象创建权交给 spring
⑤ 在 applicationContext.xml 中配置织入关系
<?xml version="1.0" encoding="UTF-8" ?> <beans xmlns ="http://www.springframework.org/schema/beans" xmlns:aop ="http://www.springframework.org/schema/aop" xmlns:xsi ="http://www.w3.org/2001/XMLSchema-instance" xsi:schemaLocation = "http://www.springframework.org/schema/beans http://www.springframework.org/schema/beans/spring-beans.xsd http://www.springframework.org/schema/aop http://www.springframework.org/schema/aop/spring-aop.xsd " > <bean id ="target" class ="com.ganga.aop.Target" /> <bean id ="myAdvice" class ="com.ganga.aop.MyAdvice" /> <aop:config > <aop:aspect ref ="myAdvice" > <aop:before method ="before" pointcut ="execution(public void com.ganga.aop.Target.sell1())" /> <aop:after-returning method ="afterReturning" pointcut ="execution(public void com.ganga.aop.Target.sell1())" /> <aop:before method ="before" pointcut ="execution(* com.ganga.aop.Target.sell2(String,int))" /> <aop:before method ="before" pointcut ="execution(* com.ganga.aop..*.sell3(..))" /> <aop:pointcut id ="pointcutSell3" expression ="execution(* com.ganga.aop..*.sell3(..))" /> <aop:around method ="around" pointcut-ref ="pointcutSell3" /> <aop:after-throwing method ="throwing" pointcut-ref ="pointcutSell3" /> <aop:after method ="after" pointcut-ref ="pointcutSell3" /> </aop:aspect > </aop:config > </beans >
⑥ 测试代码
package com.ganga.aop;import org.junit.Test;import org.junit.runner.RunWith;import org.springframework.beans.factory.annotation.Autowired;import org.springframework.test.context.ContextConfiguration;import org.springframework.test.context.junit4.SpringJUnit4ClassRunner;@RunWith(SpringJUnit4ClassRunner.class) @ContextConfiguration("classpath:applicationContext.xml") public class TestAOP { @Autowired private TargetInterface target; @Test public void testTarget () { System.out.println("=============" ); target.sell1(); System.out.println("=============" ); } @Test public void testPointcut1 () { int age = target.sell2("尴尬" , 9 ); System.out.println(age); } @Test public void testPointcut2 () throws InterruptedException { int age = target.sell3("尴尬酱" ,9 ); System.out.println(age); } }
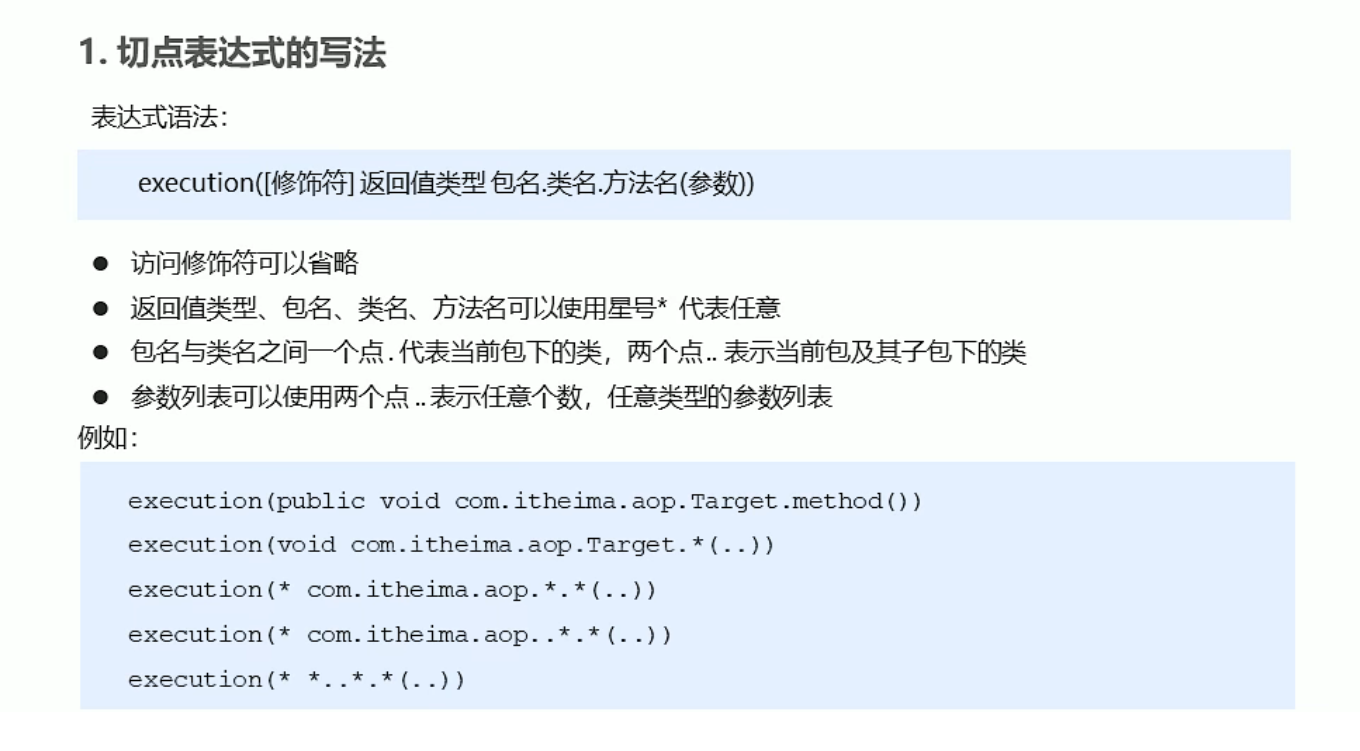
切点表达式
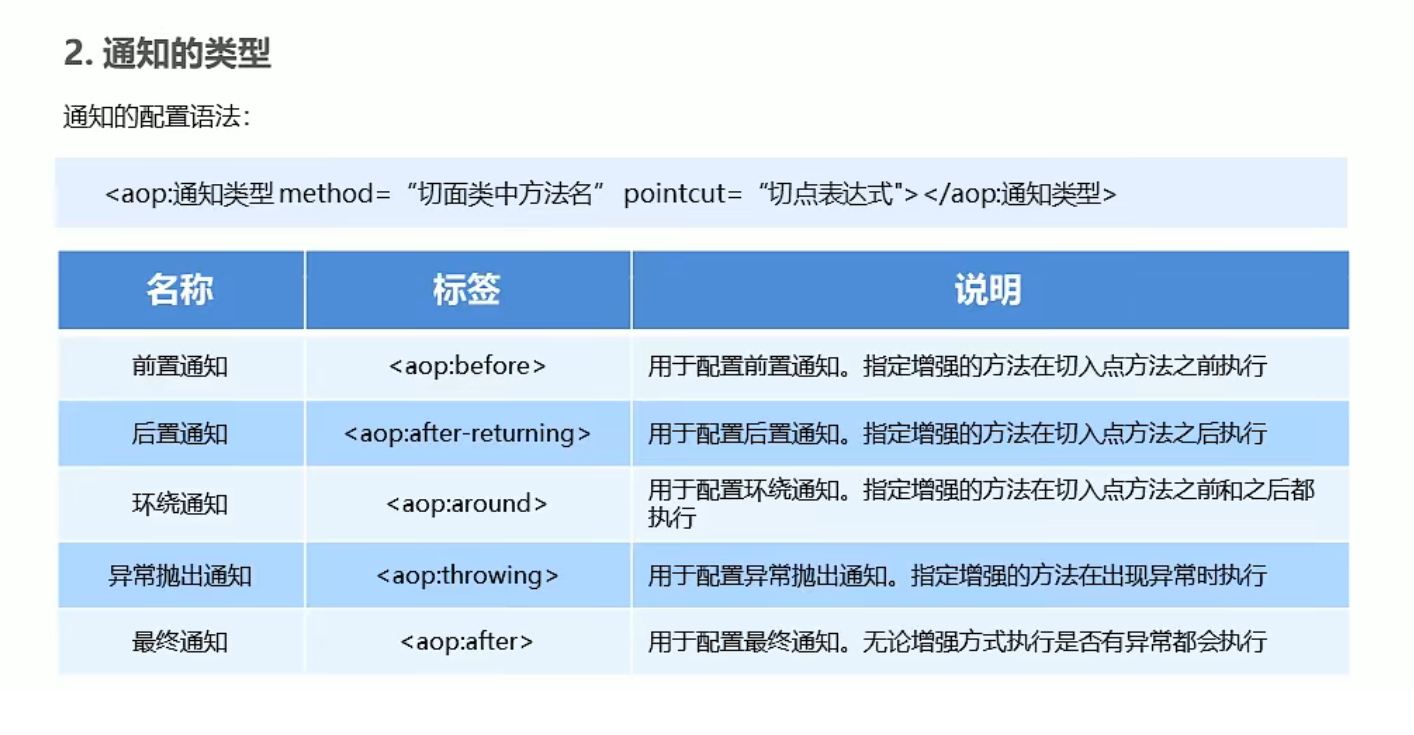
通知的类型
其中 环绕通知比较特殊:
需要参数: ProceedingJoninPoint
调用proceed()方法 并返回一个对象 也是目标对象的返回
public Object around (ProceedingJoinPoint pjp) throws Throwable { System.out.println("环绕前增强...." ); Object proceed = pjp.proceed(); System.out.println("环绕后增强...." ); return proceed; }
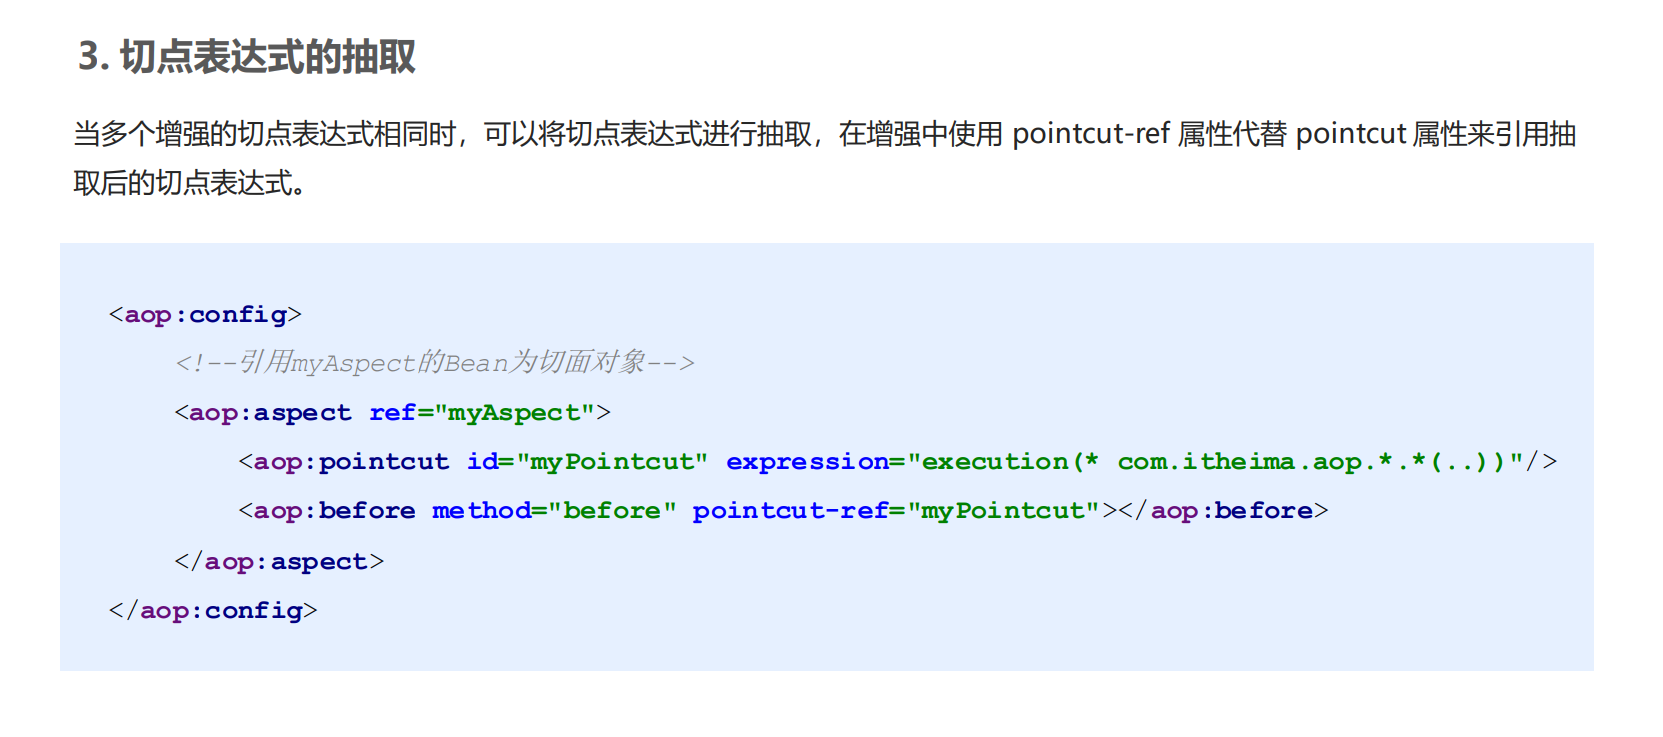
切点表达式的抽取
知识要点
Spring的事务控制 编程式事务控制 编程式事务控制相关对象
编程式事务控制三大对象
**PlatformTransactionManager [接口] 平台事务管理器 **
视频
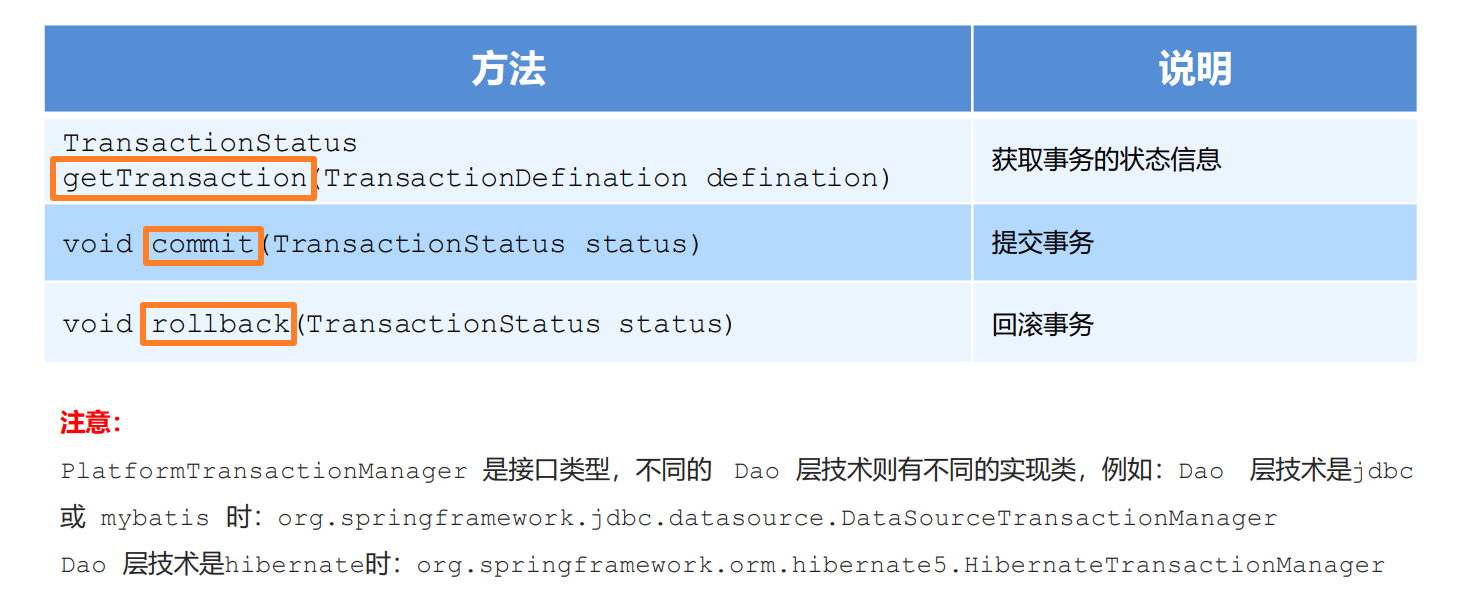
PlatformTransactionManager 接口是 spring 的事务管理器,它里面提供了我们常用的操作事务的方法。
TransactionDefinition 事务的定义信息对象
视频
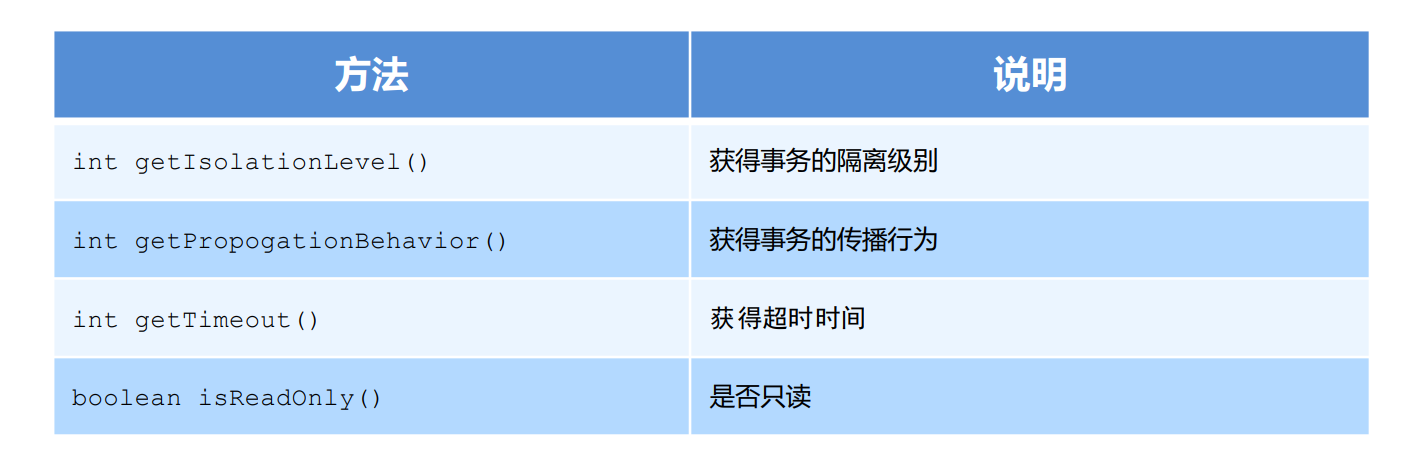
TransactionDefinition 是事务的定义信息对象,里面有如下方法:
事务隔离级别:
设置隔离级别,可以解决事务并发产生的问题,如脏读 、不可重复读 和虚读 。
事务传播行为:
**REQUIRED:如果当前没有事务,就新建一个事务,如果已经存在一个事务中,加入到这个事务中。一般的选择(默认值) **
**SUPPORTS:支持当前事务,如果当前没有事务,就以非事务方式执行(没有事务) **
MANDATORY :使用当前的事务,如果当前没有事务,就抛出异常
REQUERS_NEW :新建事务,如果当前在事务中,把当前事务挂起。
NOT_SUPPORTED :以非事务方式执行操作,如果当前存在事务,就把当前事务挂起
NEVER :以非事务方式运行,如果当前存在事务,抛出异常
NESTED :如果当前存在事务,则在嵌套事务内执行。如果当前没有事务,则执行 REQUIRED 类似的操作
超时时间
是否只读 :建议查询时设置为只读
TransactionStatus [接口] 事务的运行状态
TransactionStatus 接口提供的是事务具体的运行状态,方法介绍如下。
三者之间的关系
1. PlatformTransactionManager
接口 定义行为 接口的实现根据不同的dao层技术不同的api进行实现的
2. TransactionDefinition
封装事务的参数的
3. TransactionStatus
被动的封装事务的状态信息的
1和2是是要具体设置的 如果用Spring的 声明式事务控制 是需要配置的
而3是 1和2配置后,事务运行状态发生被动的封装事务的状态信息的,是不需要配置的
声明式事务控制 什么是声明式事务控制:
Spring 的声明式事务顾名思义就是采用声明的方式来处理事务 。这里所说的声明,就是指在配置文件中声明 ,用在 Spring 配置文件中声明式的处理事务来代替代码式的处理事务。
声明式事务处理的作用:
事务管理不侵入开发的组件。具体来说,业务逻辑对象就不会意识到正在事务管理之中,事实上也应该如 此,因为事务管理是属于系统层面的服务,而不是业务逻辑的一部分,如果想要改变事务管理策划的话, 也只需要在定义文件中重新配置即可
在不需要事务管理的时候,只要在设定文件上修改一下,即可移去事务管理服务,无需改变代码重新编译 ,这样维护起来极其方便
织入: 切面: 业务方法 –> 切点 + 事务控制 –>通知/增强
注意: Spring 声明式事务控制底层就是AOP。
基于XML的声明式事务控制 先看一下代码:
Dao层
package com.ganga.dao;public interface TransferDao { void out (String user,double money) ; void in (String user,double money) ; }
package com.ganga.dao.impl;import com.ganga.dao.TransferDao;import org.springframework.jdbc.core.JdbcTemplate;public class TransferDaoImpl implements TransferDao { private JdbcTemplate jdbcTemplate; public void setJdbcTemplate (JdbcTemplate jdbcTemplate) { this .jdbcTemplate = jdbcTemplate; } @Override public void out (String user, double money) { jdbcTemplate.update("update account set money = money-? where user = ?;" ,money,user); } @Override public void in (String user, double money) { jdbcTemplate.update("update account set money = money+? where user = ?;" ,money,user); } }
service层
package com.ganga.service;public interface TransferService { public void transfer (String outMan,String inMan,double money) ; }
package com.ganga.service.impl;import com.ganga.dao.TransferDao;import com.ganga.service.TransferService;public class TransferServiceImpl implements TransferService { private TransferDao transferDao; public void setTransferDao (TransferDao transferDao) { this .transferDao = transferDao; } @Override public void transfer (String outMan, String inMan, double money) { transferDao.out(outMan,money); System.out.println("======" ); int i = 1 /0 ; transferDao.in(inMan,money); } }
模拟controller层/服务层
package com.ganga.controller;import com.ganga.service.TransferService;import org.springframework.context.ApplicationContext;import org.springframework.context.support.ClassPathXmlApplicationContext;public class TransferController { public static void main (String[] args) { ApplicationContext app = new ClassPathXmlApplicationContext ("applicationContext.xml" ); TransferService transfer = app.getBean(TransferService.class); transfer.transfer("ganga" ,"gangajiang" ,1 ); } }
基于XML声明式事务控制的实现分析:
声明式事务控制明确事项:
切点是谁? —— 业务方法
谁是通知? —— 事务增强
配置切面? —— 事务增强+业务方法
spring-tx坐标导入
<dependency > <groupId > org.springframework</groupId > <artifactId > spring-jdbc</artifactId > <version > 5.3.18</version > </dependency > <dependency > <groupId > org.springframework</groupId > <artifactId > spring-tx</artifactId > <version > 5.3.18</version > </dependency >
applicationContext.xml的配置
<?xml version="1.0" encoding="UTF-8" ?> <beans xmlns ="http://www.springframework.org/schema/beans" xmlns:context ="http://www.springframework.org/schema/context" xmlns:aop ="http://www.springframework.org/schema/aop" xmlns:tx ="http://www.springframework.org/schema/tx" xmlns:xsi ="http://www.w3.org/2001/XMLSchema-instance" xsi:schemaLocation = "http://www.springframework.org/schema/beans http://www.springframework.org/schema/beans/spring-beans.xsd http://www.springframework.org/schema/context http://www.springframework.org/schema/context/spring-context.xsd http://www.springframework.org/schema/aop http://www.springframework.org/schema/aop/spring-aop.xsd http://www.springframework.org/schema/tx http://www.springframework.org/schema/tx/spring-tx.xsd " > <context:property-placeholder location ="classpath:jdbc.properties" /> <bean id ="dataSource" class ="com.mchange.v2.c3p0.ComboPooledDataSource" > <property name ="driverClass" value ="${jdbc.driverClass}" /> <property name ="jdbcUrl" value ="${jdbc.url}" /> <property name ="user" value ="${jdbc.user}" /> <property name ="password" value ="${jdbc.password}" /> </bean > <bean id ="jdbcTemplate" class ="org.springframework.jdbc.core.JdbcTemplate" > <property name ="dataSource" ref ="dataSource" /> </bean > <bean id ="transferDao" class ="com.ganga.dao.impl.TransferDaoImpl" > <property name ="jdbcTemplate" ref ="jdbcTemplate" /> </bean > <bean id ="transferServlet" class ="com.ganga.service.impl.TransferServiceImpl" > <property name ="transferDao" ref ="transferDao" /> </bean > <bean id ="transactionManager" class ="org.springframework.jdbc.datasource.DataSourceTransactionManager" > <property name ="dataSource" ref ="dataSource" /> </bean > <tx:advice id ="txAdvice" transaction-manager ="transactionManager" > <tx:attributes > <tx:method name ="transfer" isolation ="REPEATABLE_READ" propagation ="REQUIRED" timeout ="-1" read-only ="false" /> <tx:method name ="sell" isolation ="REPEATABLE_READ" propagation ="REQUIRED" timeout ="-1" read-only ="false" /> <tx:method name ="update*" isolation ="REPEATABLE_READ" propagation ="REQUIRED" timeout ="-1" read-only ="false" /> </tx:attributes > </tx:advice > <aop:config > <aop:advisor advice-ref ="txAdvice" pointcut ="execution(* com.ganga.service.impl..*.*(..))" /> </aop:config > </beans >
<tx:method>的相关属性
基于XML实现要点:
① 引入tx 和 aop命名空间
② 配置平台事务管理器
<bean id ="transactionManager" class ="org.springframework.jdbc.datasource.DataSourceTransactionManager" > <property name ="dataSource" ref ="dataSource" /> </bean >
③ 配置事务增强
<tx:advice id ="txAdvice" transaction-manager ="transactionManager" > <tx:attributes > <tx:method name ="transfer" isolation ="REPEATABLE_READ" propagation ="REQUIRED" timeout ="-1" read-only ="false" /> <tx:method name ="sell" isolation ="REPEATABLE_READ" propagation ="REQUIRED" timeout ="-1" read-only ="false" /> </tx:attributes > </tx:advice >
④ 配置事务 AOP 织入
<aop:config > <aop:advisor advice-ref ="txAdvice" pointcut ="execution(切点表达式)" /> </aop:config >
基于注解的声明式事务控制 ① 使用 **@Transactional **在需要进行事务控制的类或是方法上修饰,注解可用的属性同 xml 配置方式,例如隔离 级别、传播行为等。
② 注解使用在类上,那么该类下的所有方法都使用同一套注解参数配置。
③ 使用在方法上,不同的方法可以采用不同的事务参数配置。
④ Xml配置文件中要开启事务的注解驱动**<tx:annotation-driven />**
注解: @Transationall
Service
package com.ganga.service.impl;import com.ganga.dao.TransferDao;import com.ganga.service.TransferService;import org.springframework.beans.factory.annotation.Autowired;import org.springframework.stereotype.Service;import org.springframework.transaction.annotation.Isolation;import org.springframework.transaction.annotation.Propagation;import org.springframework.transaction.annotation.Transactional;@Service @Transactional(isolation=Isolation.REPEATABLE_READ, propagation = Propagation.REQUIRED, timeout = -1, readOnly = false) public class TransferServiceImpl implements TransferService { @Autowired private TransferDao transferDao; @Override @Transactional(isolation=Isolation.REPEATABLE_READ, propagation = Propagation.REQUIRED, timeout = -1, readOnly = false) public void transfer (String outMan, String inMan, double money) { transferDao.out(outMan,money); System.out.println("======" ); int i = 1 /0 ; transferDao.in(inMan,money); } }
事务注解驱动
applicationContext.xml
<bean id ="transactionManager" class ="org.springframework.jdbc.datasource.DataSourceTransactionManager" > <property name ="dataSource" ref ="dataSource" /> </bean > <tx:annotation-driven transaction-manager ="transactionManager" />
MyBatis框架 – 复习 MyBatis初始化配置
MyBatis官网文档地址: https://mybatis.org/mybatis-3/zh/getting-started.html
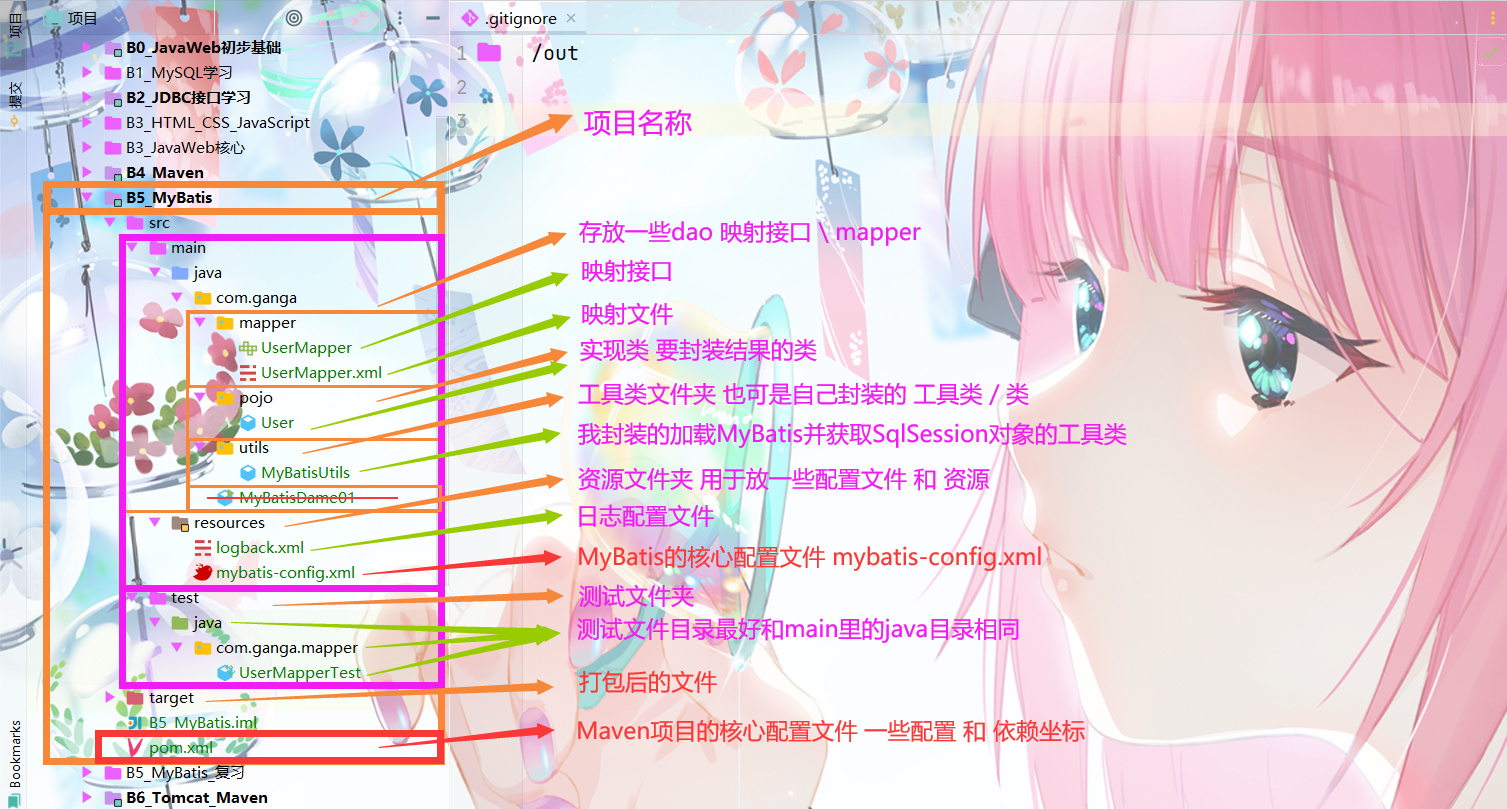
目录结构:
注意: 这个是没有使用Mapper代理开发的目录格式
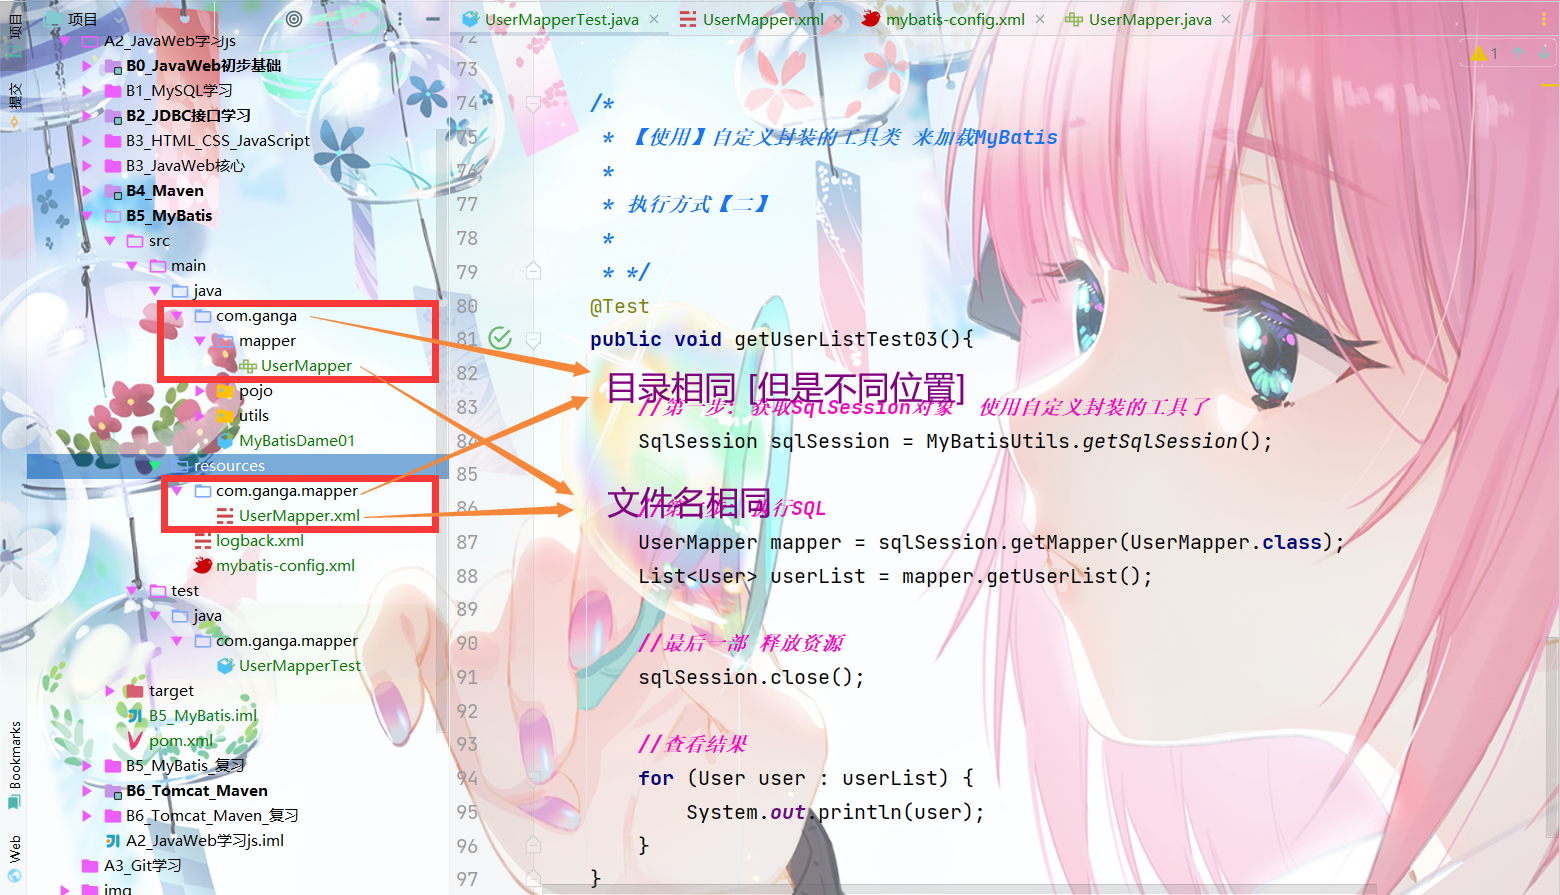
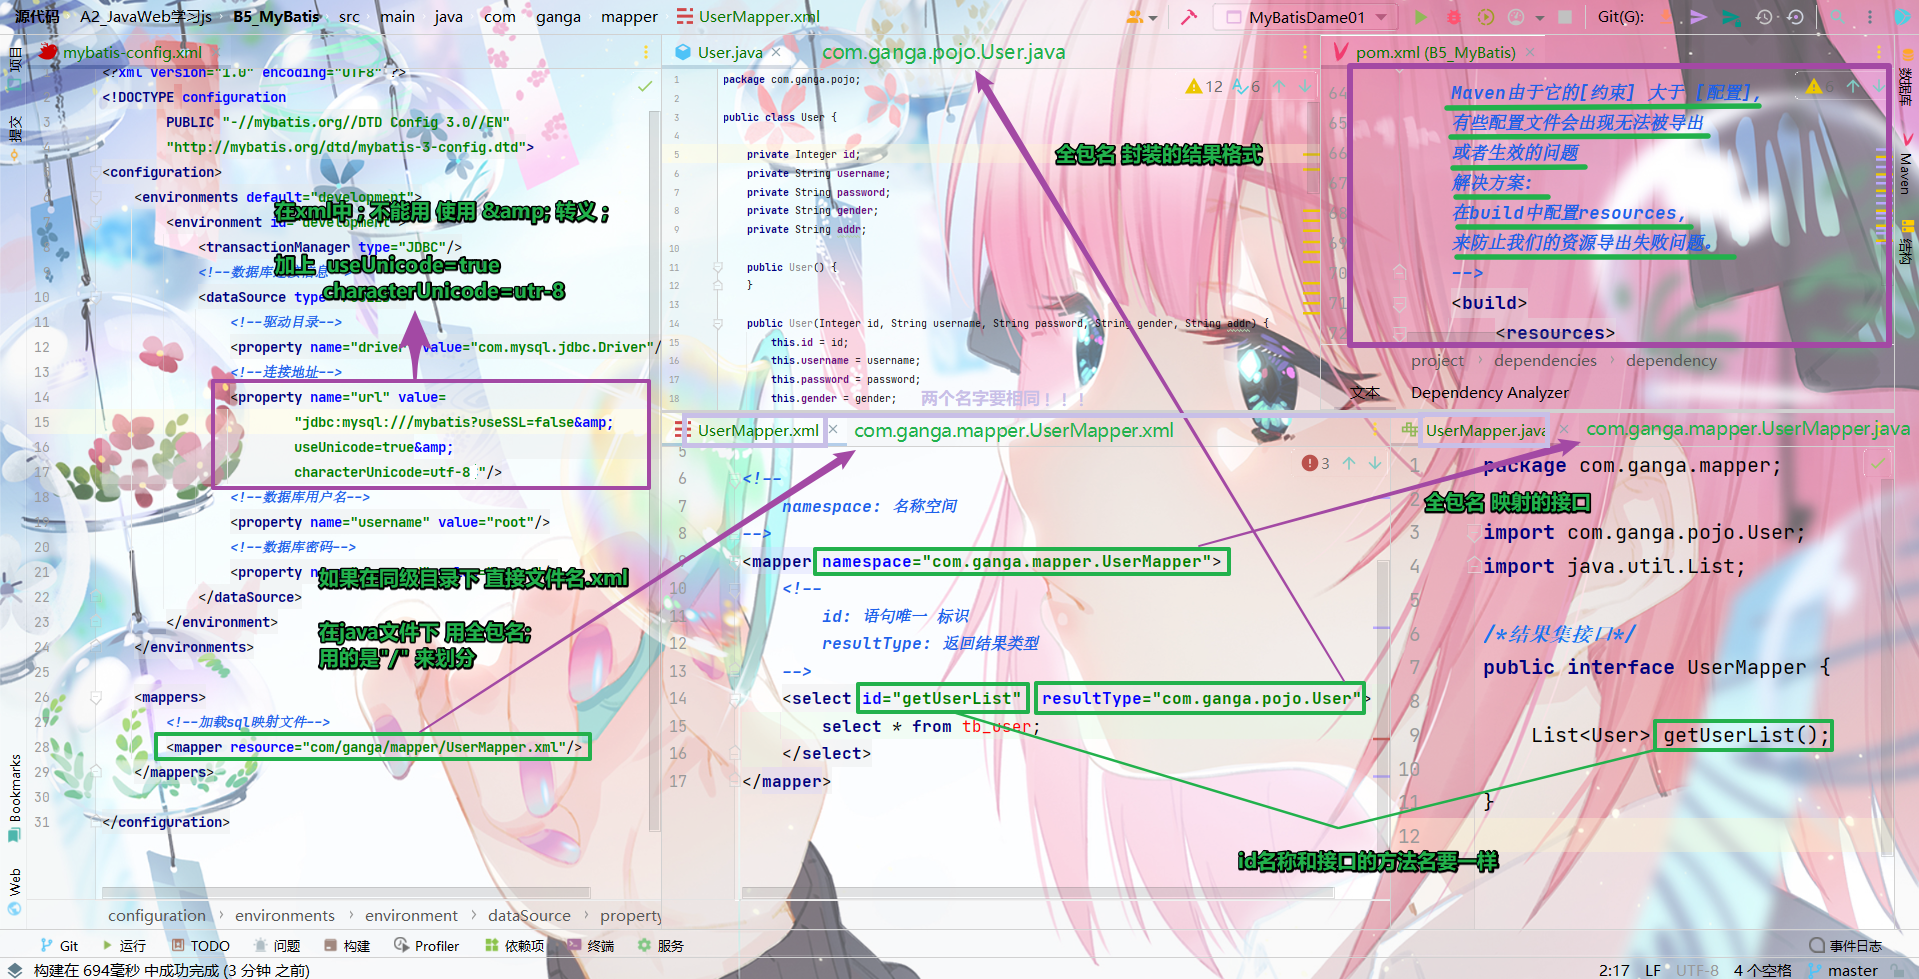
Mapper代理开发目录格式 // 优化格式 将资源配置文件放在 resources当中 但是打包后又刚好和java class文件在同一目录下
pom.xml Maven -> pom.xml核心配置文件
<?xml version="1.0" encoding="UTF-8" ?> <project xmlns ="http://maven.apache.org/POM/4.0.0" xmlns:xsi ="http://www.w3.org/2001/XMLSchema-instance" xsi:schemaLocation ="http://maven.apache.org/POM/4.0.0 http://maven.apache.org/xsd/maven-4.0.0.xsd" > <modelVersion > 4.0.0</modelVersion > <groupId > org.example</groupId > <artifactId > B5_MyBatis</artifactId > <version > 1.0-SNAPSHOT</version > <properties > <maven.compiler.source > 16</maven.compiler.source > <maven.compiler.target > 16</maven.compiler.target > </properties > <dependencies > <dependency > <groupId > org.mybatis</groupId > <artifactId > mybatis</artifactId > <version > 3.4.6</version > </dependency > <dependency > <groupId > mysql</groupId > <artifactId > mysql-connector-java</artifactId > <version > 5.1.46</version > </dependency > <dependency > <groupId > junit</groupId > <artifactId > junit</artifactId > <version > 4.13.1</version > <scope > test</scope > </dependency > <dependency > <groupId > org.slf4j</groupId > <artifactId > slf4j-api</artifactId > <version > 1.7.20</version > </dependency > <dependency > <groupId > ch.qos.logback</groupId > <artifactId > logback-classic</artifactId > <version > 1.2.3</version > </dependency > <dependency > <groupId > ch.qos.logback</groupId > <artifactId > logback-core</artifactId > <version > 1.2.3</version > </dependency > </dependencies > <build > <resources > <resource > <directory > src/main/resources</directory > <includes > <include > **/*.properties</include > <include > **/*.xml</include > </includes > <filtering > false</filtering > </resource > <resource > <directory > src/main/java</directory > <includes > <include > **/*.properties</include > <include > **/*.xml</include > </includes > <filtering > false</filtering > </resource > </resources > </build > </project >
mybatis-config.xml MyBatis -> mybatis-config.xml核心配置文件
<?xml version="1.0" encoding="UTF8" ?> <!DOCTYPE configuration PUBLIC "-//mybatis.org//DTD Config 3.0//EN" "http://mybatis.org/dtd/mybatis-3-config.dtd" > <configuration > <environments default ="development" > <environment id ="development" > <transactionManager type ="JDBC" /> <dataSource type ="POOLED" > <property name ="driver" value ="com.mysql.jdbc.Driver" /> <property name ="url" value ="jdbc:mysql:///数据库名?useSSL=false& useUnicode=true& characterUnicode=utf-8C" /> <property name ="username" value ="" /> <property name ="password" value ="" /> </dataSource > </environment > </environments > <mappers > <package name ="com.ganga.mapper" /> </mappers > </configuration >
XxxMapper.xml模板一 <?xml version="1.0" encoding="UTF-8" ?> <!DOCTYPE mapper PUBLIC "-//mybatis.org//DTD Mapper 3.0//EN" "http://mybatis.org/dtd/mybatis-3-mapper.dtd" > <mapper namespace ="com." > <select id ="" resultType ="" > select * from user; </select > </mapper >
XxxMapper.xml模板二 <?xml version="1.0" encoding="UTF-8" ?> <!DOCTYPE mapper PUBLIC "-//mybatis.org//DTD Mapper 3.0//EN" "http://mybatis.org/dtd/mybatis-3-mapper.dtd" > <mapper namespace ="com.ganga.mapper.BrandMapper" > <resultMap id ="brandResultMap" type ="com" > <result column ="数据库" property ="java类变量" /> </resultMap > <select id ="" resultMap ="brandResultMap" > select * from tb_brand; </select > <select id ="" resultMap ="resultMapId" > select * from tb_brand where id = #{id}; </select > </mapper >
封装获取SqlSessionFactory对象 package com.ganga.util;import org.apache.ibatis.io.Resources;import org.apache.ibatis.session.SqlSession;import org.apache.ibatis.session.SqlSessionFactory;import org.apache.ibatis.session.SqlSessionFactoryBuilder;import java.io.IOException;import java.io.InputStream;public class MyBatisUtils { private static SqlSessionFactory sqlSessionFactory; static { try { String resource = "mybatis-config.xml" ; InputStream inputStream = Resources.getResourceAsStream(resource); sqlSessionFactory = new SqlSessionFactoryBuilder ().build(inputStream); } catch (IOException e) { e.printStackTrace(); } } public static SqlSessionFactory getSqlSessionFactory () { return sqlSessionFactory; } }
相关API 执行方式
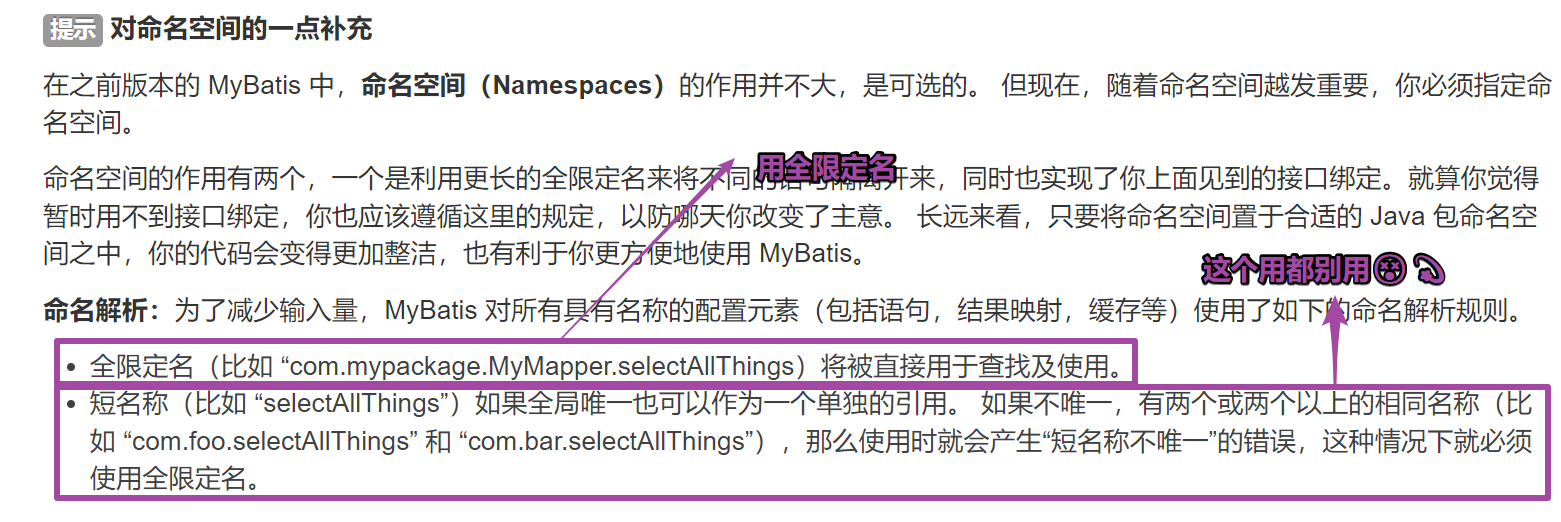
全限定名
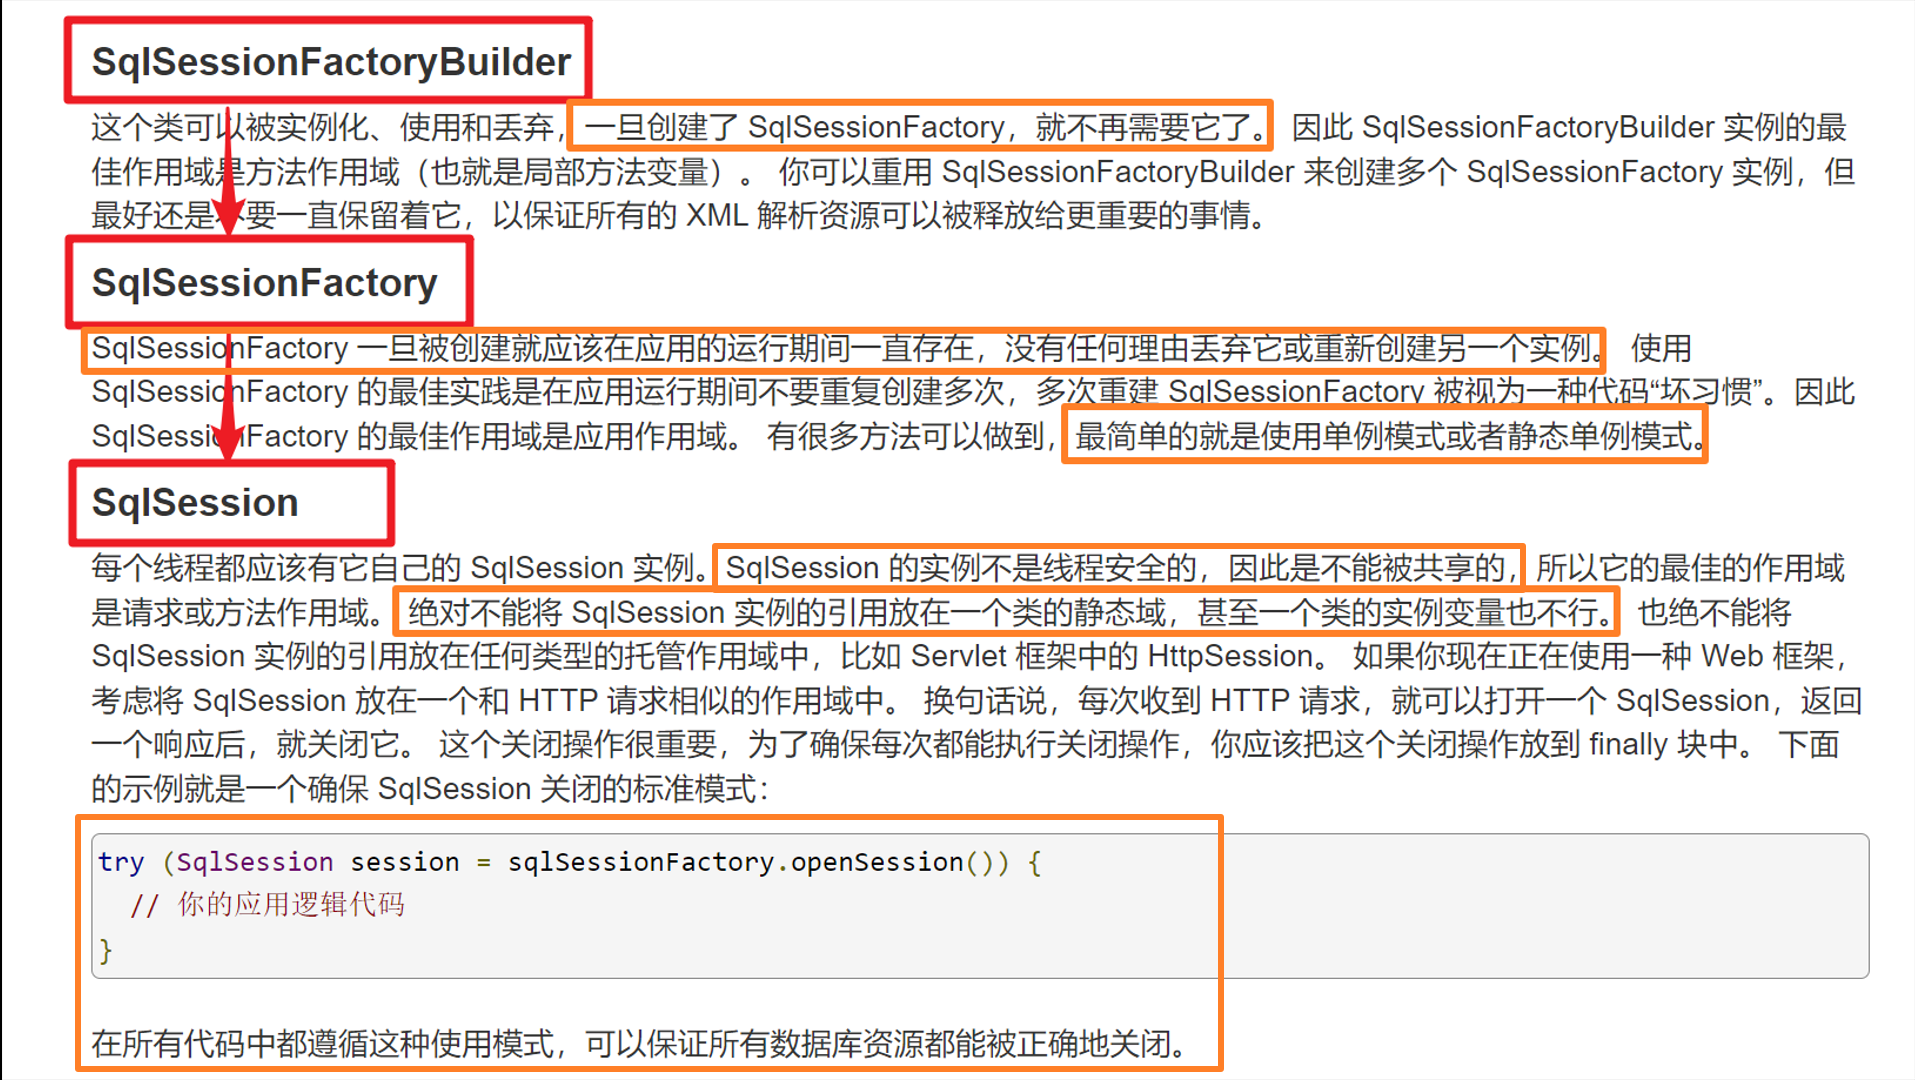
三个核心类
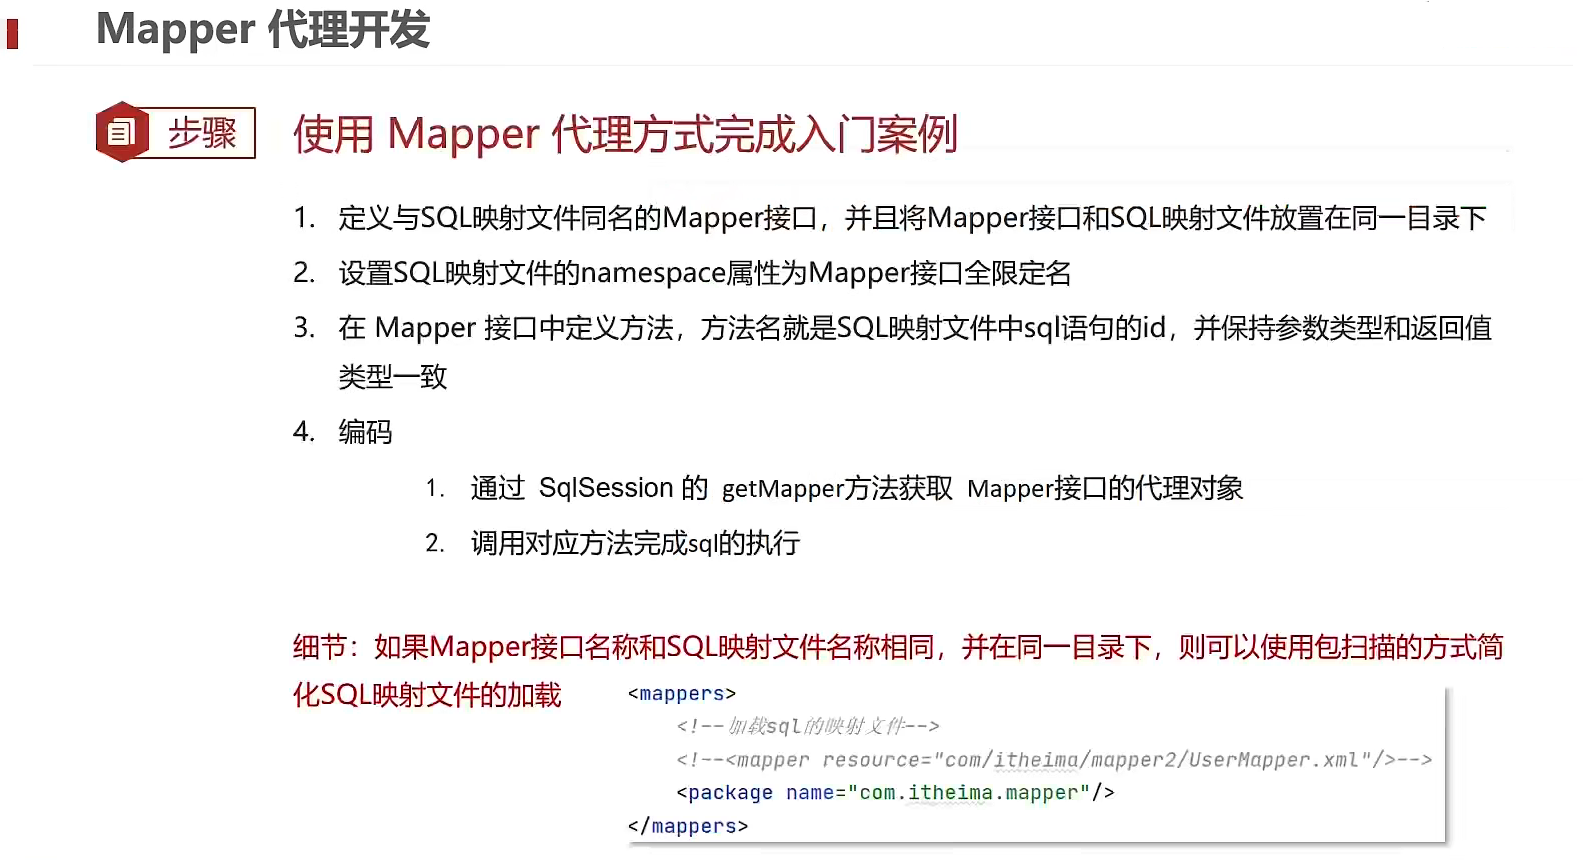
Mapper代理
resultMap 映射 <resultMap id ="brandResultMap" type ="com.ganga.pojo.Brand" > <result column ="brand_name" property ="brandName" /> <result column ="company_name" property ="companyName" /> </resultMap > <select id ="selectAll" resultMap ="brandResultMap" > select * from tb_brand; </select >
参数封装 Mybatis 接口方法中可以接收各种各样的参数,如下:
多个参数
单个参数:单个参数又可以是如下类型
POJO 类型
Map 集合类型
Collection 集合类型
List 集合类型
Array 类型
其他类型
常用的三种: 参数接收方式
散装参数: 如果方法中有多个参数, 需要使用( @Param(“SQL参数占位符名称”)数据类型 参数名称一般和占位符名称相同 )
对象参数: 对象的属性名称要和参数占位符名称一致
map集合参数: Map map = new HashMap(); map.put(“占位符名称”,参数);
散装参数: List<Brand> selectByCondition1 (@Param("status") int status, @Param("companyName") String companyName, @Param("brandName") String brandName) ; int status = 1 ; String companyName = "华为" ; String brandName = "华为" ; companyName = "%" + companyName + "%" ; brandName = "%" + brandName + "%" ; SqlSession sqlSession = MyBatisUtils.getSqlSessionFactory().openSession(); BrandMapper brandMapper = sqlSession.getMapper(BrandMapper.class); List<Brand> brands = brandMapper.selectByCondition1(status, companyName, brandName); sqlSession.close();
对象参数: List<Brand> selectByCondition2 (Brand brand) ; int status = 1 ; String companyName = "华为" ; String brandName = "华为" ; companyName = "%" + companyName + "%" ; brandName = "%" + brandName + "%" ; Brand brand = new Brand (); brand.setStatus(status); brand.setCompanyName(companyName); brand.setBrandName(brandName); SqlSession sqlSession = MyBatisUtils.getSqlSessionFactory().openSession(); BrandMapper brandMapper = sqlSession.getMapper(BrandMapper.class); List<Brand> brands = brandMapper.selectByCondition2(brand); sqlSession.close();
map集合参数: List<Brand> selectByCondition3 (Map map) ; int status = 1 ; String companyName = "华为" ; String brandName = "华为" ; companyName = "%" + companyName + "%" ; brandName = "%" + brandName + "%" ; Map map = new HashMap (); map.put("status" ,status); map.put("companyName" ,companyName); map.put("brandName" ,brandName); SqlSession sqlSession = MyBatisUtils.getSqlSessionFactory().openSession(); BrandMapper brandMapper = sqlSession.getMapper(BrandMapper.class); List<Brand> brands = brandMapper.selectByCondition3(map); sqlSession.close();
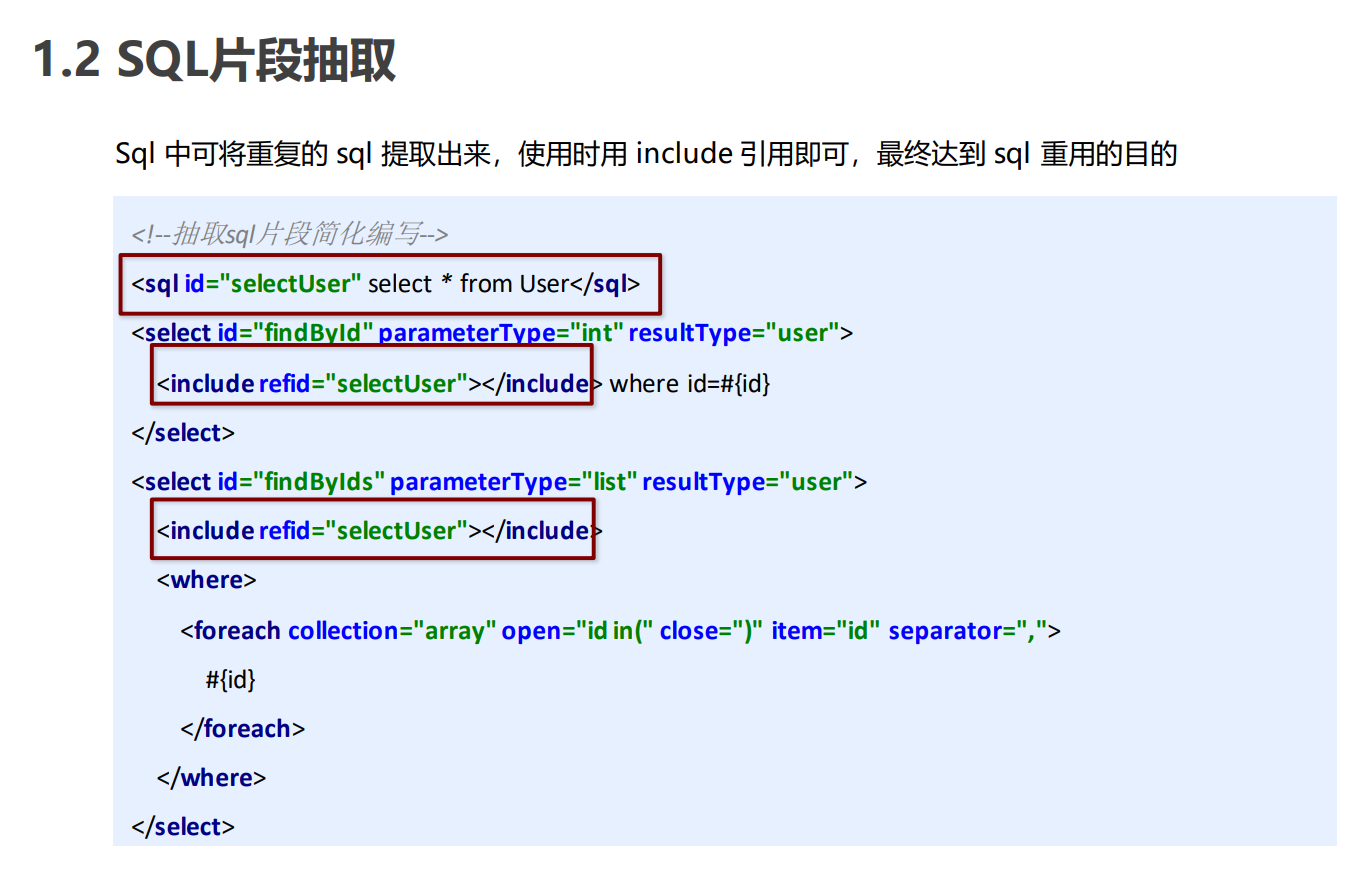
提取Sql片段
动态SQL 动态查询
<select id ="selectDynamicSQL03" resultMap ="brandResultMap" > select * from tb_brand <where > <if test ="status != null" > status = #{status} </if > <if test ="companyName != null and companyName != ''" > and company_name like #{companyName} </if > <if test ="brandName != null and brandName != ''" > and brand_name like #{brandName}; </if > </where > </select > <select id ="selectDynamicSQL001" resultMap ="brandResultMap" > select * from tb_brand where <choose > <when test ="status != null" > status = #{status} </when > <when test ="companyName != null and companyName != ''" > company_name like #{companyName} </when > <when test ="brandName != null and brandName != ''" > brand_name like #{brandName}; </when > <otherwise > 1 = 1 </otherwise > </choose > </select > <select id ="selectDynamicSQL002" resultMap ="brandResultMap" > select * from tb_brand <where > <choose > <when test ="status != null" > status = #{status} </when > <when test ="companyName != null and companyName != ''" > company_name like #{companyName} </when > <when test ="brandName != null and brandName != ''" > brand_name like #{brandName}; </when > </choose > </where > </select >
动态修改
<update id ="updateBrandDynamic" > update tb_brand <set > <if test ="brandName != null and brandName != ''" > brand_name = #{brandName}, </if > <if test ="companyName != null and companyName != ''" > company_name = #{companyName}, </if > <if test ="ordered != null" > ordered = #{ordered}, </if > <if test ="description != null and description != ''" > description = #{description}, </if > <if test ="status != null" > status = #{status} </if > </set > where id = #{id}; </update >
动态删除
<delete id ="deleteByIdAll" > delete from tb_brand where id in <foreach collection ="ids" item ="id" separator ="," open ="(" close =")" > #{id} </foreach > </delete >
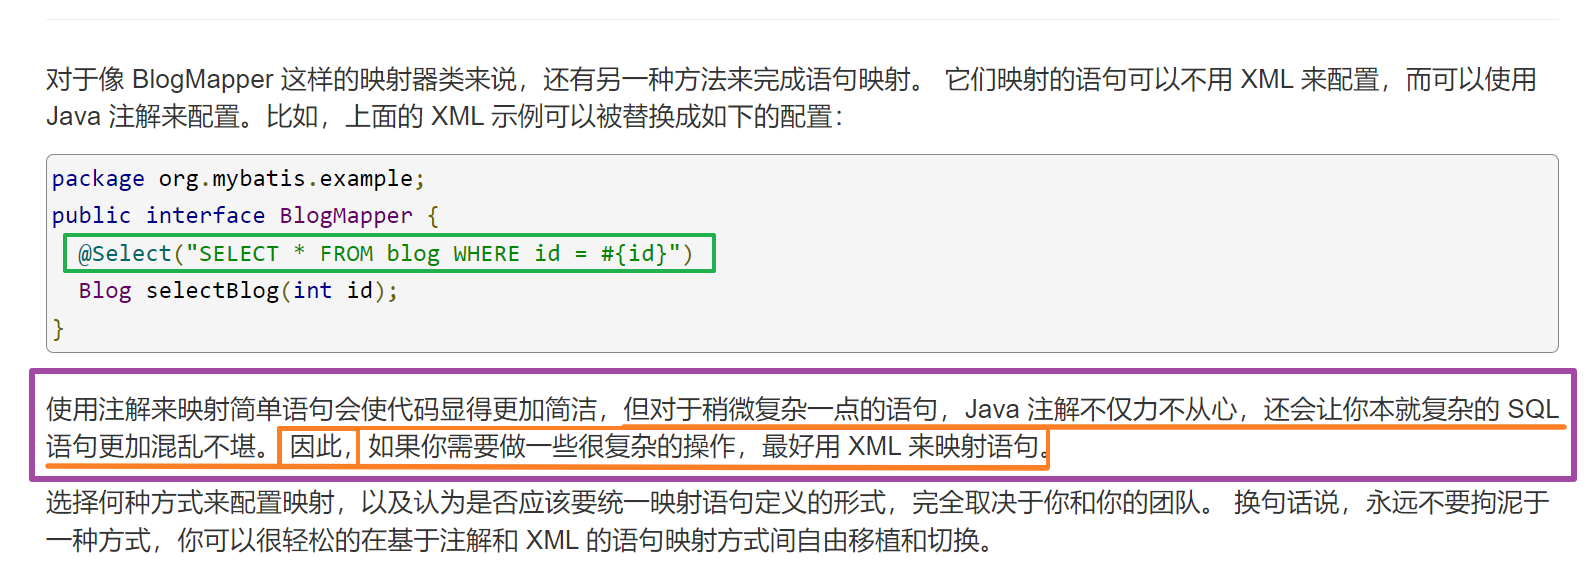
注解开发 Mybatis 针对 CURD 操作都提供了对应的注解,已经做到见名知意。如下:
查询 :@Select
添加 :@Insert
修改 :@Update
删除 :@Delete
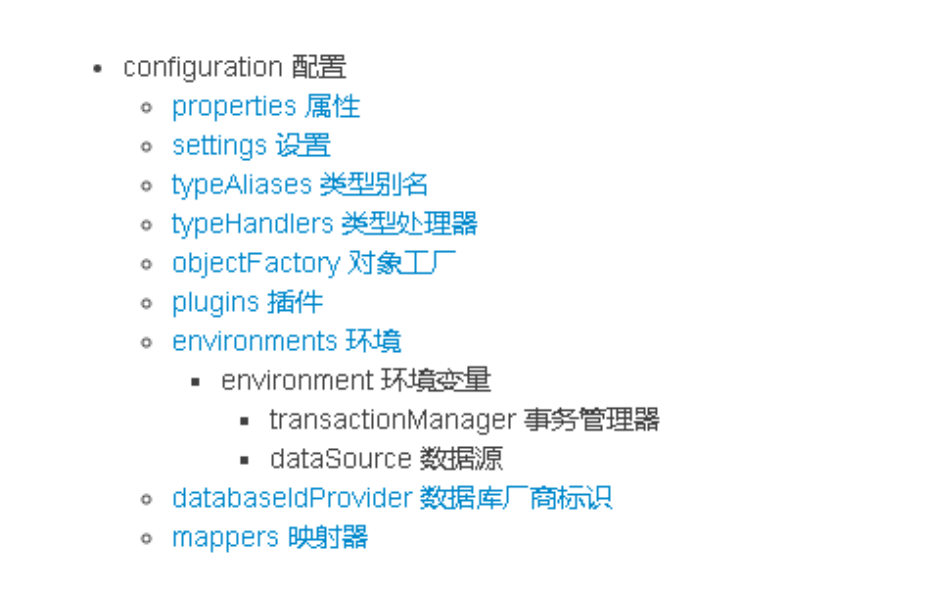
MyBatis核心配置文件深入
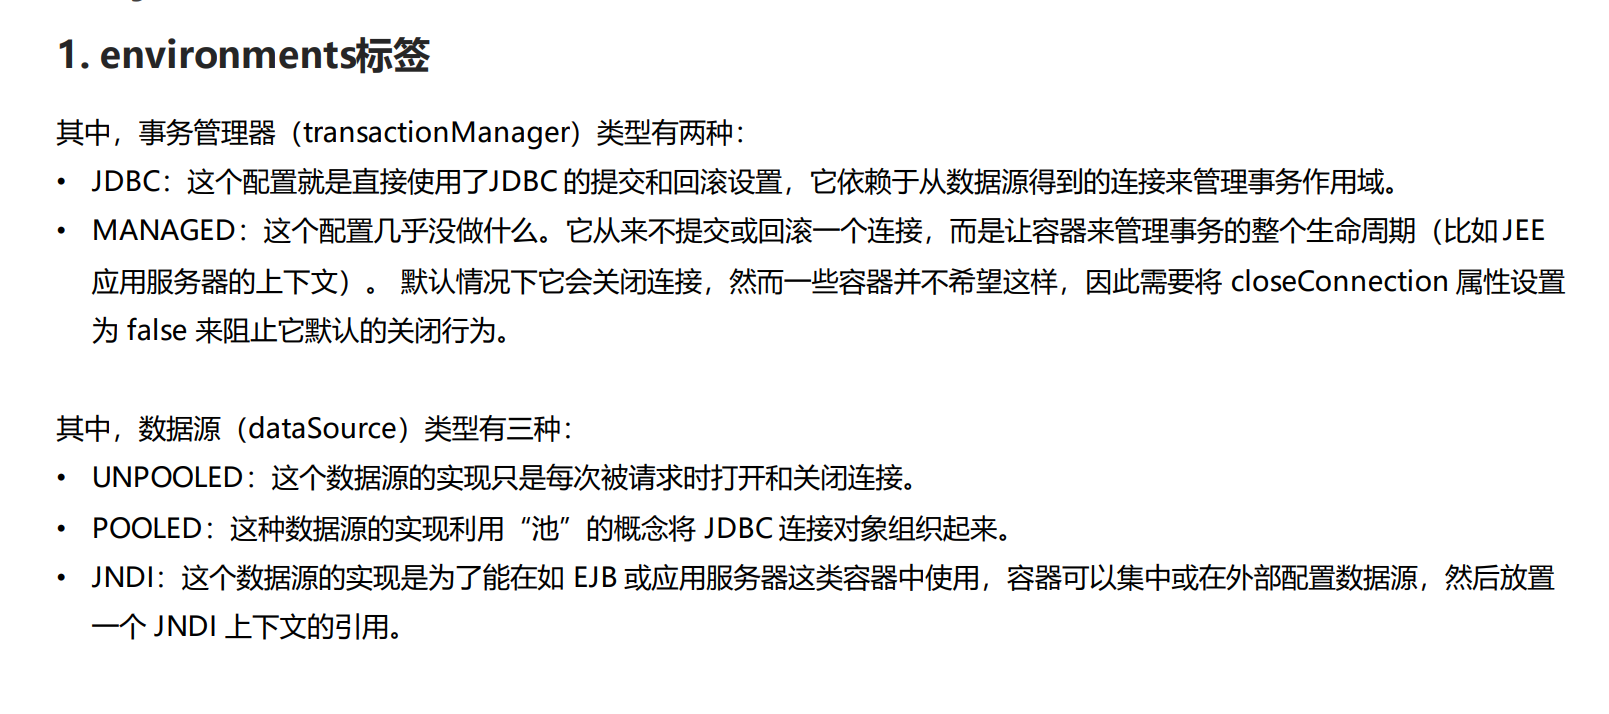
environments标签
<environments default ="development" > <environment id ="development" > <transactionManager type ="JDBC" /> <dataSource type ="POOLED" > <property name ="driver" value ="" /> <property name ="url" value ="" /> <property name ="username" value ="" /> <property name ="password" value ="" /> </dataSource > </environment > </environments >
mapper标签 该标签的作用是加载映射的,加载方式有如下几种:
使用相对于类路径的资源引用 ,例如:
<mapper resource="org/mybatis/builder/AuthorMapper.xml"/>
使用完全限定资源定位符(URL) ,例如:
<mapper url="file:///var/mappers/AuthorMapper.xml"/>
使用映射器接口实现类的完全限定类名 ,例如:
<mapper class="org.mybatis.builder.AuthorMapper"/>
将包内的映射器接口实现全部注册为映射器 ,例如:
<package name="org.mybatis.builder"/>
Properties标签 实际开发中,习惯将数据源的配置信息单独抽取成一个properties文件,该标签可以加载额外配置的properties文件 — 使用el表达式
<properties resource ="jdbc.properties" > </properties > <environments default ="development" > <environment id ="development" > <transactionManager type ="JDBC" /> <dataSource type ="POOLED" > <property name ="driver" value ="${jdbc.driverClass}" /> <property name ="url" value ="${jdbc.url}" /> <property name ="username" value ="${jdbc.user}" /> <property name ="password" value ="${jdbc.password}" /> </dataSource > </environment > </environments >
jdbc.driverClass =com.mysql.jdbc.Driver jdbc.url =jdbc:mysql:///webcase?useSSL=false&useServerPrepStmts=true jdbc.user =root jdbc.password =ganga
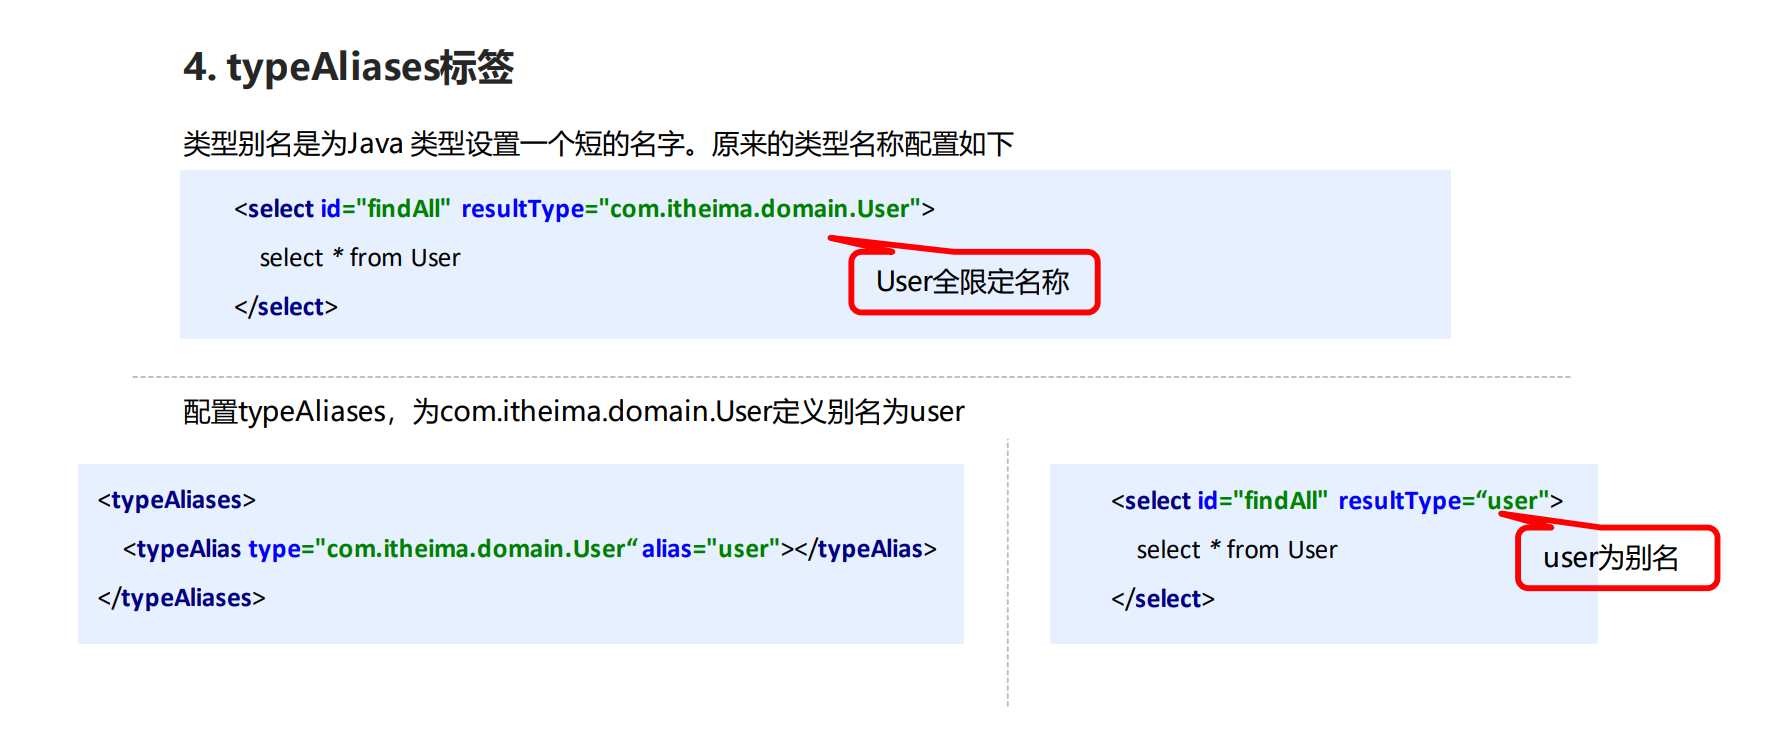
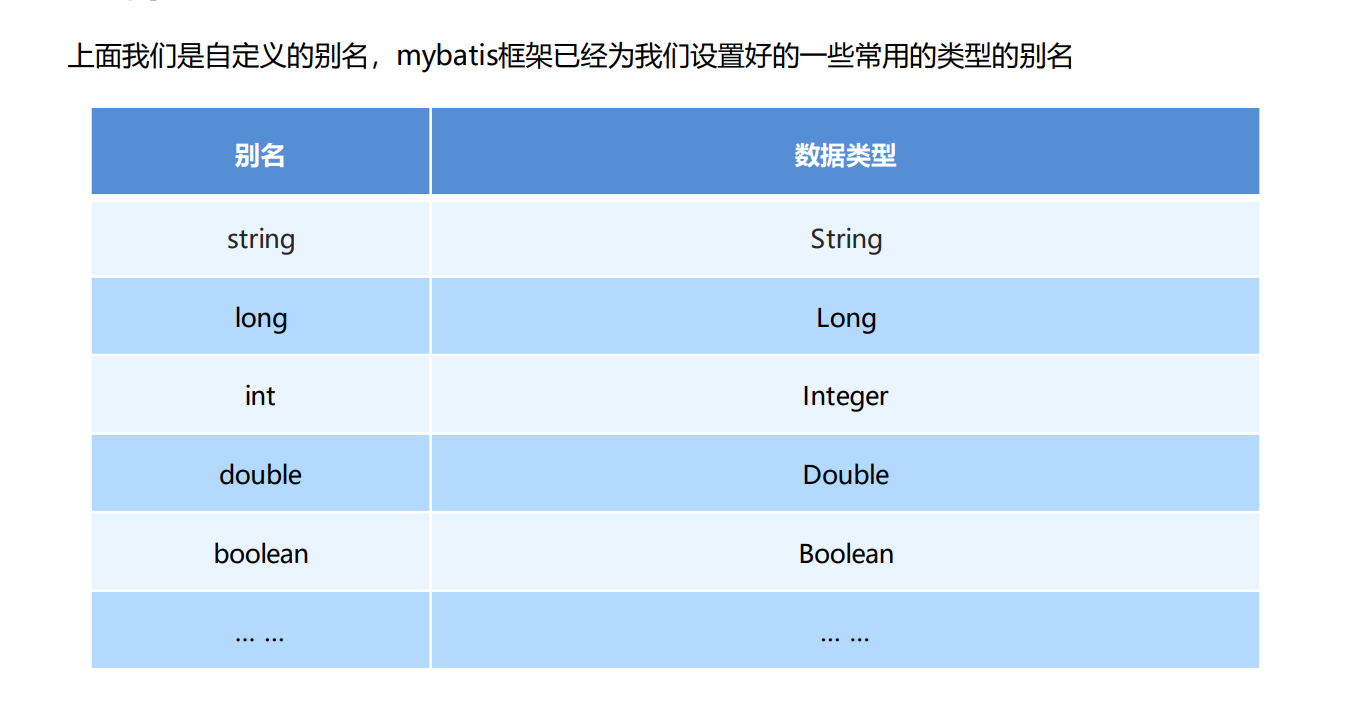
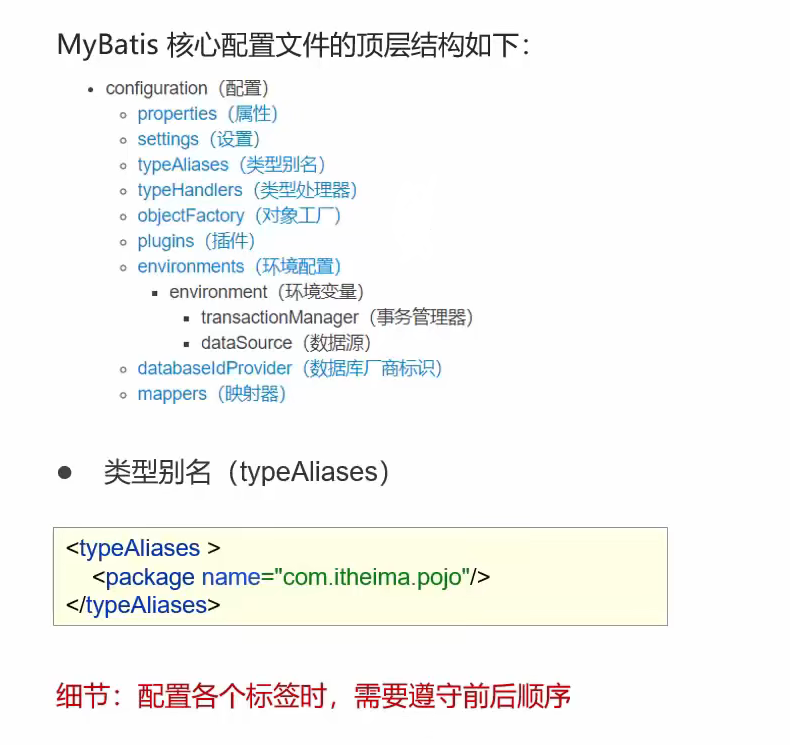
typeAliases标签
综合演示 mybatis-config.xml <?xml version="1.0" encoding="UTF8" ?> <!DOCTYPE configuration PUBLIC "-//mybatis.org//DTD Config 3.0//EN" "http://mybatis.org/dtd/mybatis-3-config.dtd" > <configuration > <environments default ="development" > <environment id ="development" > <transactionManager type ="JDBC" /> <dataSource type ="POOLED" > <property name ="driver" value ="com.mysql.jdbc.Driver" /> <property name ="url" value ="jdbc:mysql:///webcase?useSSL=false& useUnicode=true& characterUnicode=utf-8C" /> <property name ="username" value ="root" /> <property name ="password" value ="ganga" /> </dataSource > </environment > </environments > <mappers > <package name ="com.ganga.mapper" /> </mappers > </configuration >
MyBatisUtils.java package com.ganga.util;import org.apache.ibatis.io.Resources;import org.apache.ibatis.session.SqlSessionFactory;import org.apache.ibatis.session.SqlSessionFactoryBuilder;import java.io.IOException;import java.io.InputStream;public class MyBatisUtils { private static SqlSessionFactory sqlSessionFactory; static { try { String resource = "mybatis-config.xml" ; InputStream inputStream = Resources.getResourceAsStream(resource); sqlSessionFactory = new SqlSessionFactoryBuilder ().build(inputStream); } catch (IOException e) { e.printStackTrace(); } } public static SqlSessionFactory getSqlSessionFactory () { return sqlSessionFactory; } }
UserMapper.xml <?xml version="1.0" encoding="UTF-8" ?> <!DOCTYPE mapper PUBLIC "-//mybatis.org//DTD Mapper 3.0//EN" "http://mybatis.org/dtd/mybatis-3-mapper.dtd" > <mapper namespace ="com.ganga.mapper.BrandMapper" > <resultMap id ="brandResultMap" type ="com.ganga.pojo.Brand" > <result column ="brand_name" property ="brandName" /> <result column ="company_name" property ="companyName" /> </resultMap > <select id ="selectAll" resultMap ="brandResultMap" > select * from tb_brand; </select > <select id ="selectById" resultMap ="brandResultMap" > select * from tb_brand where id = #{id}; </select > <select id ="selectByOrdered" resultMap ="brandResultMap" > select * from tb_brand where ordered > = 50; </select > <select id ="selectByCondition1" resultMap ="brandResultMap" > select * from tb_brand where status = #{status} and company_name like #{companyName} and brand_name like #{brandName}; </select > <select id ="selectByCondition2" resultMap ="brandResultMap" > select * from tb_brand where status = #{status} and company_name like #{companyName} and brand_name like #{brandName}; </select > <select id ="selectByCondition3" resultMap ="brandResultMap" > select * from tb_brand where status = #{status} and company_name like #{companyName} and brand_name like #{brandName}; </select > <select id ="selectDynamicSQL01" resultMap ="brandResultMap" > select * from tb_brand where status = #{status} and company_name like #{companyName} and brand_name like #{brandName}; </select > <select id ="selectDynamicSQL02" resultMap ="brandResultMap" > select * from tb_brand where <if test ="status != null" > status = #{status} </if > <if test ="companyName != null and companyName != ''" > and company_name like #{companyName} </if > <if test ="brandName != null and brandName != ''" > and brand_name like #{brandName}; </if > </select > <select id ="selectDynamicSQL03" resultMap ="brandResultMap" > select * from tb_brand <where > <if test ="status != null" > status = #{status} </if > <if test ="companyName != null and companyName != ''" > and company_name like #{companyName} </if > <if test ="brandName != null and brandName != ''" > and brand_name like #{brandName}; </if > </where > </select > <select id ="selectDynamicSQL001" resultMap ="brandResultMap" > select * from tb_brand where <choose > <when test ="status != null" > status = #{status} </when > <when test ="companyName != null and companyName != ''" > company_name like #{companyName} </when > <when test ="brandName != null and brandName != ''" > brand_name like #{brandName}; </when > <otherwise > 1 = 1 </otherwise > </choose > </select > <select id ="selectDynamicSQL002" resultMap ="brandResultMap" > select * from tb_brand <where > <choose > <when test ="status != null" > status = #{status} </when > <when test ="companyName != null and companyName != ''" > company_name like #{companyName} </when > <when test ="brandName != null and brandName != ''" > brand_name like #{brandName}; </when > </choose > </where > </select > <insert id ="addAll" useGeneratedKeys ="true" keyProperty ="id" > insert into tb_brand (brand_name, company_name, ordered, description, status) values (#{brandName}, #{companyName}, #{ordered}, #{description}, #{status}); </insert > <update id ="updateBrand" > update tb_brand set brand_name = #{brandName}, company_name = #{companyName}, ordered = #{ordered}, description = #{description}, status = #{status} where id = #{id}; </update > <update id ="updateBrandDynamic" > update tb_brand <set > <if test ="brandName != null and brandName != ''" > brand_name = #{brandName}, </if > <if test ="companyName != null and companyName != ''" > company_name = #{companyName}, </if > <if test ="ordered != null" > ordered = #{ordered}, </if > <if test ="description != null and description != ''" > description = #{description}, </if > <if test ="status != null" > status = #{status} </if > </set > where id = #{id}; </update > <delete id ="deleteById" > delete from tb_brand where id = #{id}; </delete > <delete id ="deleteByIdAll" > delete from tb_brand where id in <foreach collection ="ids" item ="id" separator ="," open ="(" close =")" > #{id} </foreach > </delete > </mapper >
pojo - User.java package com.ganga.pojo;public class Brand { private Integer id; private String brandName; private String companyName; private Integer ordered; private String description; private Integer status; public Brand () { } public Brand (Integer id, String brandName, String companyName, Integer ordered, String description, Integer status) { this .id = id; this .brandName = brandName; this .companyName = companyName; this .ordered = ordered; this .description = description; this .status = status; } public Integer getId () { return id; } public void setId (Integer id) { this .id = id; } public String getBrandName () { return brandName; } public void setBrandName (String brandName) { this .brandName = brandName; } public String getCompanyName () { return companyName; } public void setCompanyName (String companyName) { this .companyName = companyName; } public Integer getOrdered () { return ordered; } public void setOrdered (Integer ordered) { this .ordered = ordered; } public String getDescription () { return description; } public void setDescription (String description) { this .description = description; } public Integer getStatus () { return status; } public void setStatus (Integer status) { this .status = status; } @Override public String toString () { return "Brand{" + "id=" + id + ", brandName='" + brandName + '\'' + ", companyName='" + companyName + '\'' + ", ordered=" + ordered + ", description='" + description + '\'' + ", status=" + status + '}' ; } }
Dao层 接口:
package com.ganga.mapper;import com.ganga.pojo.Brand;import org.apache.ibatis.annotations.Param;import org.apache.ibatis.annotations.Select;import java.util.List;import java.util.Map;public interface BrandMapper { List<Brand> selectAll () ; Brand selectById (int id) ; List<Brand> selectByOrdered () ; List<Brand> selectByCondition1 (@Param("status") int status, @Param("companyName") String companyName, @Param("brandName") String brandName) ; List<Brand> selectByCondition2 (Brand brand) ; List<Brand> selectByCondition3 (Map map) ; List<Brand> selectDynamicSQL01 (Map map) ; List<Brand> selectDynamicSQL02 (Map map) ; List<Brand> selectDynamicSQL03 (Map map) ; List<Brand> selectDynamicSQL001 (Brand brand) ; List<Brand> selectDynamicSQL002 (Brand brand) ; int addAll (Brand brand) ; int updateBrand (Brand brand) ; int updateBrandDynamic (Brand brand) ; int deleteById (int id) ; int deleteByIdAll (@Param("ids") int [] ids) ; @Select("select * from tb_brand where id = #{id}") List<Brand> selectByIdAnnotation (int id) ; }
Service层 package com.ganga.service;import com.ganga.mapper.UserMapper;import com.ganga.pojo.User;import com.ganga.util.MyBatisUtils;import org.apache.ibatis.session.SqlSession;import org.apache.ibatis.session.SqlSessionFactory;import java.util.List;public class UserService { private SqlSessionFactory factory = MyBatisUtils.getSqlSessionFactory(); public User selectAll (User user) { SqlSession sqlSession = factory.openSession(); UserMapper mapper = sqlSession.getMapper(UserMapper.class); User us = mapper.selectAll(user); sqlSession.close(); return us; } public boolean selectByName (String name) { SqlSession sqlSession = factory.openSession(); UserMapper mapper = sqlSession.getMapper(UserMapper.class); User user = mapper.selectByName(name); sqlSession.close(); if (user == null ){ return true ; }else { return false ; } } public int addUser (String username, String password) { SqlSession sqlSession = factory.openSession(); UserMapper mapper = sqlSession.getMapper(UserMapper.class); int i = mapper.addUser(username, password); sqlSession.commit(); sqlSession.close(); return i; } }
Web层 package com.ganga.web.register;import com.ganga.service.UserService;import javax.servlet.*;import javax.servlet.http.*;import javax.servlet.annotation.*;import java.io.IOException;@WebServlet("/register") public class RegisterServlet extends HttpServlet { private UserService userService = new UserService (); @Override protected void doGet (HttpServletRequest request, HttpServletResponse response) throws ServletException, IOException { String username = request.getParameter("username" ); String password = request.getParameter("password" ); String checkCode = request.getParameter("checkCode" ); System.out.println(username); System.out.println(password); System.out.println("p5sv" .equalsIgnoreCase(checkCode)); System.out.println(userService.selectByName(username)); if ("p5sv" .equalsIgnoreCase(checkCode)){ if (userService.selectByName(username)){ userService.addUser(username, password); request.setAttribute("register_msg" ,"注册成功, 请登录!" ); request.getRequestDispatcher("/login.jsp" ).forward(request,response); }else { request.setAttribute("register_msg" ,"用户名已经存在!" ); request.getRequestDispatcher("/register.jsp" ).forward(request,response); } } else { request.setAttribute("register_msg" , "验证码错误" ); request.getRequestDispatcher("/register.jsp" ).forward(request,response); } } @Override protected void doPost (HttpServletRequest request, HttpServletResponse response) throws ServletException, IOException { this .doGet(request, response); } }
我的踩坑必坑指南
单词复习
单词
解释
===================
===================
environment
环境
resource
资源
mapper
映射
pojo
实体类
utils
工具
@SqlSessionFactoryBuilder SQL会话工厂创建者
@SqlSessionFactory SQL会话工厂
@. openSession(t/f)
获取SqlSession对象
@SqlSession SQL会话
@ .getMapper(#.class)
获取Mapper代理对象
Mapper
namespace
名称空间
resultMap
结果Map / 数据库与类的映射
id=””
resultMap的唯一标识
type=””
要映射的实体类 全限定名
<result <id
前者完成普通列的映射 后者时主键
column=””
数据库列名
property=””
映射类的属性名
@@Param (@Param(“status”) int 映射参数名)
dynamic 动态
<choose
选择 -> switch
<<when
何时 -> case
<<otherwise
否则 -> default
<foreach
循环
collection=””
集合 -> 要遍历的集合
item=””
项目 -> 每个结果
separator=””
分离 -> 每个后面要用什么分离
open=””
打开 -> 开始时,前面要加的东西
close=””
关闭 -> 结束时,后面要加的东西
Spring整合MyBatis pom.xml <packaging > war</packaging > <dependencies > <dependency > <groupId > org.springframework</groupId > <artifactId > spring-context</artifactId > <version > 5.3.18</version > </dependency > <dependency > <groupId > org.aspectj</groupId > <artifactId > aspectjweaver</artifactId > <version > 1.9.9.1</version > </dependency > <dependency > <groupId > org.springframework</groupId > <artifactId > spring-web</artifactId > <version > 5.3.18</version > </dependency > <dependency > <groupId > org.springframework</groupId > <artifactId > spring-test</artifactId > <version > 5.3.18</version > </dependency > <dependency > <groupId > org.springframework</groupId > <artifactId > spring-jdbc</artifactId > <version > 5.3.18</version > </dependency > <dependency > <groupId > org.springframework</groupId > <artifactId > spring-webmvc</artifactId > <version > 5.3.18</version > </dependency > <dependency > <groupId > org.springframework</groupId > <artifactId > spring-tx</artifactId > <version > 5.3.18</version > </dependency > <dependency > <groupId > org.mybatis</groupId > <artifactId > mybatis</artifactId > <version > 3.4.6</version > </dependency > <dependency > <groupId > org.mybatis</groupId > <artifactId > mybatis-spring</artifactId > <version > 1.3.2</version > </dependency > <dependency > <groupId > mysql</groupId > <artifactId > mysql-connector-java</artifactId > <version > 5.1.49</version > </dependency > <dependency > <groupId > com.alibaba</groupId > <artifactId > druid</artifactId > <version > 1.2.8</version > </dependency > <dependency > <groupId > c3p0</groupId > <artifactId > c3p0</artifactId > <version > 0.9.1.2</version > </dependency > <dependency > <groupId > javax.servlet</groupId > <artifactId > servlet-api</artifactId > <version > 2.5</version > <scope > provided</scope > </dependency > <dependency > <groupId > javax.servlet.jsp</groupId > <artifactId > javax.servlet.jsp-api</artifactId > <version > 2.3.3</version > </dependency > <dependency > <groupId > junit</groupId > <artifactId > junit</artifactId > <version > 4.13.1</version > </dependency > <dependency > <groupId > com.fasterxml.jackson.core</groupId > <artifactId > jackson-databind</artifactId > <version > 2.13.2.2</version > </dependency > <dependency > <groupId > com.fasterxml.jackson.core</groupId > <artifactId > jackson-annotations</artifactId > <version > 2.13.2</version > </dependency > <dependency > <groupId > com.alibaba</groupId > <artifactId > fastjson</artifactId > <version > 1.2.76</version > </dependency > <dependency > <groupId > commons-io</groupId > <artifactId > commons-io</artifactId > <version > 2.6</version > </dependency > <dependency > <groupId > commons-fileupload</groupId > <artifactId > commons-fileupload</artifactId > <version > 1.4</version > </dependency > <dependency > <groupId > org.slf4j</groupId > <artifactId > slf4j-api</artifactId > <version > 1.7.20</version > </dependency > <dependency > <groupId > ch.qos.logback</groupId > <artifactId > logback-classic</artifactId > <version > 1.2.3</version > </dependency > <dependency > <groupId > ch.qos.logback</groupId > <artifactId > logback-core</artifactId > <version > 1.2.3</version > </dependency > </dependencies > <build > <resources > <resource > <directory > src/main/resources</directory > <includes > <include > **/*.properties</include > <include > **/*.xml</include > </includes > <filtering > false</filtering > </resource > <resource > <directory > src/main/java</directory > <includes > <include > **/*.properties</include > <include > **/*.xml</include > </includes > <filtering > false</filtering > </resource > </resources > </build >
jdbc.properties jdbc.driverClass =com.mysql.jdbc.Driver jdbc.url =jdbc:mysql:///webcase?useSSL=false&useServerPrepStmts=true jdbc.user =root jdbc.password =ganga
logback.xml <?xml version="1.0" encoding="UTF-8" ?> <configuration > <appender name ="Console" class ="ch.qos.logback.core.ConsoleAppender" > <encoder > <pattern > [%level] %cyan([%thread]) %boldGreen(%logger{15}) - %msg %n</pattern > </encoder > </appender > <logger name ="com.ganga" level ="DEBUG" additivity ="false" > <appender-ref ref ="Console" /> </logger > <root level ="INFO" > <appender-ref ref ="Console" /> </root > </configuration >
mybatis-config.xml <?xml version="1.0" encoding="UTF-8" ?> <!DOCTYPE configuration PUBLIC "-//mybatis.org//DTD Config 3.0//EN" "http://mybatis.org/dtd/mybatis-3-config.dtd" > <configuration > <typeAliases > <typeAlias alias ="user" type ="com.ganga.pojo.User" /> <package name ="com.ganga.pojo" /> </typeAliases > </configuration >
applicationContext.xml <?xml version="1.0" encoding="UTF-8" ?> <beans xmlns ="http://www.springframework.org/schema/beans" xmlns:context ="http://www.springframework.org/schema/context" xmlns:aop ="http://www.springframework.org/schema/aop" xmlns:tx ="http://www.springframework.org/schema/tx" xmlns:xsi ="http://www.w3.org/2001/XMLSchema-instance" xsi:schemaLocation = "http://www.springframework.org/schema/beans http://www.springframework.org/schema/beans/spring-beans.xsd http://www.springframework.org/schema/context http://www.springframework.org/schema/context/spring-context.xsd http://www.springframework.org/schema/aop http://www.springframework.org/schema/aop/spring-aop.xsd http://www.springframework.org/schema/tx http://www.springframework.org/schema/tx/spring-tx.xsd " > <context:component-scan base-package ="com.ganga" > <context:exclude-filter type ="annotation" expression ="org.springframework.stereotype.Controller" /> </context:component-scan > <context:annotation-config > </context:annotation-config > <context:property-placeholder location ="classpath:jdbc.properties" /> <bean id ="dataSource" class ="com.alibaba.druid.pool.DruidDataSource" > <property name ="driverClassName" value ="${jdbc.driverClass}" /> <property name ="url" value ="${jdbc.url}" /> <property name ="username" value ="${jdbc.user}" /> <property name ="password" value ="${jdbc.password}" /> </bean > <bean id ="sqlSessionFactory" class ="org.mybatis.spring.SqlSessionFactoryBean" > <property name ="dataSource" ref ="dataSource" > </property > <property name ="configLocation" value ="classpath:mybatis-config.xml" > </property > <property name ="mapperLocations" value ="classpath:com/ganga/mapper/*.xml" /> </bean > <bean id ="userMapper" class ="org.mybatis.spring.mapper.MapperFactoryBean" > <property name ="mapperInterface" value ="com.ganga.mapper.UserMapper" /> <property name ="sqlSessionFactory" ref ="sqlSessionFactory" /> </bean > <bean id ="accountMapper" class ="org.mybatis.spring.mapper.MapperFactoryBean" > <property name ="mapperInterface" value ="com.ganga.mapper.AccountMapper" /> <property name ="sqlSessionFactory" ref ="sqlSessionFactory" /> </bean > <bean class ="org.mybatis.spring.mapper.MapperScannerConfigurer" > <property name ="basePackage" value ="com.ganga.mapper" /> </bean > <bean id ="transactionManager" class ="org.springframework.jdbc.datasource.DataSourceTransactionManager" > <property name ="dataSource" ref ="dataSource" /> </bean > <tx:advice id ="txAdvice" > <tx:attributes > <tx:method name ="*" /> </tx:attributes > </tx:advice > <aop:config > <aop:advisor advice-ref ="txAdvice" pointcut ="execution(* com.ganga.service.impl..*.*(..))" /> </aop:config > </beans >
spring-mvc.xml <?xml version="1.0" encoding="UTF-8" ?> <beans xmlns ="http://www.springframework.org/schema/beans" xmlns:context ="http://www.springframework.org/schema/context" xmlns:mvc ="http://www.springframework.org/schema/mvc" xmlns:xsi ="http://www.w3.org/2001/XMLSchema-instance" xsi:schemaLocation = "http://www.springframework.org/schema/beans http://www.springframework.org/schema/beans/spring-beans.xsd http://www.springframework.org/schema/context http://www.springframework.org/schema/context/spring-context.xsd http://www.springframework.org/schema/mvc http://www.springframework.org/schema/mvc/spring-mvc.xsd " > <context:component-scan base-package ="com.ganga.controller" /> <mvc:annotation-driven conversion-service ="conversionService" /> <bean id ="internalResourceViewResolver" class ="org.springframework.web.servlet.view.InternalResourceViewResolver" > <property name ="prefix" value ="/jsp/" /> <property name ="suffix" value =".jsp" /> </bean > <mvc:default-servlet-handler /> <bean id ="conversionService" class ="org.springframework.context.support.ConversionServiceFactoryBean" > <property name ="converters" > <list > <bean class ="com.ganga.util.DataConverter" > </bean > </list > </property > </bean > <bean id ="multipartResolver" class ="org.springframework.web.multipart.commons.CommonsMultipartResolver" > <property name ="maxUploadSize" value ="40960000" /> <property name ="maxUploadSizePerFile" value ="20480000" /> <property name ="defaultEncoding" value ="utf-8" /> </bean > <mvc:interceptors > <mvc:interceptor > <mvc:mapping path ="/bean/*" /> <bean class ="com.ganga.interceptor.MyInterceptor" /> </mvc:interceptor > </mvc:interceptors > <bean class ="org.springframework.web.servlet.handler.SimpleMappingExceptionResolver" > <property name ="defaultErrorView" value ="/index.jsp" /> <property name ="exceptionMappings" > <map > <entry key ="java.lang.ClassCastException" value ="/error.jsp" /> <entry key ="java.lang.ArithmeticException" value ="/error.jsp" /> <entry key ="java.io.FileNotFoundException" value ="/error.jsp" /> <entry key ="java.lang.NullPointerException" value ="/error.jsp" /> <entry key ="com.ganga.exception.MyException" value ="/error.jsp" /> </map > </property > </bean > <bean class ="com.ganga.exception.MyHandlerExceptionResolver" /> </beans >
web.xml <?xml version="1.0" encoding="UTF-8" ?> <web-app xmlns ="http://xmlns.jcp.org/xml/ns/javaee" xmlns:xsi ="http://www.w3.org/2001/XMLSchema-instance" xsi:schemaLocation ="http://xmlns.jcp.org/xml/ns/javaee http://xmlns.jcp.org/xml/ns/javaee/web-app_4_0.xsd" version ="4.0" > <context-param > <param-name > contextConfigLocation</param-name > <param-value > classpath:applicationContext.xml</param-value > </context-param > <listener > <listener-class > org.springframework.web.context.ContextLoaderListener</listener-class > </listener > <servlet > <servlet-name > DispatcherServlet</servlet-name > <servlet-class > org.springframework.web.servlet.DispatcherServlet</servlet-class > <init-param > <param-name > contextConfigLocation</param-name > <param-value > classpath:spring-mvc.xml</param-value > </init-param > <load-on-startup > 1</load-on-startup > </servlet > <servlet-mapping > <servlet-name > DispatcherServlet</servlet-name > <url-pattern > /</url-pattern > </servlet-mapping > <filter > <filter-name > characterEncodingFilter</filter-name > <filter-class > org.springframework.web.filter.CharacterEncodingFilter</filter-class > <init-param > <param-name > encoding</param-name > <param-value > UTF-8</param-value > </init-param > </filter > <filter-mapping > <filter-name > characterEncodingFilter</filter-name > <url-pattern > /*</url-pattern > </filter-mapping > <listener > <listener-class > com.ganga.util.MyServletContextListener</listener-class > </listener > </web-app >
日期转换工具 package com.ganga.util;import org.springframework.core.convert.converter.Converter;import java.text.ParseException;import java.text.SimpleDateFormat;import java.util.Date;public class DataConverter implements Converter <String, Date> { @Override public Date convert (String source) { SimpleDateFormat simple = new SimpleDateFormat ("yyyy-MM-dd:HH-mm-ss" ); Date date = null ; try { date = simple.parse(source); } catch (ParseException e) { e.printStackTrace(); } return date; } }
修复DBCP的BUG package com.ganga.util;import com.mysql.jdbc.AbandonedConnectionCleanupThread;import javax.servlet.ServletContextEvent;import javax.servlet.ServletContextListener;import java.sql.Driver;import java.sql.DriverManager;import java.sql.SQLException;import java.util.Enumeration;public class MyServletContextListener implements ServletContextListener { public void contextInitialized (ServletContextEvent servletContextEvent) { } public void contextDestroyed (ServletContextEvent servletContextEvent) { Enumeration<Driver> drivers = DriverManager.getDrivers(); Driver driver = null ; while (drivers.hasMoreElements()) { try { driver = drivers.nextElement(); DriverManager.deregisterDriver(driver); } catch (SQLException ex) { } } AbandonedConnectionCleanupThread.checkedShutdown(); System.out.println(" 线程释放成功... " ); } }
MyBatisUtils – 整合后用不到 package com.ganga.util;import org.apache.ibatis.io.Resources;import org.apache.ibatis.session.SqlSessionFactory;import org.apache.ibatis.session.SqlSessionFactoryBuilder;import java.io.IOException;import java.io.InputStream;public class MyBatisUtils { private static SqlSessionFactory sqlSessionFactory; static { try { String resource = "mybatis-config.xml" ; InputStream inputStream = Resources.getResourceAsStream(resource); sqlSessionFactory = new SqlSessionFactoryBuilder ().build(inputStream); } catch (IOException e) { e.printStackTrace(); } } public static SqlSessionFactory getSqlSessionFactory () { return sqlSessionFactory; } }
MyHandlerExceptionResolver package com.ganga.exception;import org.springframework.web.servlet.HandlerExceptionResolver;import org.springframework.web.servlet.ModelAndView;import javax.servlet.http.HttpServletRequest;import javax.servlet.http.HttpServletResponse;import java.io.FileNotFoundException;public class MyHandlerExceptionResolver implements HandlerExceptionResolver { @Override public ModelAndView resolveException (HttpServletRequest request, HttpServletResponse response, Object handler, Exception ex) { ModelAndView mav = new ModelAndView (); if (ex instanceof ClassCastException){ mav.addObject("errors" ,"类转换异常" ); }else if (ex instanceof ArithmeticException){ mav.addObject("errors" ,"除0异常" ); }else if (ex instanceof FileNotFoundException){ mav.addObject("errors" ,"空文件路径异常" ); }else if (ex instanceof NullPointerException){ mav.addObject("errors" ,"空指针异常" ); }else if (ex instanceof MyException){ mav.addObject("errors" ,"自定义异常" ); } mav.setViewName("/errors.jsp" ); return mav; } }

